Besides the email notifications, SMS notifications give you the possibility to send SMS messages to your customers and employees to inform them about the appointments or events. As for the emails, here you also have three different times when these messages can be sent: right after an event is triggered, in the scheduled specified time after the appointment/event, and in the scheduled specified time of the day.
Creating your account
SMS notifications page you will find on the Notifications page in a separate tab right beside the Email Notifications tab.
Once you click on the SMS notifications tab you will see the option for creating an account.

Enter your email and password and click on the “Sign Up” button to proceed to the SMS Notifications page. The option for Sign In are exactly the same, so the next time when you come to the page after you logged out you will see the same options to enter the email and password.
If you forgot your password, on the Sign In window you will see an option “Forgot Password?”, click on it and the plugin will ask you to enter your email so we can send you the Recovery email.

Once you enter the email and click on the button Send Recovery Email, our plugin will send you the email with a button to reset your password. Click on this button in your email and you will be redirected to the SMS notifications page to enter your new password.
You will see two options here “New Password” and “Re-type New Password”, once you fill them with the same new password, click on the “Reset Password” button, and the option for Sing In will open again.

Setting up your SMS notifications
Once you enter the page you will see a blank page for SMS History since you don’t have any sent messages yet, so we will go back to this page later.
On the left, you will see a sidebar with the options for setting up your messages. Once you click on the “Customize SMS” option from the menu you will see exactly the same options as for the email notification. On this tab, you can check which messages you want to send to your customers and/or employees, and you can completely adjust the messages to fit your needs using the placeholders in the “Show SMS Placeholder” option on the right.

Pricing
The next option in the menu is Pricing. Here you can see the prices for SMS messages for each country. At the top of the list, you will see an option “View pricing for:” where you can choose the country from a dropdown menu.

** Please note: Prices displayed on the Pricing list are for one segment of the SMS message. One segment of the message contains 160 characters, so if you add more than 160 characters the message will contain more than one segment and the price will be multiplied. Special characters are counted differently and if you use them one segment will have less than 160 characters. **
Payment History
On the Payment History page, you can see the history of your payments that you have made for recharging your balance for sending SMS. The table contains the information about the date and time when the payment is made, type of payment, payment ID, amount, and status, so you can see your payment history at any time. Also, above the table, you will see a date picker where you can set the date range for which you want to see the payments. If you don’t choose a date range, it will show all payments sorted by the latest, by default.

User Profile
On this page, you can change your profile information. The page is divided into two parts:
- User Profile – here you have two options – to log out from the SMS Notifications page and to change your Alpha Sender ID.
The “Alpha Sender ID” is the name that will be shown as a sender name in your messages. To set it, click on the Change Alpha Sender ID and the input will open for you to enter the new ID. After you enter it, click on the Save button and the new sender ID will be shown. - Security – here you have options to change the password. If you want to change the password, enter the current password, then enter a new one and re-type it to confirm it. After you did that click on the “Change Password” button and you will see the notice about the successful password change.

SMS History
The SMS History shows the history of all your sent SMS messages. Like the other lists, this one also has the date picker so you can set a range of dates for which you want to see the history of your messages.
The list has information about the date, time, phone number, user, the cost for the message, segments (the size of a message), status, and text. If you click on the “View Message” the text of the message will show below so you can see the context of the message at any time.

Recharge Balance
On the right side of your SMS notifications page, you will see your current balance and besides it the option “Recharge Balance”.
Once you click on it the modal will open with three payment amounts: $10, $20, $50, $100, $200, and $500. Choose one of them and click on the “Recharge” button and the modal for payment will open. Just one note: If you are from a country where VAT or GST applies, a VAT/GST charge will be added to the transaction.

Understanding how Notifications work
Notifications are emails sent to your customers and employees to alert them about some event. There are three different times when notifications can be sent:
- Right after an event is triggered.
- At the scheduled specified time after the appointment.
- At the scheduled specified time of the day.
For the 2. and 3. notifications types, it is necessary to set up a cron job on your server. You can see below how to configure these notifications.
Appointment Notifications
Notifications are divided into two tabs:
- To Customer – notifications you can enable/disable for sending to the customer, and
- To Employee – notifications you can enable/disable for sending to the employee.
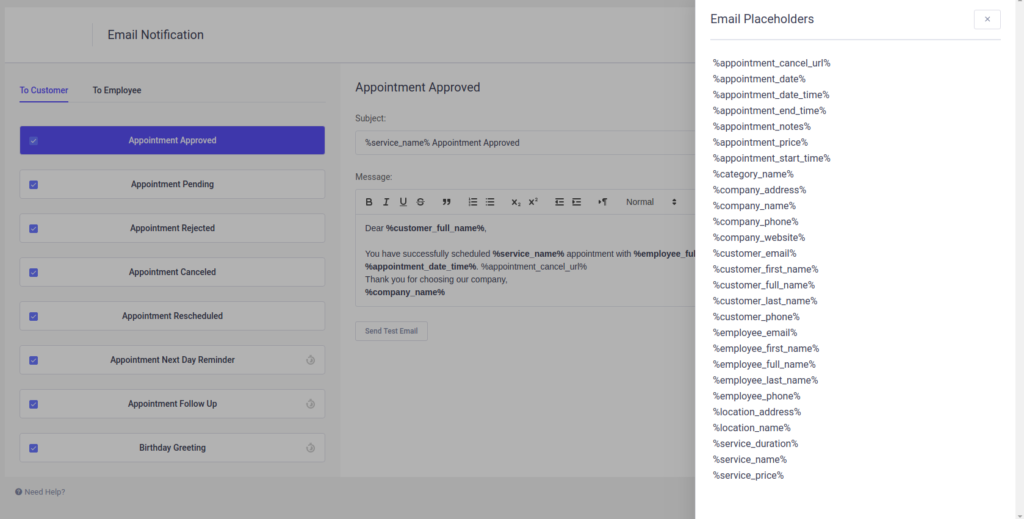
For appointment notifications, five notification types are the same for customers and employees: Appointment Approved, Appointment Pending, Appointment Rejected, Appointment Cancelled and Appointment Rescheduled, and three are only available for the customer: Appointment Next Day Reminder, Appointment Follow Up and Birthday Greeting. We will briefly explain each of them.
Appointment Approved
This email message will be sent right after your customer finishes the booking procedure, or after an appointment is created from the back-end of the plugin, if the default status of your appointment is Approved. This notification is available for both – the customer and the employee, but you can uncheck one of them if you don’t want it to be sent to both.
** If you want to send this email notification right after the appointment is scheduled, make sure you’ve set “Default Appointment Status” as Approved in the General Settings If you’ve set “Default Appointment Status” as Pending this notification will be sent after you manually change the appointment status on the back-end. **
Appointment Pending
This email will be sent when the appointment is created but with a Pending status. You can set your “Default Appointment Status” as Pending, so every time a new appointment is created this email will be sent. The appointment will get a Pending status, so you will need to manually confirm it in the back-end of the plugin.
Appointment Rejected
This email is sent after the appointment is rejected. By default, an appointment can be rejected by the administrator or the manager. However, you can give permissions to the employees to reject their appointments by enabling the Allow employees managing their appointments option in General Settings. So, once the appointment is rejected the customer or employee will get an email about this action.
Appointment Cancelled
This email will be sent after your customer cancels the appointment. The Cancel option is available for customers at the back-end of the plugin and through the cancel URL link in email, so once the customer cancels the appointment an email about this action will be sent to your customer and/or employee.
Appointment Rescheduled
By default, the administrator and the manager can move the appointment in the calendar or edit the date and time in the “Edit appointment” dialog. You can also give permissions to the employees to reject their appointments by enabling the option in General Settings. Either way, once you enable this notification, every time when the date and/or time details of the appointment changes the email will be sent.
Appointment Next Day Reminder
With this notification, you can remind your customer or employee about a next day appointment. On the upper right side of the page, you will see an option Scheduled For where you can choose a time when this notification will be sent. Once you’ve chosen the time and message, click on the Save button, otherwise, the chosen notification time will not be saved.
Appointment Follow Up
This is one of the two notifications available only to the customer. With this notification, you can send a follow-up email to thank your customer for coming or give some additional information. On the upper right side of the page, you will see an option to choose a time and schedule for this email. If you choose 1 hour, for example, the email will be sent to your customer 1 hour after the appointment. When you’ve finished configuring the notification, click Save and your notification message will be saved for sending.
Birthday Greeting
With this email, you can congratulate your customer on their birthday. To be able to send this email you need to have filled in the Date of Birth option in the customer’s dialog. Choose a birthday greeting text and a time in the Scheduled For option when this email will be sent and click Save to keep your settings.
Events notifications
When it is about events, five notification types are the same for customers and employees: Event Booked, Event Cancelled by Admin, Event Cancelled by Attendee, Event Rescheduled, and Event Next Day Reminder; and Event Follow up is only available for the customer.
Event Booked
This email message will be sent right after your attendee finishes the booking procedure. The notification is available for both – the customer and the employee, but you can uncheck one of them if you don’t want it to be sent to both.
Event Cancelled By Admin
This email message will be sent after the admin cancels the event. The notification is available for both – the customer and the employee, but you can uncheck one of them if you don’t want it to be sent to both.
Event Cancelled By Attendee
This email message will be sent after the attendee cancels the event. At the moment, the notification will be sent only to the attendee as approval of his cancellation. The employee will receive the notification only when the whole event is cancelled, not for each attendee.
Event Next Day Reminder
With this notification, you can remind your customer and/or employee about an event that happens the next day. On the upper right side of the page, you will see an option Scheduled For where you can choose a time when this notification will be sent. Once you’ve chosen the time and message, click on the Save button, otherwise, the chosen notification time will not be saved.
Event Follow up
As the appointment follow-up, you will use the Event Follow up to thank your attendee for coming or give some additional information. On the upper right side of the page, you will see an option to choose a time and schedule for this email. If you choose 1 hour, for example, the email will be sent to your attendees 1 hour after the appointment. When you’ve finished configuring the notification, click Save and your notification message will be saved for sending.
Configuring Notifications
To set up notifications you must first configure Notifactions Settings on the Naldoria Booking Settings page. Settings that are mandatory are “Sender Name” and “Sender Email”. By default, Mail Service is set to “PHP Mail” but we strongly recommend changing to another mail server.
Each notification is enabled by default and it is possible to disable notifications if you want to prevent them from being sent. Also, it comes with the default “Subject” and “Message” that can be changed. In the “Subject” and in the “Message” it is possible to use placeholders. Click on the Show Email Codes button on the upper right side of the Notifications page and a dialog with placeholders will appear. Choose the one you need, click on it, the placeholder will be copied, after which you will paste it into the text area. In the real notifications received by your customers and employees, placeholders will be replaced with real data.
** Please note: If you used our custom fields feature to add some new fields on the booking form, you will see the placeholders for those fields here as well. Each field will have its own placeholder with ID that is given by the order in which the fields are created, but once you hover over the placeholder you will see its name. **
Along with email and SMS notifications, Naldoria allows you to configure and use WhatsApp notifications as well. They use a similar approach, but with a few differences. Let’s dive in.
Setting up the app on Facebook
Visit this link to log into, or create your Facebook Developer Account. You can use your personal account, or your company’s Facebook account, you just need to log into it.
App Creation
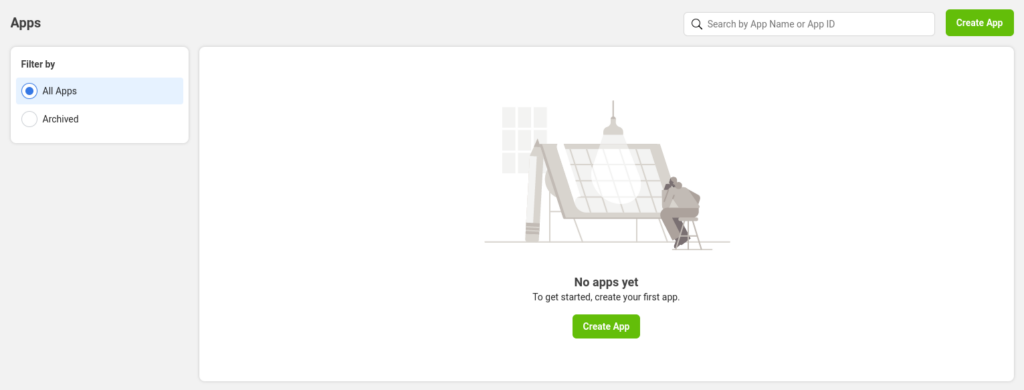
Within the Facebook developer account, you’ll either see a list of your apps (if you already used it) or you’ll see a blank screen as shown in the screenshot below. All you need to do is click on “Create App” either in the top right, next to the search box, or in the App list section.
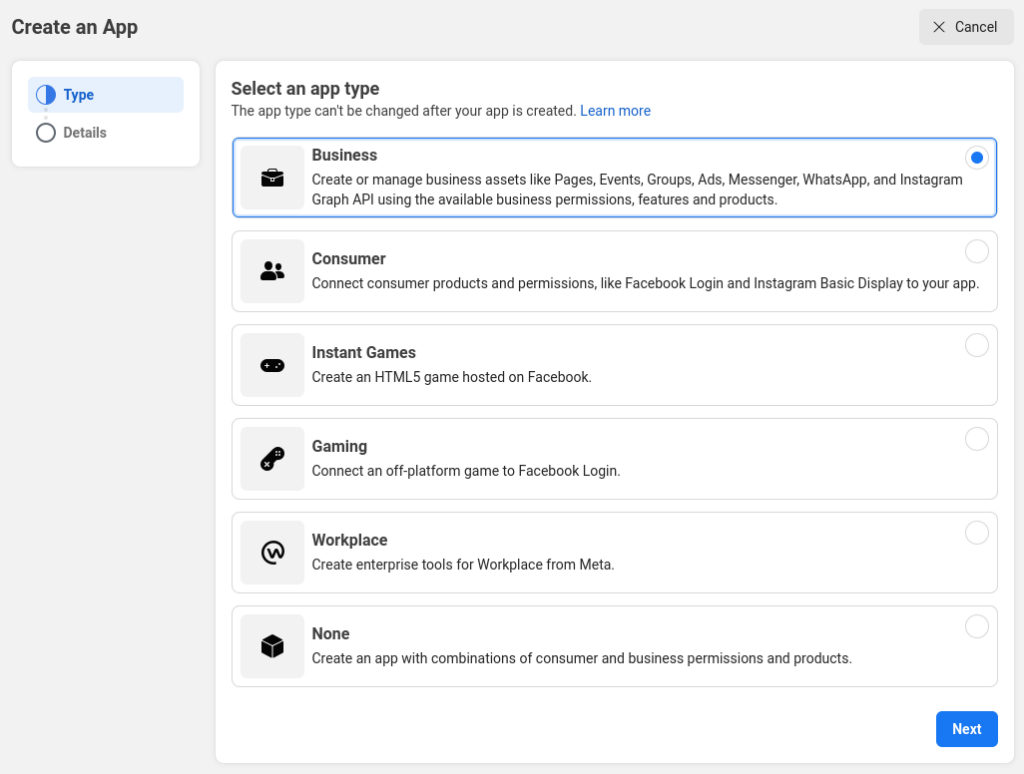
Select App type – Since you need to use WhatsApp with your business (regardless if you’re a “One-man show” or an enterprise), you need to select the “Business” type app option, and click the “Next” button in the lower right corner.
Provide basic information – In here, you only need to choose the display name of your app (you can change this later). The email you’re logged in with is already populated, and the Business Account is not a mandatory option for using WhatsApp within Naldoria, so even if your account is linked to a Business Account, you don’t need to select it.

** Facebook doesn’t allow certain terms like “whatsapp”. For example, you may not use Meta’s trademarks or brand elements (including FB, Face, Book, Insta, Gram, and Rift) or any confusingly similar terms in your app name if such term is, or could be perceived as, a reference to Facebook or its brands. **
Once you click the “Create app” button, Facebook will ask for your Facebook password. Enter the password and click “Submit” to continue.
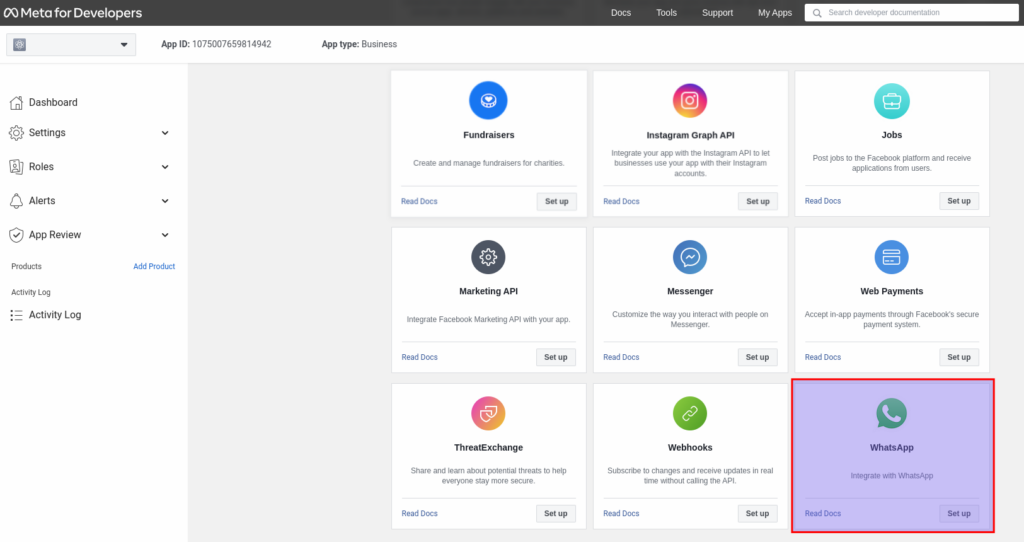
This completes the creation of the app, and now we need to add a product to the app (WhatsApp). To do that, scroll down to the end of the page and click on “Set up” in the lower right corner of the “WhatsApp” card:
The next screen informs you what’s included in the Business Platform API and by continuing, you agree to the Facebook Terms for WhatsApp Business and the Meta Hosting Terms for Cloud API. All you need to do is click on “Continue”:

The next screen consists of data needed to test the app – a Temporary Access Token, Phone Number ID, WhatsApp Business Account ID, and Curl of sending messages.
Please note: You will need the Phone Number ID and the WhatsApp Business Account ID later when you configure WhatsApp integration in Naldoria.

In the “From” section, you will see a test number assigned to your account (this number cannot be used in production).
In the “To” section, you will see a drop-down menu that will be empty when you expand it. You can click on “Manage phone number list” and add up to 5 phone numbers to receive free test messages.
** WhatsApp will send a confirmation code to the phone number, so you can’t actually add this number until you enter the 5-digit verification code you receive in the WhatsApp account linked to the phone number you provided. **
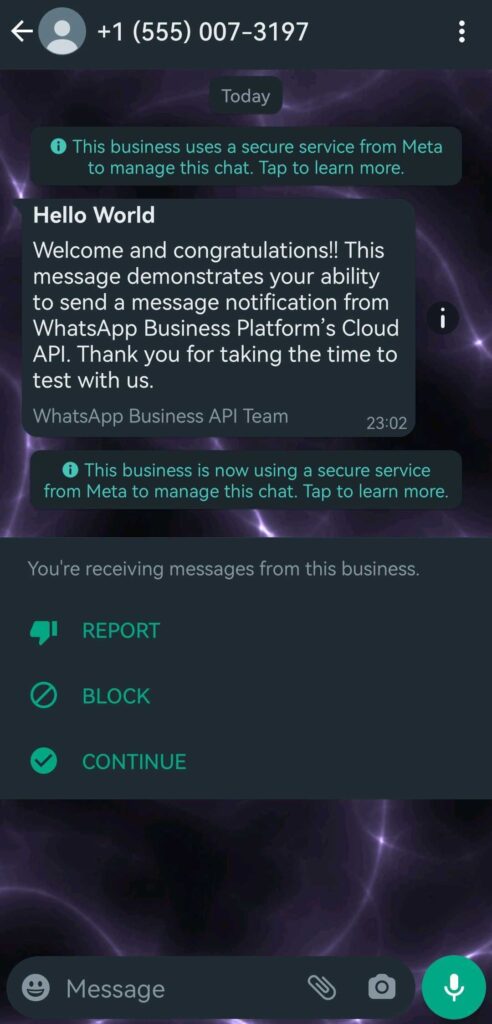
Once you add your personal number for testing, you can click on the blue “Send message” button in the lower right corner under Step 2 and you should receive a WhatsApp message similar to this:
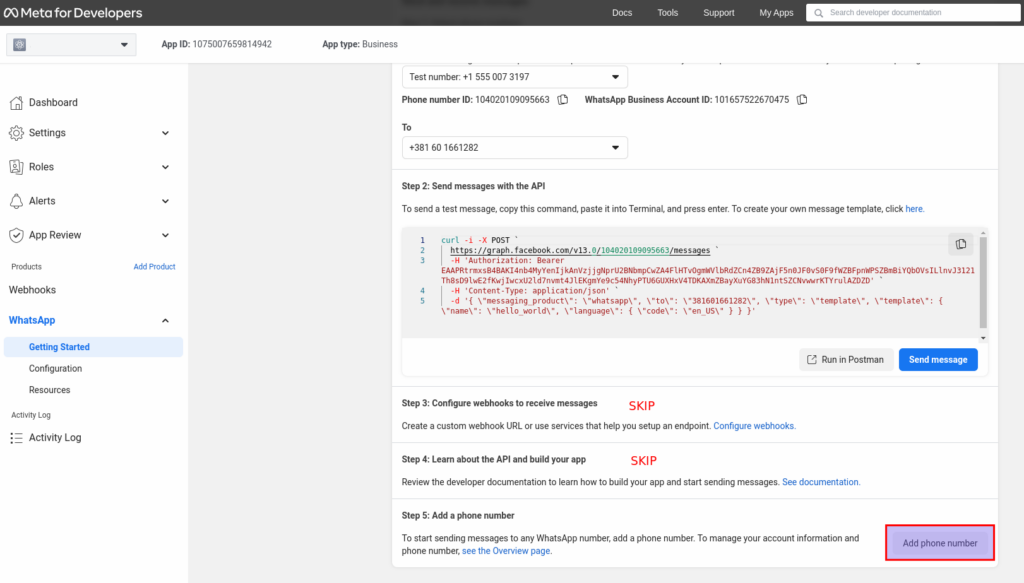
After you receive the text message, you can scroll down in the Facebook for Developers page; skip steps 3 and 4 and click on “Add phone number” in the bottom right:
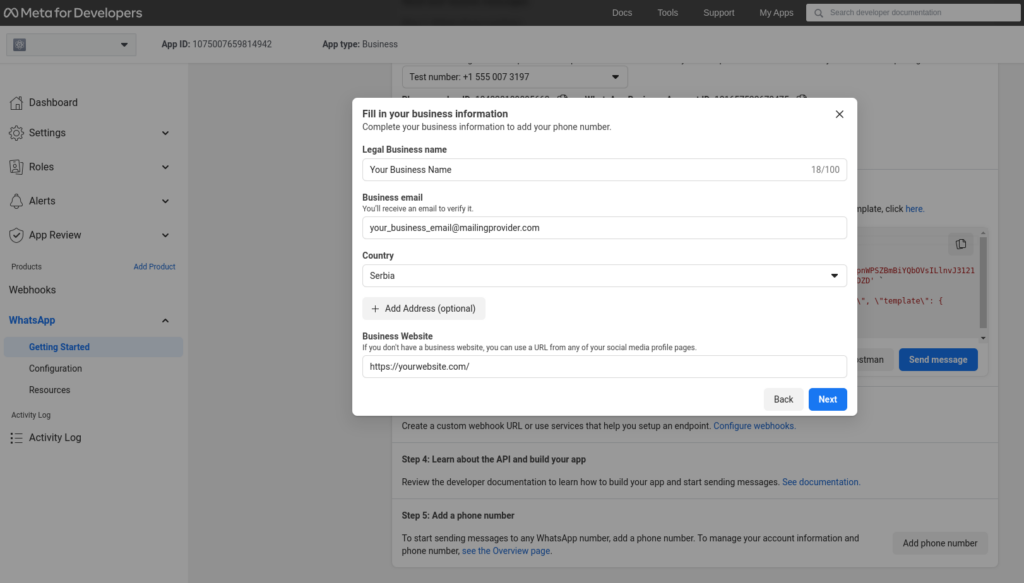
This will bring up a modal where you add your business name (this is the name your customers will see on WhatsApp when they receive a message from you), business email (needs to be a valid email, since you’ll need to confirm it), your country, and your business’ website.
When you’re done populating this, click on “Next” in the bottom right corner.
The next pop-up will ask for the timezone, business category, and business description. Fill in the details carefully and click the “Next” button in the bottom right corner.

Enter your business’ official phone number that will be used for Naldoria.
** Bear in mind that this can’t be the number that’s already using WhatsApp, so it has to be a number that’s new to WhatsApp.
If you enter a number that’s already being used by WhatsApp (regardless if it’s a personal or a business account), once you link it here – you won’t be able to use it on a mobile device anymore, so we strongly recommend obtaining a new number for this integration. **
You can enter your Business’ landline number also, you just need to select the “Phone Call” radio button below in order to activate it.
If you’re using a mobile number, you can also select the “Text message” option, and you will receive the verification code.
Please note that this is the number your customers will receive messages from.
Once you click on “Next” in the bottom right corner of the pop-up, you will receive the verification code.

After you click on “Next”, you will receive an OTP message from WhatsApp to your WhatsApp business number. Enter the verification code (OTP number) and click the “Finish” button. Your number will be verified at this stage and it will be linked with your WhatsApp business account.
At this point, you’ve configured the phone number you’ll use for WhatsApp messaging if you want to actually chat with your customers, but in order to integrate it with Naldoria, you will need a permanent access token.
In the “Getting Started” section, at the top, you will notice a “Temporary access token”, and a message that says “This token will expire in 23 hours”. This can’t be used in Naldoria since if, for example, you want to send the message after 23 hours from NOW pass, the current access token will not work and you will need to log into the Facebook for Developers page again and click on the “Refresh” button in order to create a new token.
Instead of doing that, we need to create a token that never expires.

While logged into your Facebook for Developers account, access the Business Settings Page.
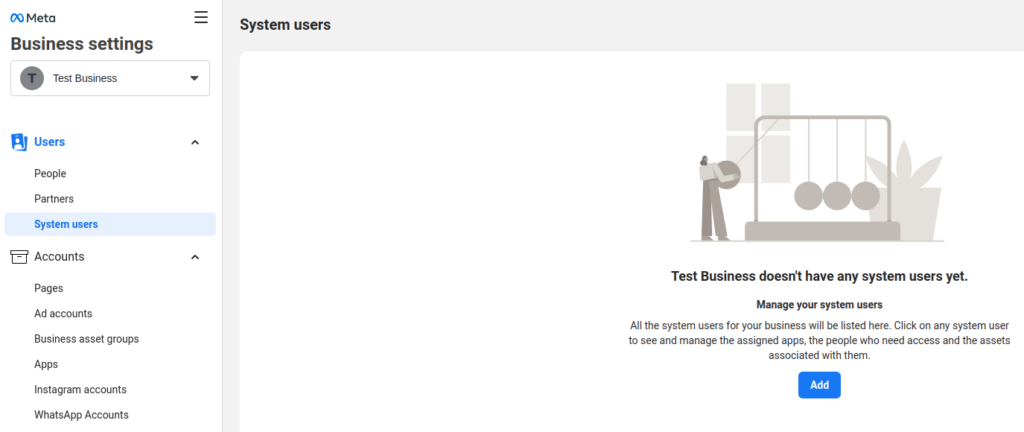
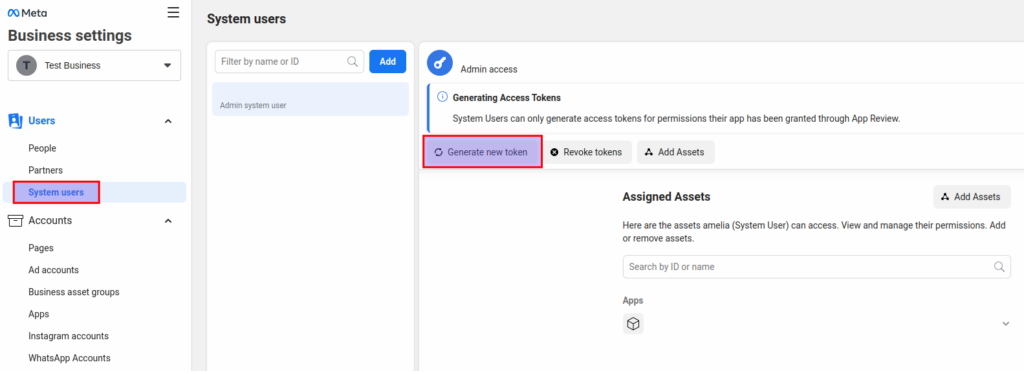
Under the “Users” section in the left sidebar, click on “System users”. You will see a blank page where you need to click on “Add” to add a user:
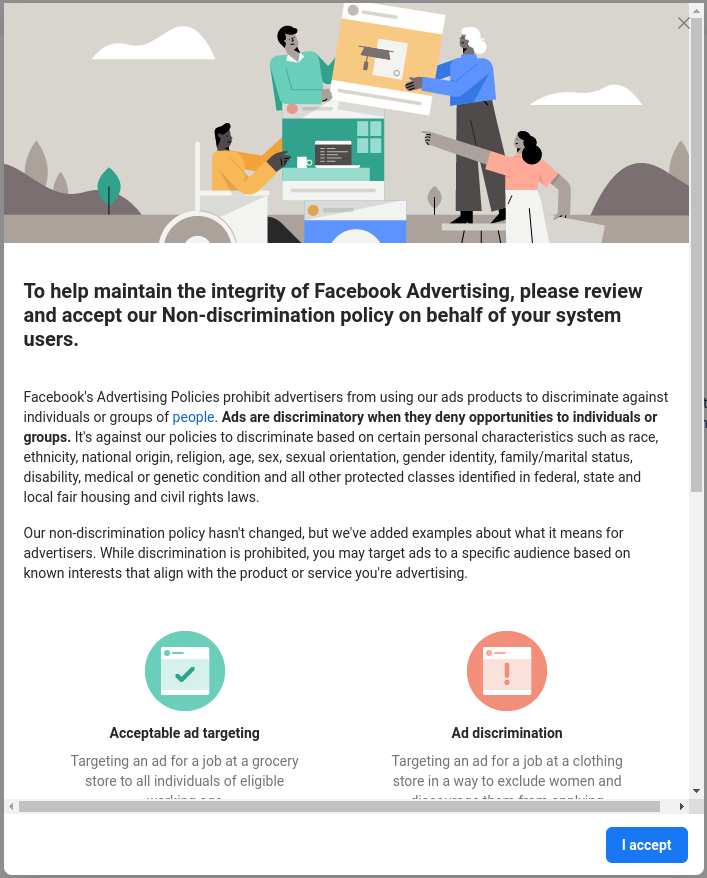
You will be prompted with Facebook’s Non-discrimination policy which you have to review and accept. Once you scroll through this modal and review the policy, click on “I accept” in the bottom right corner of the pop-up.
On the next screen, you’ll see a “Thank you” message from Facebook, and you only need to click on “Done” in the bottom right to continue creating a new user.
Enter the username and select the role “Admin”. Once you’re done, click on “Create system user”:

You may, again, be prompted with Facebook’s Non-discrimination policy which you have to review and accept.
After you accept the policy again, you’ll see the newly created Admin user. In the right section of the screen, click on the “Add Assets” button.

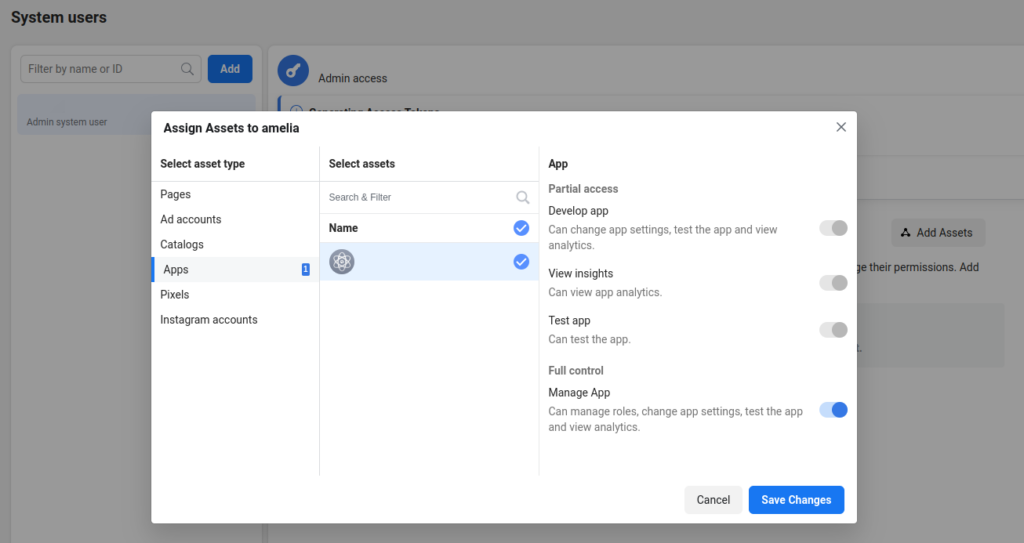
In the pop-up that appears, click on Apps, then select the App previously created for WhatsApp integration, enable the Full Control (“Manage App”) slider, and click on “Save Changes”.
The next pop-up will inform you that a new asset has been added, and all you need to do is click on “Done”.
After that, in the left sidebar, under “Accounts”, click on “WhatsApp accounts”. Select the previously created business app and then click on one of the “Add People” buttons:

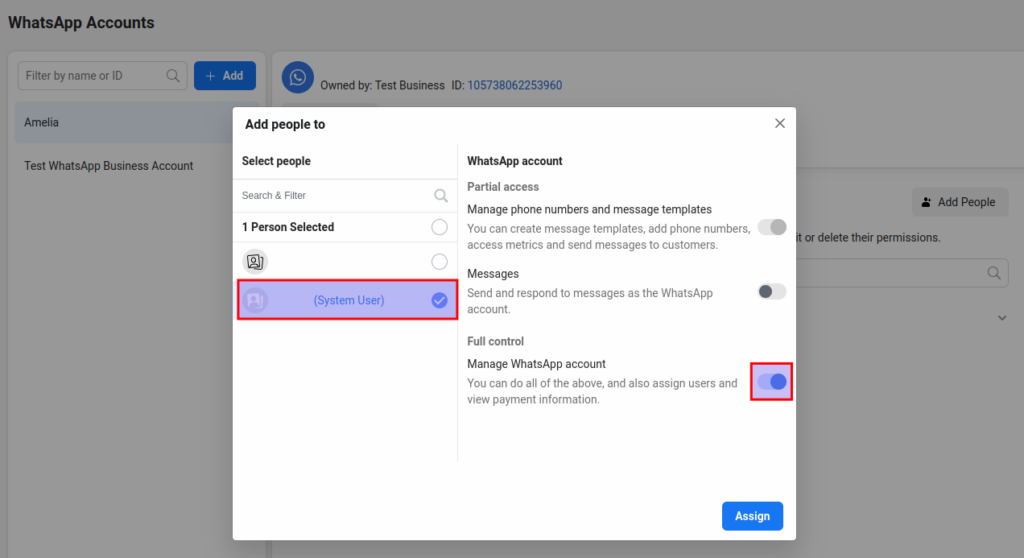
In the pop-up that appears, select the system user previously created, and then enable the “Full Control” option again and then click “Assign” in the bottom right corner:
You’ll see a prompt that confirms that 1 Person has been added to the WhatsApp account, so just click “Done”.
After that, go back to the “System Users” section in the left sidebar (agree to Facebook’s Non-discrimination policy if prompted again), and click on the “Generate new token” button:
Select the App from the drop-down menu, and scroll down. You will see a few notices, and below them, you’ll see the list of available permissions.
Scroll down and enable these two permissions:
- whatsapp_business_messaging
- whatsapp_business_management
After you select them, click on the “Generate token” button in the lower right corner of this pop-up.

Finally, you’ll see the token that will not expire and that will be active forever, unless you click the “Revoke Token” button.
You can also verify the token scope from the Facebook token debugger tool and check the scope of the token added successfully or not.
** Facebook will not remember this token, so copy it and save it someplace safe. **

WhatsApp Settings in Naldoria
Now that we have a permanent token in Facebook for Developers, we can go back to the WordPress site. Under Naldoria/Notifications click on the “WhatsApp Notifications” tab.
In there, you’ll need to paste the Phone Number ID, Permanent access token, and your WhatsApp Business Account ID.

Once you save the configuration, you’ll be taken to message templates, that are similar to Email and SMS notifications.
The only difference is that WhatsApp templates can’t be configured in Naldoria, but instead, you need to configure them in your Business Settings Page.
In the left sidebar, click on the three lines  and then click on “WhatsApp Manager”:
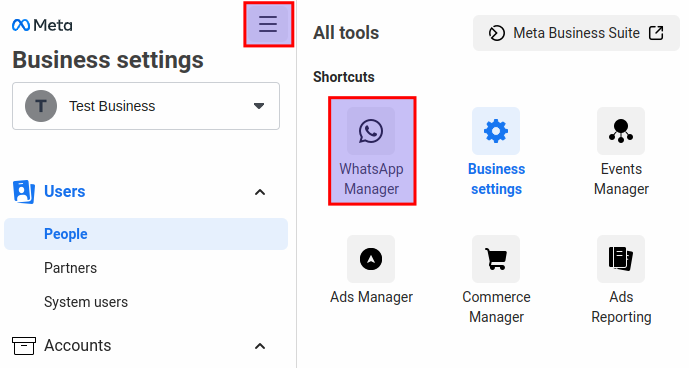
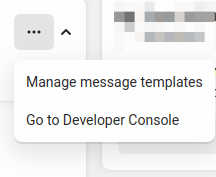
In the “Overview” section that appears next, click on the three dots on the right of the WhatsApp account you previously created, and then click on “Manage message templates”:
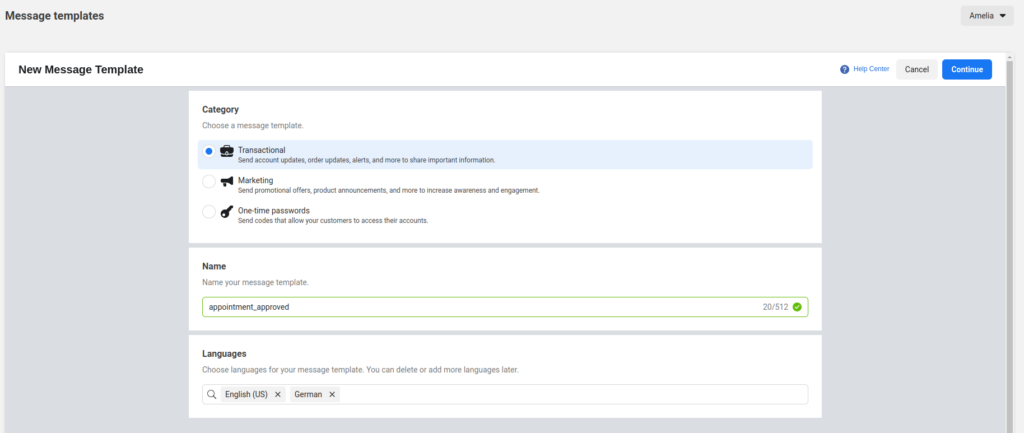
On the next page, you will be able to create new templates that will be used in Naldoria. Simply click on “Create Message Template” in the top right to start.
When creating a template, the category needs to be “Transactional”. Then, you define the name of the template (you can use the same names seen in Naldoria, like “appointment_approved”, “appointment_pending”, and so on) and select the languages that you use in Naldoria. After you configure this, click on “Continue” in the top right corner.
Please note:
- The name of the template needs to be lowercase without spaces. You can try adding them, and Facebook will automatically modify uppercase to lowercase, and replace spaces with an underscore.
- The languages you select in the template need to be included in Naldoria also. The default language is set in Notifications/WhatsApp Notifications when you access settings, but if you added more languages in Naldoria’s General Settings, they will be available as well, so you can add these languages when creating templates in WhatsApp.
Templates in WhatsApp are similar but, again, different from creating templates for Email and SMS notifications.
The main difference is that you need to configure variables (placeholders) in the template, and they can only be numerical. As you can see in the screenshot below, these placeholders are not the same as Naldoria’s (which are enclosed in % symbols), and they are shown as {{1}}, {{2}}, and so on.
An important thing here is to know which variable will be assigned to which placeholder in Naldoria. For example, {{1}} in WhatsApp will be %service_name% in Naldoria.
The Header and the Footer are optional, and the Header can include variables, while the Footer cannot. If you’re adding a Header, select “Text” from the drop-down and type your header as shown in the example below.
Once you create the template, click the “Submit” button in the upper right corner. If you forgot to add the template for another language, you’ll be prompted with a warning, so you can go back and add the template for another language.
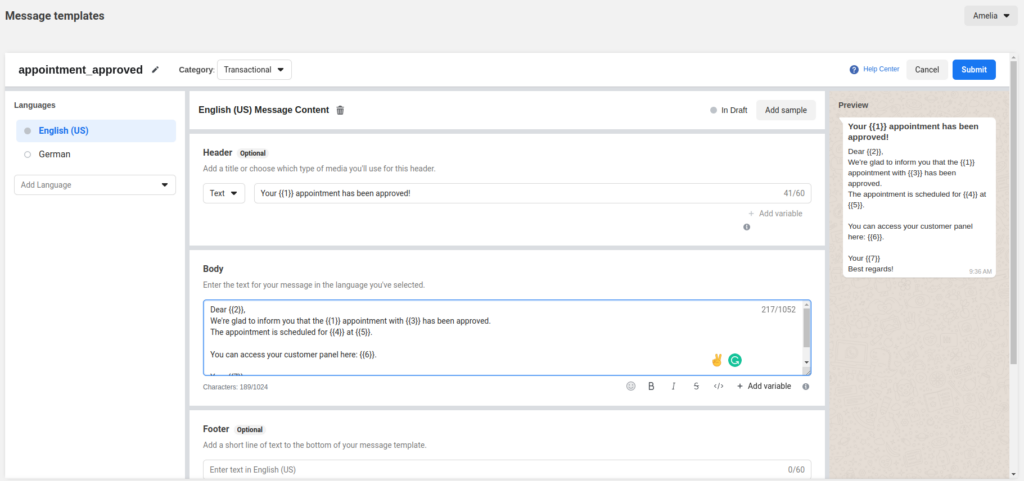
Each template you create will be reviewed by WhatsApp, and it usually takes an hour for it to be approved. An approved template will have a green circle next to the language, and a pending template will have a blank circle, as indicated in the screenshot below:
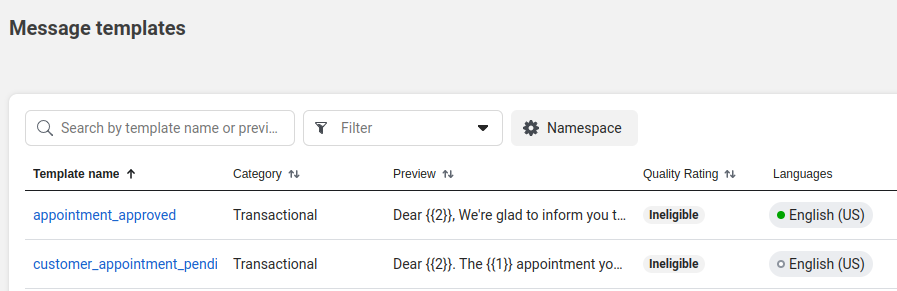
** Once a template is approved, it can no longer be edited. Only rejected templates can be edited. If you need to modify the template once it’s approved, you will need to delete the old one and create a new template.
WhatsApp doesn’t accept line breaks, TAB, and 4 spaces put together, so avoid using them in the template. Line breaks will be replaced with a semi-colon ( ; ). **
Linking variables with Naldoria Placeholders
Back in Naldoria/Notifications/WhatsApp Notifications (once you refresh the page), when you click on the “Template name” drop-down, you will see the list of all templates created in the app (both approved and pending ones):
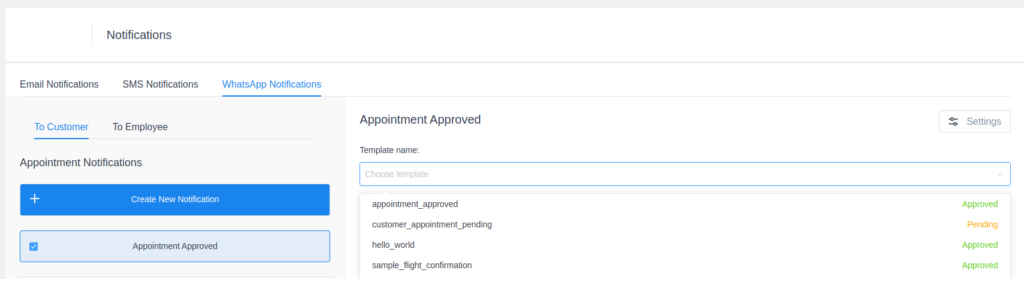
Select the template you want to associate with the Naldoria template you clicked on (or created) and then you can continue linking the variables to placeholders.
Placeholders for Headers and placeholders for the message body are separate, so {{1}} in the header is not the same as {{1}} in the message body. All variables you added to the message template in WhatsApp will be added below the header and the message body, so you can link them.
First, the {{1}} variable needs to be linked to Category/%service_name% (in this example) in the header:

Then, below that, you can see the message template pulled from WhatsApp, and below the template, you will be able to link the variables with placeholders in Naldoria:
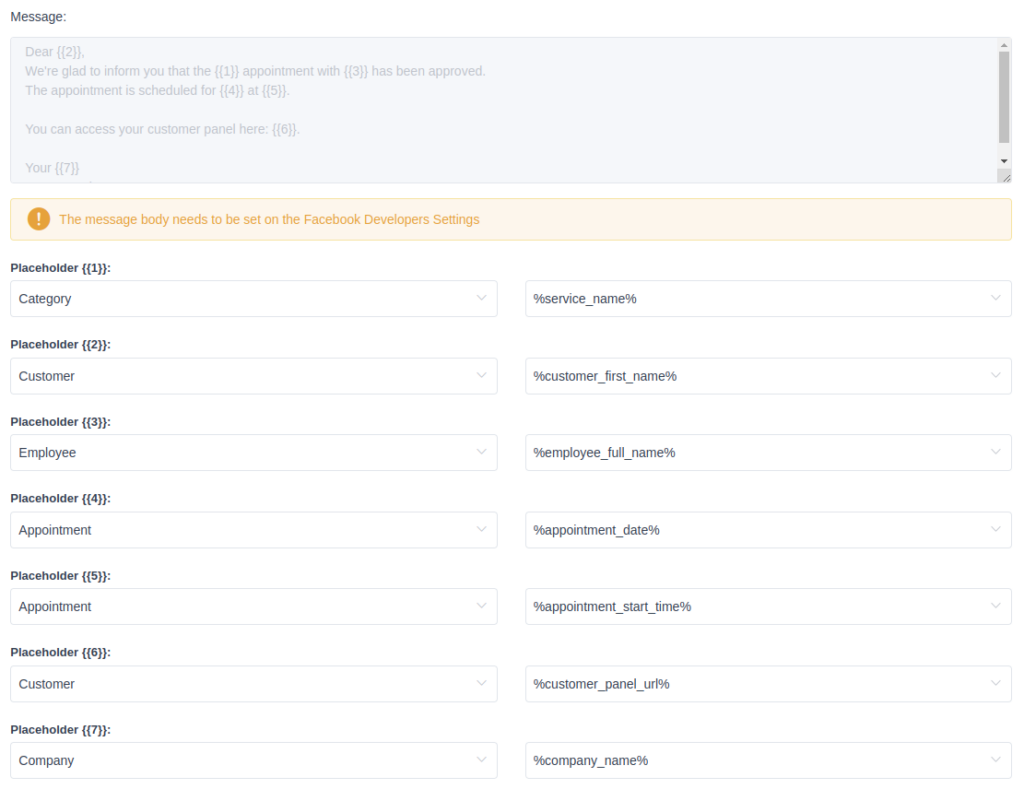
When you’re done linking the variables to placeholders, scroll all the way down and click on the “Save” button in the lower right corner, to save the notification template.
Now, as in all other notifications, you can test the messages. Click on “Send Test WhatsApp Message”, enter the phone number you want the message to arrive to, and select the template you want to test.
The test message that you receive will replace the placeholders just like Email and SMS test notifications do – with test data (John Doe for the customer name, Richard Roe for the employee name, etc).

Enable the Auto-Responder message
Since WhatsApp integration can’t be used to chat with your customers, you can configure the Auto-Responder message, so your customers are aware of this.
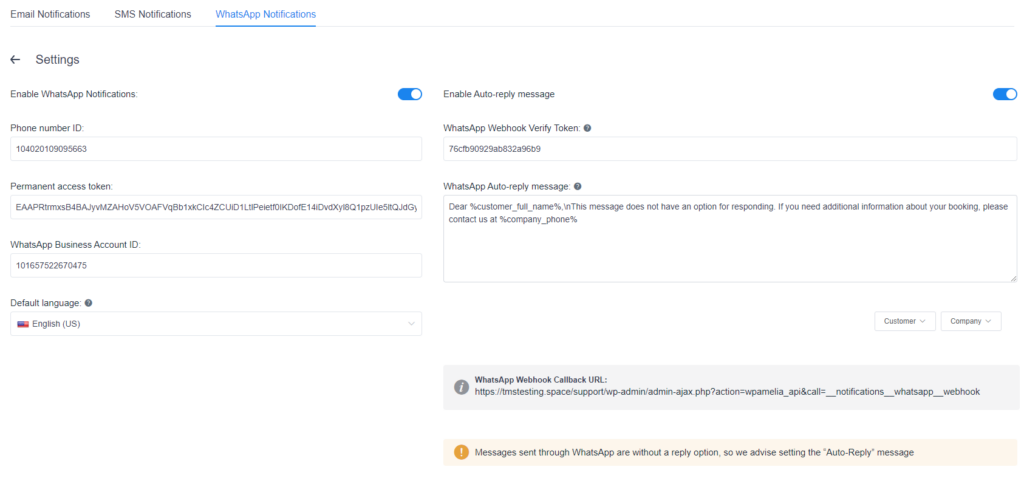
Back, in Naldoria/Notifications/WhatsApp Notifications, you need to access Settings in the top right corner. In there, you will see the details you already entered (Phone Number ID, Permanent Access Token, and the WhatsApp Business ID) on the left.
On the right, you’ll see an auto-generated WhatsApp Webhook Verify Token (please note that this token can be changed manually), the WhatsApp Auto-reply message (which you can also modify, and use Naldoria’s placeholders), and the WhatsApp Webhook Callback URL.
First, copy the WhatsApp Webhook Verify Token and go to your Developers Console.
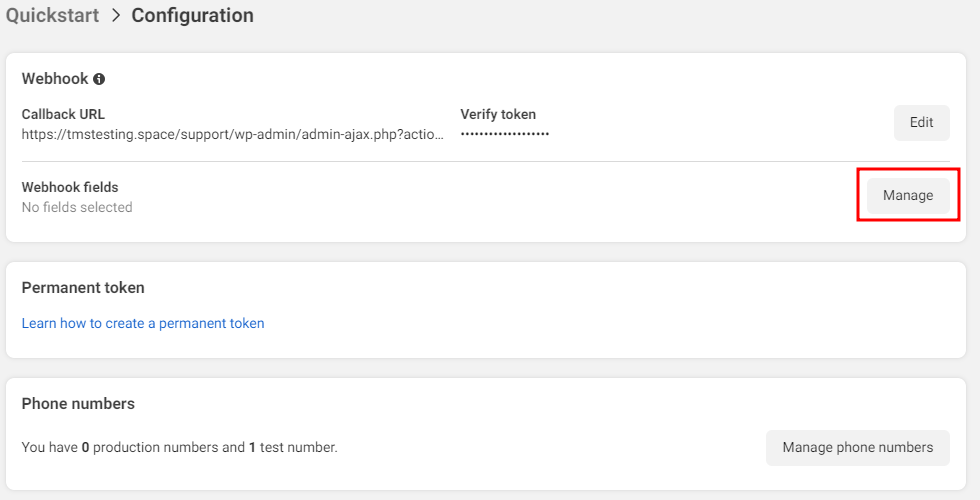
In the left-hand side menu, expand WhatsApp and click on Configuration. On the right, in the Webhook section, on the far right, click on Edit.

This will open a window where you can paste the WhatsApp Webhook Verify Token you previously copied from Naldoria.
Then, go back to Naldoria and copy the WhatsApp Webhook Callback URL and paste it into the first field in Meta for Developers:
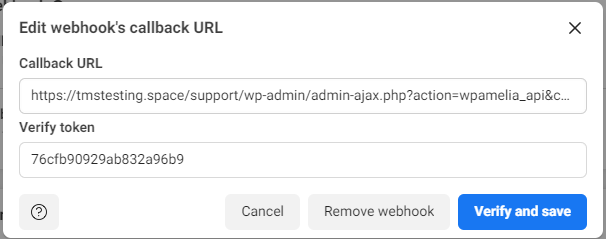
Once you paste this data, click on Verify and save.
This will close the modal and refresh the Configuration page.
Now, you need to click the Manage button, next to the Webhook fields.
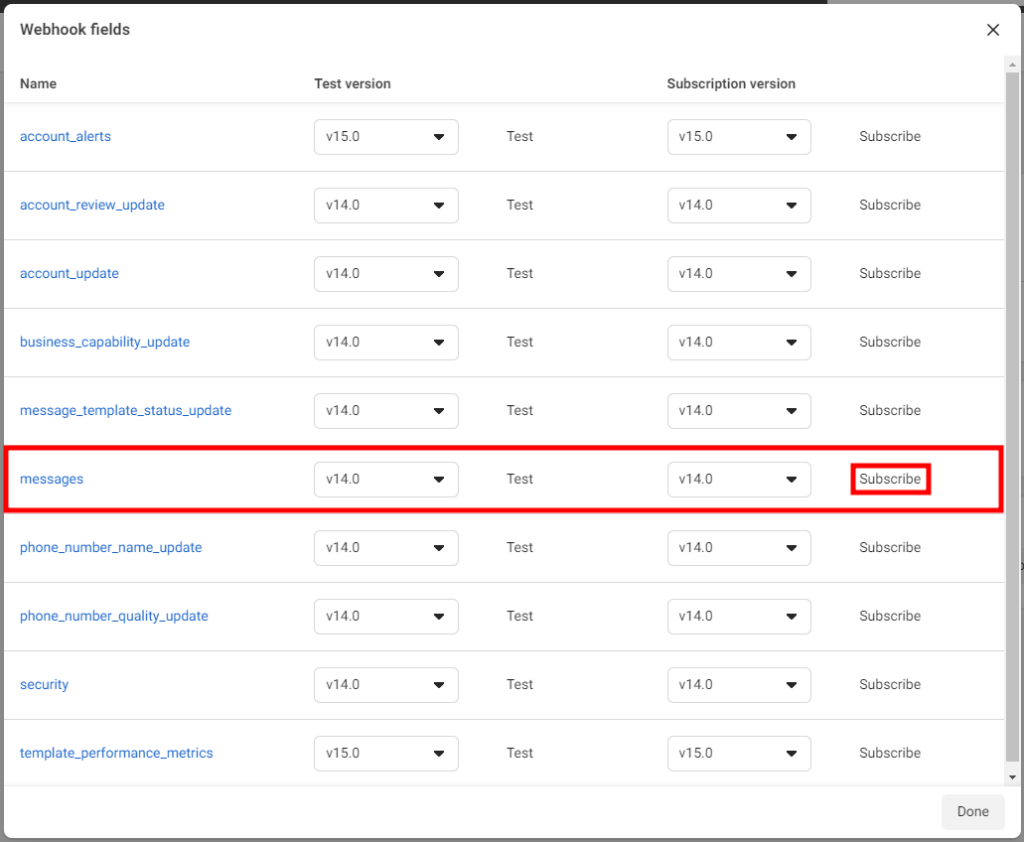
In there, look for messages in the first column, and then click on Subscribe on the far right, in the same row:
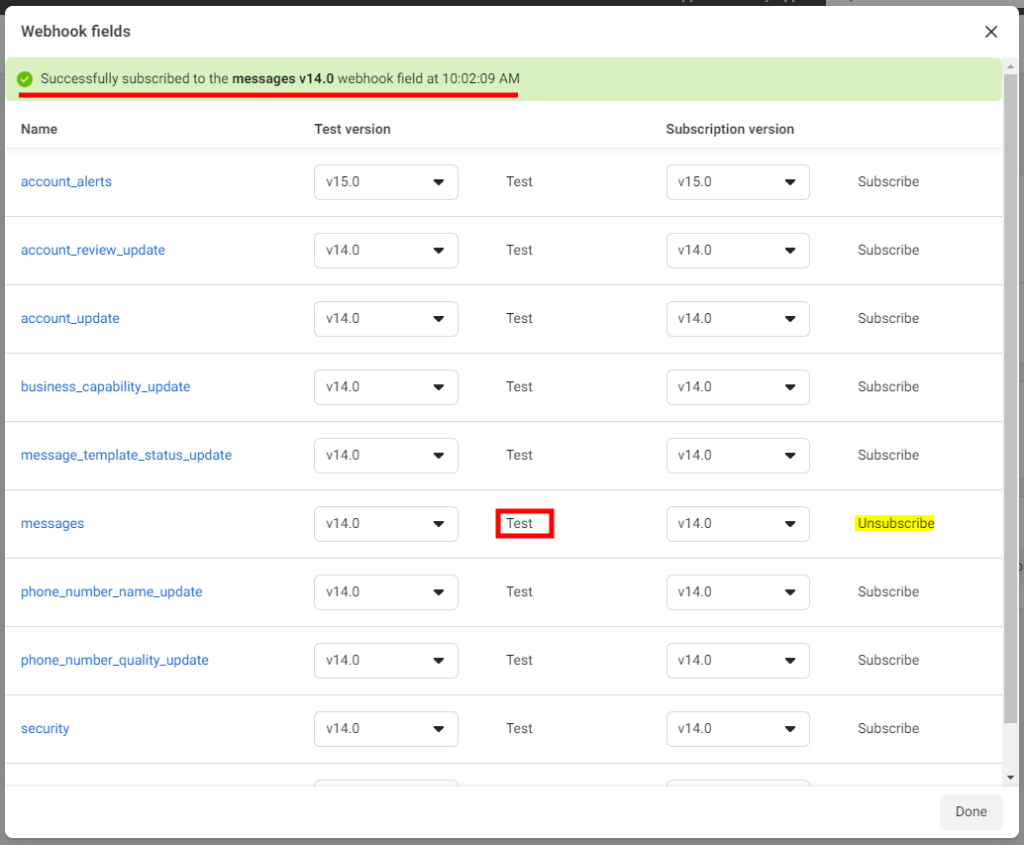
You will see a green message at the top of this window which will let you know that you successfully subscribed to messages.
You can also click on Test in the 3rd column to test this message, and if the test goes through fine, the green message on the top will refresh and tell you that the message was successfully tested.
That completes the configuration of the auto-responder message, so you can click on Done in the bottom right corner, and close the Meta for Developers window.
Now, it’s up to you to edit the auto-responder message in Naldoria, if you haven’t already.
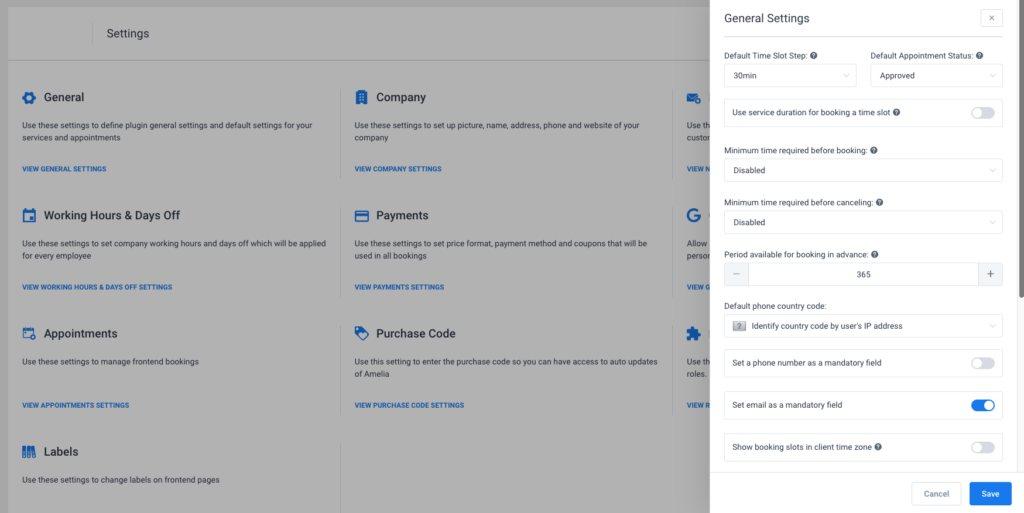
Default Time Slot Step
This setting allows you to choose a default length for the time slot step, which is used to “grid” the business hours and appointment durations. It determines the time slot step in which your appointments can be scheduled. The setting contains time slot step options ranging from 1 minute to 8 hours, and what you define here will be applied to all time settings such are “Duration”, “Buffer time before” and “Buffer time after” in the Service settings.
For example, if you choose 10 minutes as the default time slot step, the working hours will be divided by a grid of 10 minutes, your customers will be offered to book appointments at 9:00, 9:10, 9:20, 9:30, etc., and the service duration will be configurable as 10 min, 20 min, 30 min, 40 min and so on.
** THE DEFAULT TIME SLOT IS 30 MIN. **
Use service duration for booking a time slot
Enable this option if you need to set the time slots on the booking form to be the same as the service duration. For example: let’s say you provide service between 5:30 pm and 9:30 pm and the service lasts 1 hour. If you use this Default Time Slot Step 30 minutes, your clients will see available time slots at 5:30, 6:00, 6:30, etc. If however, someone books 6 pm the preceding half-hour cannot be used (a customer cannot book because the service lasts 1 hour). If you enable the service duration option, however, customers will see 5:30, 6:30, 7:30, and 8:30 as the available times and there will not be a time shown that cannot be booked.
Default Appointment Status
With this setting, you can set the default status for all newly created appointments. If you set “Pending” as a default appointment status, future appointments will have this status at the time of scheduling and will require manual approval and status change in the plugin’s back-end.
** THE DEFAULT CONDITION IS APPROVED. **
Minimum time required before booking
This setting allows you to set the minimum period before the appointment when customers can submit a booking request. By default, it is disabled, which means for example, that your customers will be able to book appointments within several minutes from the current time. Should your business require a certain period of time to prepare for the appointment, simply choose one of the options from this setting, and any booking within a given period prior to booking will be disallowed.
For example, if you choose 1 day as your minimum time required before booking, your customers will need to schedule an appointment at least 1 day in advance.
Note that the minimum time required before booking works only for the front-end bookings, it doesn’t apply to the appointments added through the back-end.
DEFAULT: DISABLED.
Minimum time required before cancelling/rescheduling
This setting allows you to set the time period before the appointment, after which customers will not be able to cancel or reschedule their request. By default, it is disabled, which means your customers can cancel/reschedule an appointment at any moment before it starts. To disallow late cancellations/rescheduling simply choose an option, e.g., 1 day. The 1-day option, for example, would not allow a customer to cancel or reschedule tomorrow’s appointment.
DEFAULT: DISABLED.
Period available for booking in advance
This option allows you to set how far into the future bookings can be made. For example, if you set 365 days, your customers will be able to schedule an appointment for up to one year in advance. If you set it to 10 days, your customers won’t be able to book an appointment beyond that time.
365 DAYS IS THE DEFAULT SETTING.
Default phone country code
You can choose a specific country code for the phone numbers, otherwise, you can choose the “Identify country code by user’s IP address” option and the country code will be “guessed” by the current user’s IP address.
DEFAULT: IDENTIFY COUNTRY CODE BY USER’S IP ADDRESS
Set phone number as a mandatory field
This option allows you to determine whether entering a phone number will be mandatory or optional for a customer during the booking process. By DEFAULT this option is DISABLED, which means your customer will not be required to enter a phone number.
DEFAULT: DISABLED.
Manage languages
This option allows you to add or remove languages that will be available throughout the plugin for translating dynamic strings such as names, descriptions or notifications.
Set email as a mandatory field
This option is here so you can choose whether the email field on the booking form will be mandatory or not. By default, this option is enabled, so your customers will need to add their email during the booking. If you disable it, your customers will be able to finish the booking process without entering any email.
DEFAULT: ENABLED.
Show booking slots in a client time zone
This option gives you the possibility to use our plugin through several time zones. If you enable this option your clients will see time slots in their own time zone, and once they schedule an appointment you will see it in the back-end in the time zone that you have set in the WordPress General Settings under the Timezone option. So, for example, if your clients are in a time zone that is 1 hour less than yours, they will schedule an appointment for 8 pm, and you will see this appointment at 9 pm in the appointments list.
DEFAULT: DISABLED.
Show Add To Calendar option to customers
This option gives you the opportunity to remove the Add To Calendar option from front-end pages. The Add To Calendar option is there to allow your customers to enter an appointment they have just scheduled in their calendar. The option is enabled by default, but if you don’t want to give this option to your customers you can simply disable it, and this step will not appear in the booking process.
DEFAULT: ENABLED.
Please note: If this option is enabled and your customers choose Outlook or iCal as an option, after they click “Add to Calendar” button the cal.ics file will be downloaded, and they will need to click on this file to add the appointment/event to their calendar.
Send ics file in the notifications
This option gives you the opportunity to send ics file in the notifications that are sent to the customer so they can download it and use it to add an appointment or an event to their calendar. This option is very important if you plan to use our integration with WooCommerce and you want your customers to have the option to add appointment/event to their calendar since if integration with WooCommerce is used customers will be redirected to the WooCommerce cart and they will not have Add to Calendar option on the end of the booking process.
DEFAULT: DISABLED.
Default items per page
This setting allows you to choose the number of items you and your employees will see on the admin pages of the plugin. Since you have from 9 to 30 options you can adjust the look of your pages as you prefer.
DEFAULT: 12 OPTIONS.
Default page on the back-end
This setting allows you to choose which page you will see first whenever you access your back-end. By default, it is set to show the Dashboard page first, but if you prefer you can change it to Appointments or Calendar, or if you just use Events you can change it to Events.
DEFAULT: DASHBOARD PAGE.
Google Map API Key
This option allows you to add the Google Map API Key so you can show a Google static map on the “Locations” page.
Redirect URL After Booking
This option allows you to set the URL to which the customers will be redirected once they schedule an appointment. If you don’t configure it, once your customers click on the Finish button they will be brought back to the first booking step.
Attachment upload path
With this setting, you can set the path where you want attachments to be saved (if you use the Attachment custom field). If you leave this field empty, all attachments will be uploaded to the WordPress ‘uploads’ folder.
Enable Google reCAPTCHA
This option is made if you want to use Google reCAPTCHA to prevent bots from booking appointments. Once you enable this option you will see three other options that will be explained below.
In order to use reCAPTCHA in our plugin, you need to sign up for an API key pair for your site here. The API key pair has a site key and secret key which you need to copy and paste into our two fields below called “Google reCAPTCHA Site Key” and “Google reCAPTCHA Secret Key”. Besides these two options, you will also see the option “Add “Invisible Google reCaptcha”. This option allows you to set a smaller reCaptcha without a checkbox field in the lower right corner of the booking form. Customers will still be checked just faster and if you have lots of custom fields then this kind of a reCaptcha will more suit you since it won’t take up much space.
Use the input controls available at Naldoria -> Settings -> Company to adjust the Picture, Name, Address and Phone of your organization, as shown in the illustration. Later, values entered in these fields will be used in the notifications automatically sent to your employees and customers.

Working Hours
This option allows you to set company-wide working hours and breaks. If you want to set the same hours for every day, simply set the first day and click on the “Apply to All Days” button.
Please note that changes in global working hours will not be applied to previously created employees since they already have a unique schedule. Instead, those changes will be applied to all new employees that you create afterward.

Days Off
The Days Off setting allows you to set one or multiple days off that apply to the whole company. Click on the “Add Day Off” button, enter the “Day Off name”, select one or a range of days, and check if you want these days to be repeated yearly. Since repeating days off and one-time days off are coloured differently you can differentiate between them easily.

Please note: The Days Off feature only works for Services, not Events. Adding a Day Off will not block existing Events.
There are two ways you can configure the schedule in Naldoria
- You can configure general working hours for the whole company in the Working Hours setting on the Settings page.
- Individually set the working hours and services schedule, and add Days off and Special Days for each employee.
When you access the Employee profile, you will see three tabs related to the schedule – Work Hours, Special Days, and Days Off:
Work Hours – This is where you set custom working hours and breaks for any employee if his working hours and breaks differ from the ones set in the company’s global settings. You can choose different working hours and breaks for any day of the week. If you would like to set the same schedule for the entire week, simply configure Monday’s schedule and then click the “Apply to All Days” button – this way the Monday schedule will be copied to all the other days.
It is also possible to add multiple periods during the day and set a different set of services for each period. This way you can create a flexible service schedule for your employees.
On the right side of each period, you will see an option for selecting the services. You can select one, two, or more services, and those selected services will be provided by your employee just in that period. So, for example, you can set the “Cardio training” service from 10 pm to 12 pm, and the “Yoga class” from 7 pm to 8 pm.
Additionally, it is possible to define multiple locations or separate locations for each employee’s working period as well. In the employee’s details you still need to set a single default location, so, if your employee works on only one location, just define it in the “Details” tab, and you won’t have to set it in the work hours for each period – the default location will be automatically assigned to all periods.
However, if you have one employee working on multiple locations, you can choose one or more locations for each time period that you create. This way, the same employee can be booked for specific services at certain hours at one location, and then provide the same or different services at a different location.
If you add multiple locations in the employee’s Work Hours, once a location is selected when booking, all other locations will be blocked at this time.
Please note: If your locations are physically separated, keep in mind that your employees will need time to get from one location to another, so it may be necessary to add buffer times for your services in order to make it possible for employees to get from one appointment to another.

![]()
Please note: After setting these options you can potentially face these two issues:
- All dates appear in the calendar as unavailable – This can happen if the service duration is configured to be longer than employee’s working periods, so the service cannot fit in his schedule.
- If some dates or some times in the calendar are unavailable, and they should be – check if you have Google or Outlook calendar integration configured. Temporarily disable the “Remove Google Calendar Busy Slots” or “Remove Outlook Calendar Busy Slots” and check the front-end page again – if the dates/slots are there, your employee has some busy events in the calendar that are blocking dates/times.
- Days Off – Similarly with working hours and breaks, you can set custom days off for every employee. Click on the “Add Day Off” button and you’ll see several new options. Enter the day off’s name, a date, or a range of dates, and specify whether you want this day off to repeat yearly. After you click “Add Day Off“, your Day Off will be saved. Depending on whether it is a repeating one or a one-time day off, it will be coloured in orange or red on the list.

- Special Days – This feature allows you to configure one or multiple days when the employee’s schedule is somehow different from the standard one. E.g. one can have different working hours, provide different services, and/or work in a different location for one Thursday only. Whether you need to set shorter or longer working hours for just one day or a period, set a different service for one specific day or a whole week, or assign the employee to a different location for a day — here you can do all of this.
Once you configure it, it will override the employee’s general working hours and his service schedule, but it will not override his days off.
Click on the “Add Special Day” button and the configuration section will appear. In the “Date” option choose a date or a range of dates, then set one or multiple periods of time with working hours, choose one or multiple services for each of them in the “Service” option, and select a specific location in the “Location” option, according to what’s the special day’s setup. After you configure the special schedule, click on the “Save Special Day” button and this schedule will be applied.
If you have services that are only provided from time to time (not on a daily or a weekly basis, but on specific occasions), this feature is a perfect match to configure such services. You can simply delete the working hours for an employee and just use the special days, so the calendar on the front-end will show the first available appointment slot. This is useful especially for services that happen from time to time. The customers won’t need to search for a date. Instead, the month with the available date will be shown right away.

![]()
Once you’ve set it all, click on the “Save” button and your schedule will be applied for the employee.

If you don’t want to use price and payment settings and you don’t want to show them on the front pages, just put 0 as a price for a service and the extras. By doing so, your price and payment methods will be automatically hidden.
Currency
With this option, you can set the currency that will be used for all prices.
DEFAULT: US DOLLAR
Price Symbol Position
There are four options for the currency symbol position. You can set it to be:
- Before the value
- Before the value, separated with space
- After the value
- After the value, separated with space
DEFAULT: BEFORE THE VALUE
Price Separator
With the “Price Separator” option you can configure the separator format – decide which symbol to use for separating thousands, and which for separating the integer part from the fractional part (decimal separator). For the thousand separator, possible symbols are a comma, dot, and space. For the decimal separator, possible symbols are comma and dot.
DEFAULT: COMMA-DOT
Price Number Of Decimals
Allows you to set the number of digits after the decimal separator.
DEFAULT: 2
Custom Currency Symbol
This setting allows you to set a symbol that you want for the currency you choose in the Currency option. After you choose the currency, the default symbol for that currency will be shown in the input field ($ by default as US Dollar is the default Currency in Naldoria), so if you need you can change it here and Save the change.
Coupons
When the “Coupons” option is enabled, the “Coupons” tab will be visible on the “Finance” page, and it will be possible to create discount coupons that can be applied to Appointments or edit the existing coupons. When scheduling appointments, customers will be able to enter a discount coupon code to get a discount.
DEFAULT: ENABLED
Default Payment Method
This option allows you to set the default payment method that will be displayed for customers if you are using more than one payment method in your plugin. So, if for example, you use all three payment options, you can choose PayPal to be the default one.
On-site
If you allow the on-site payment method, your customers will be able to pay for booked appointments in cash when they come to the appointment. If all other payment methods are disabled, this method will be enabled by default.
DEFAULT: ENABLED
PayPal
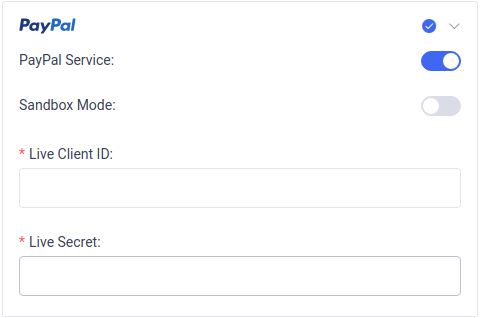
This option allows customers to pay appointments directly with PayPal (debit/credit card or PayPal balance). First, you need to enable the “PayPal service”, and then you can choose if you would like to use PayPal in sandbox mode or in Live mode.
To use the Live mode, you need to copy “Live Client ID” and “Live Secret” from your PayPal account (App) and paste them into Naldoria Settings/Payments/PayPal.
PayPal “Sandbox Mode” is a testing environment that mimics the live PayPal production environment and should only be used for testing purposes.
To set your PayPal Sandbox setting simply follow the next steps:
- Go to https://developer.paypal.com/developer/accountStatus/,
- On the left in the “Dashboard” menu click on “My Apps & Credentials”,
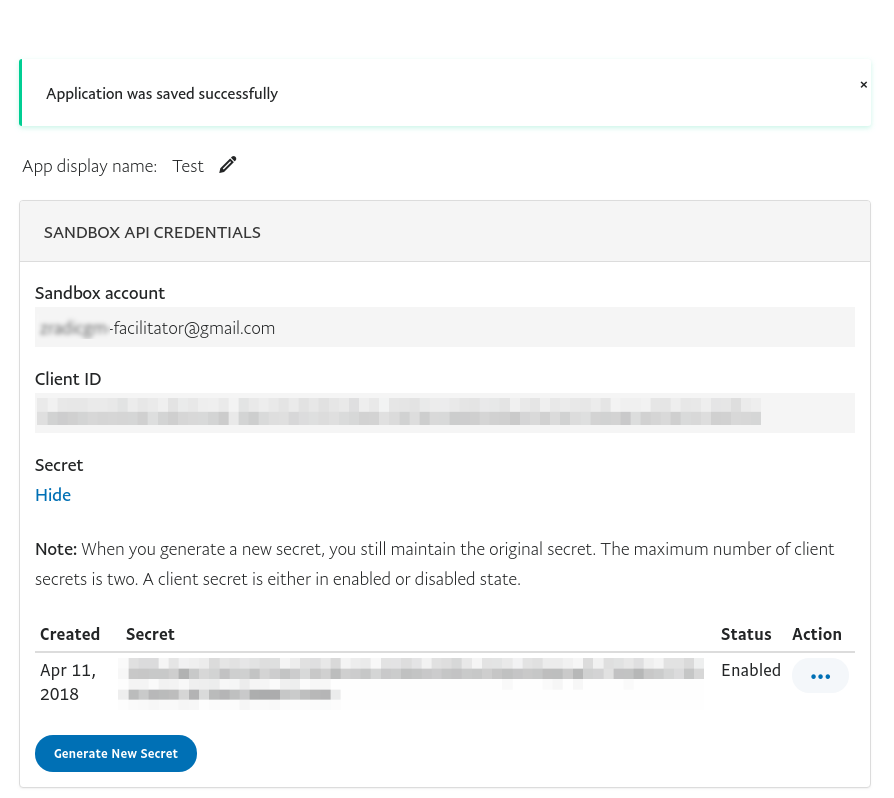
- In the “REST API apps” section you need to create a new App (or use the existing one),
- You must then copy data from the fields “Client ID” and “Secret” into Sandbox PayPal Payment Settings on the Settings page of the plugin.
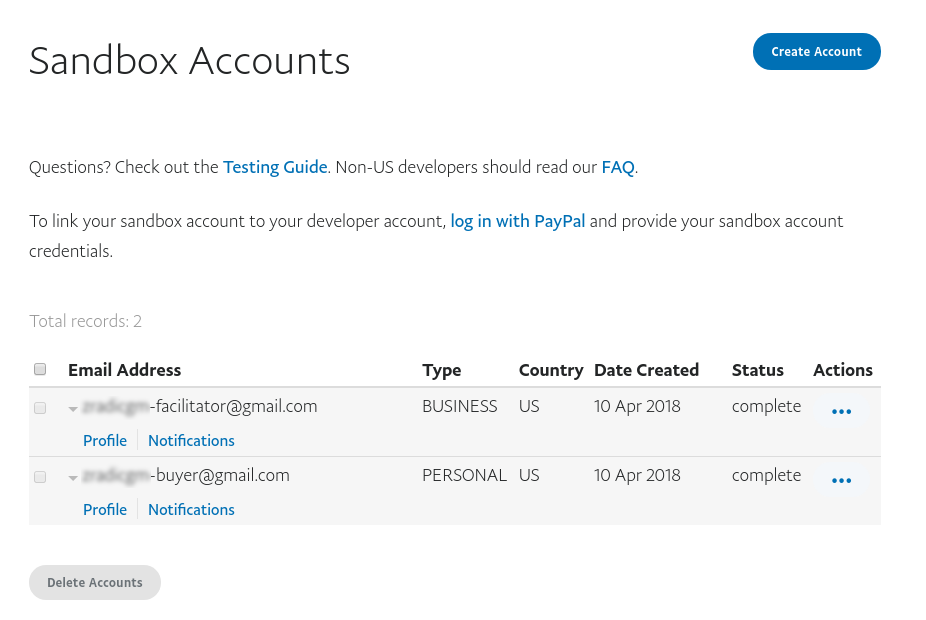
5. On the left in the “Sandbox” menu click on “Accounts”,
6. From the “Sandbox Accounts” section you can use emails and passwords from sandbox developer accounts (BUSINESS and PERSONAL) on this link for testing after paying with PayPal in Naldoria.
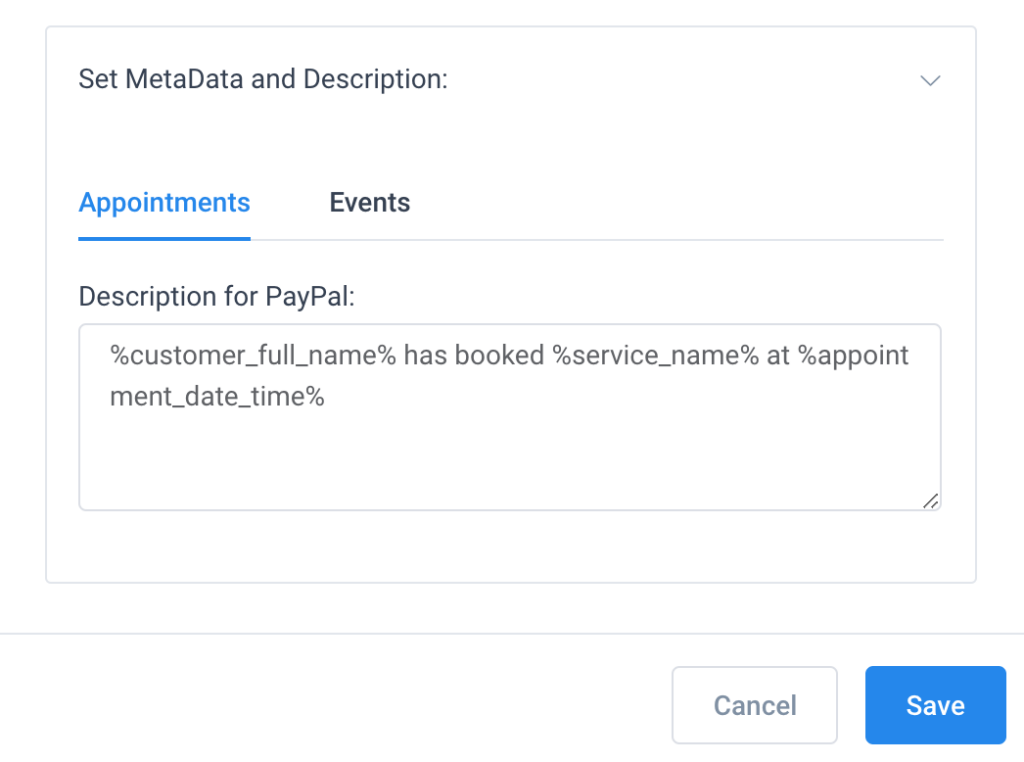
Once you enable PayPal as a payment method you will notice at end of the modal new option “Set MetaData and Description”. For PayPal, you can only set a description for the payment. You can set a different description for appointments and for events and that description will be shown on the PayPal side so you can know all the details about the customer that made the appointment. To set the description you can use placeholders from the email notifications so the plugin can send different customer data each time. You can of course add placeholders for appointment details as well.
Stripe
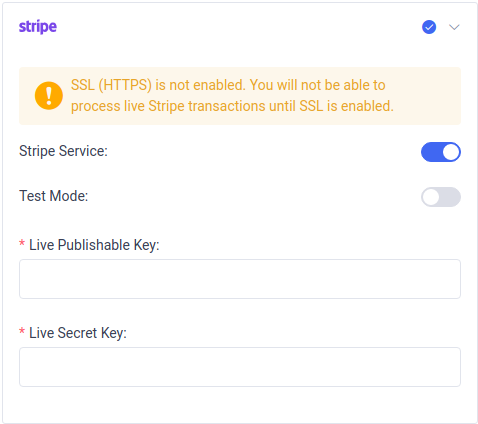
To enable the Stripe Payment method, enable the “Stripe Service” option, after which you can enable the “Test Mode” to run tests with Stripe. When you enable “Test Mode” you need to add “Test Publishable Key” and “Test Secret Key”. To use live transactions, you should leave “Test Mode” disabled, and enter the “Live Publishable Key” and “Live Secret Key” that are located on your Stripe dashboard.
However, you will be required to have an SSL certificate in place for PCI compliance if you want to have payments processed on your site.
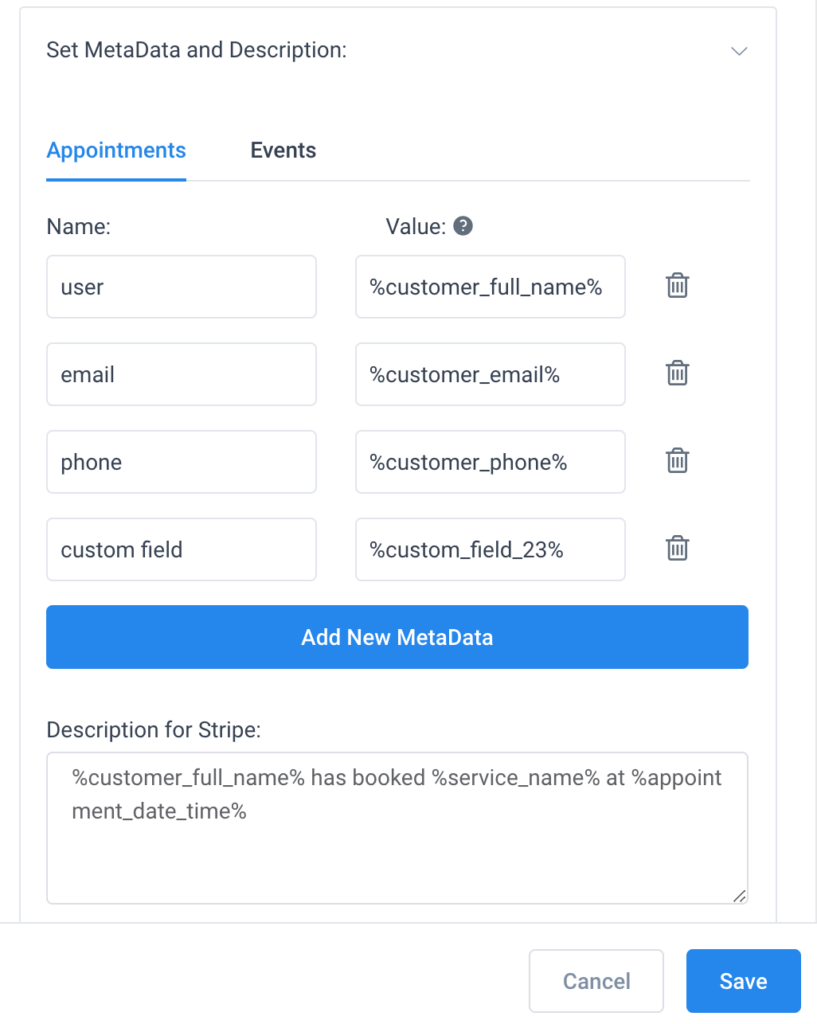
Once you enable Stripe as a payment method you will notice at end of the modal that the option “Set MetaData and Description” has changed. For Stripe, you can only set both MetaData and description for the payment. You can set several MetaData options as shown in the example below and you can add a different description for appointments and for events. Same as for PayPal for both MetaData and Description you can use placeholders from the email notifications so the plugin can send different customer’s and appointment’s data each time.
Mollie
Mollie payment gateway is one of the most used payment gateways in Europe and supports various payment methods such as Apple Pay, Credit Card, PayPal, Klarna, iDeal, and many more. It is supported only in the SEPA area and the only acceptable currency is Euro.
Razorpay
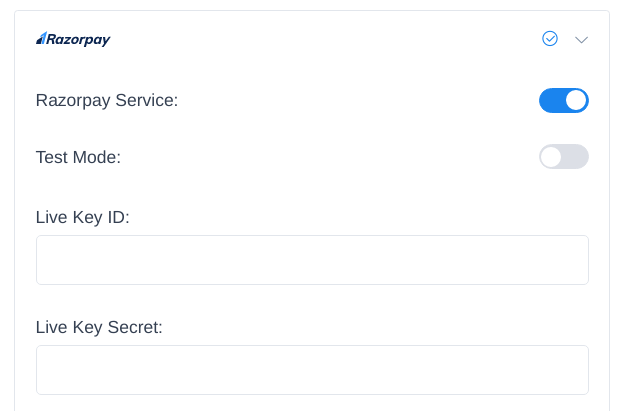
If you want to use Razorpay as a payment method in Naldoria, you should enable the Razorpay Service option in Payment settings. After you enable it you will see the Test mode option, and two additional input fields for the Key ID and Key Secret. If you enable Test mode, you will need to provide the Test Key ID and Test Key Secret from your Razorpay account, and if you use Live mode (Test mode disabled) you will need to provide the Live credentials from your Razorpay account accordingly.
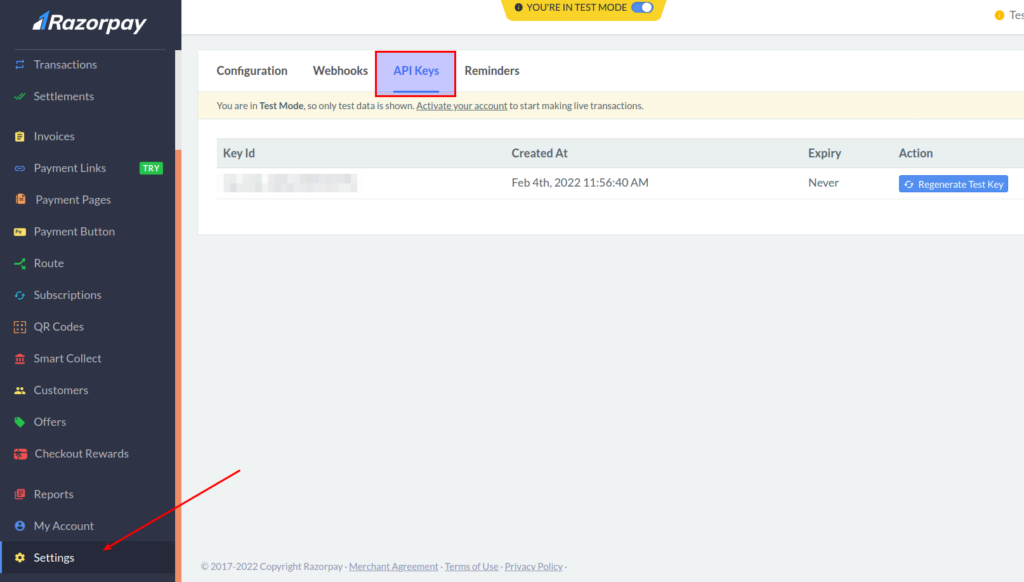
In order to provide Key ID and Secret in Naldoria for Razorpay, you need to create an API Key first on your Razorpay account, and then copy them to corresponding fields on the Settings page in Naldoria. In order to create the API key, login to your Razorpay account, choose the mode that you want to create the API Key for – live or test, and then navigate to Settings -> API Keys -> Generate Key to generate the key. The Key ID and Key Secret will appear on a pop-up page and you need to copy these and paste them to the corresponding fields in Naldoria. If you need more help in generating the keys in Razorpay, you can find more information on this Razorpay docs page.
Please note: On your Razorpay Dashboard, you need to go to settings and change Payment Capture from automatic to manual. This will insure that if something goes wrong in the booking, the payment will not be captured. Payments that aren’t captured are refunded after 5 days.
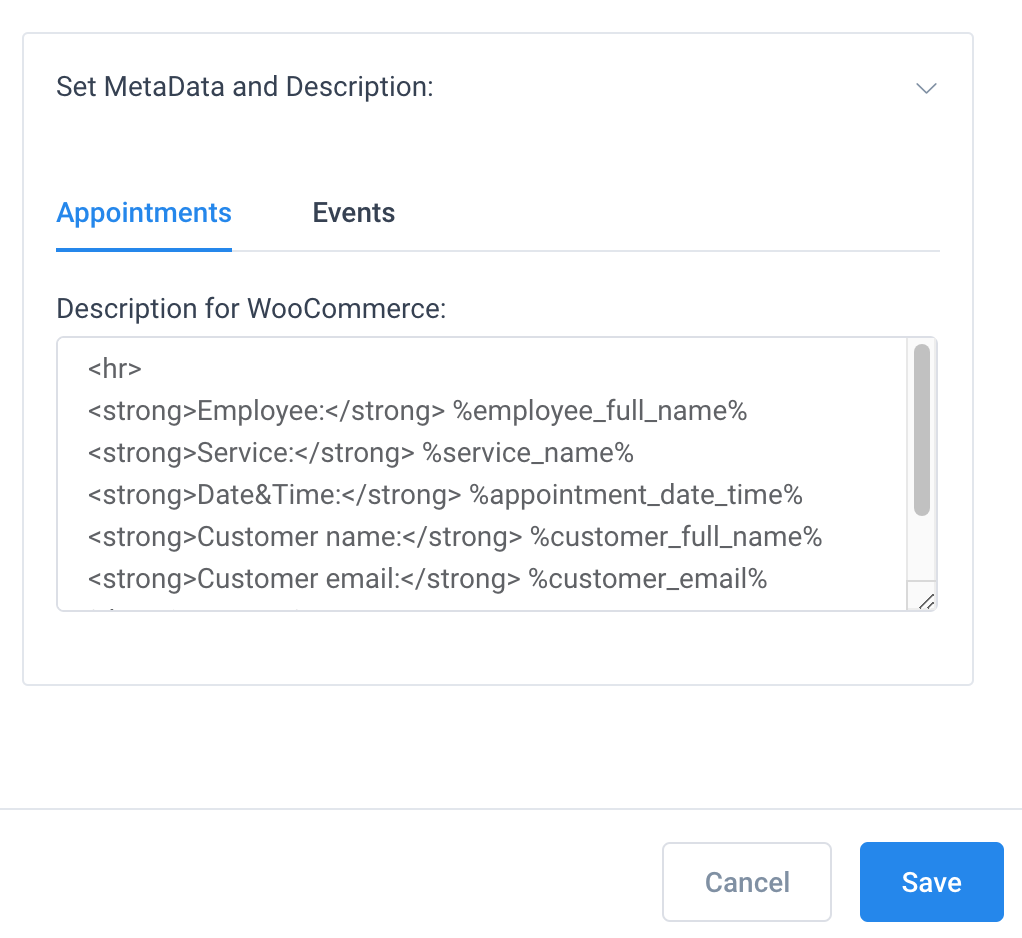
Like for the other payment methods, when you enable Razorpay, you will have the option to set Metadata and Razorpay Description in the “Set MetaData and Description” option. With setting this up you will have information about the bookings from, as metadata or description, in the corresponding payments on your Razorpay account. You can set several MetaData options and both MetaData and description are set separately for Appointments, Packages and Events. For both MetaData and Description, you can use placeholders so the plugin can send different data for each booking.
If you choose to enable WooCommerce as a payment method you will see that other payment methods will automatically become disabled (since WooCommerce supports them all and cannot be used together) and a place for adding WooCommerce description will be shown. Description can be added for both events and appointments separately and you can even add it in a form of a combination of HTML code and our email placeholders, like showed below.
Please note: Placeholders made for adding Zoom links and cancelation links from the email notifications cannot be added in these MetaData fields and descriptions.
Setting up different payment methods for each service
You can also set different payment methods for each service. If, for example, you have one service for which you want your customers to pay on-site and another one that requires payment during the booking process, you can set this now. In order to see the options first, you need to enable all payment methods that you want to use in Payment Settings on the Settings page. After you’ve done this, go to the Services page, open service and you will see the Settings tab. Enable the payment method that you want to have for that service and click Save.
Please note: If you disable all payment methods for one service, that service will have the default payment method set in Payment Settings on the Settings page.
Payment from Link
Allow your customers to pay via email notifications or through their Customer Panel, by enabling the option “Allow payment via Payment Link”. If you choose to allow customers to pay through email, for this option to work you need to add new payment link placeholders to the message templates. To view a detailed list of the placeholders that you can use please follow this link. Also, you can set a URL where customers will be redirected once the payment from the link is processed, by using the option “Redirect URL after Payment”. By default, this will be set to your main site URL, but you can change it according to your requirements.
If your default status is set to “Pending” you can use the option “Update Appointment Status” which will automatically change the appointment/event status to “Approved” after the payment from the link is processed.
Managing Date and Time properly is vital for a booking tool, as a wrong configuration or time zone can totally invalidate a business’s schedule.
You can always modify it by going to the Settings » General page in the WordPress admin area and scroll down to the TimeZone section. Set up the “Timezone”, “Date Format”, “Time Format”, and the “Week Starts On” settings as appropriate for your business. After you click “Save Changes”, the defined settings will be used by Naldoria booking.


Once you enter the Labels Settings you will see the option Enable Labels Settings which is enabled by default. This option allows you to change these labels here. As you can see from the picture, if you have a Gym and you need to change the employee/s and service/s labels for some other, you can enter the names you want your clients to see when they are scheduling. After entering the names, click Save, go to the front page, and you will see the new names for those labels.
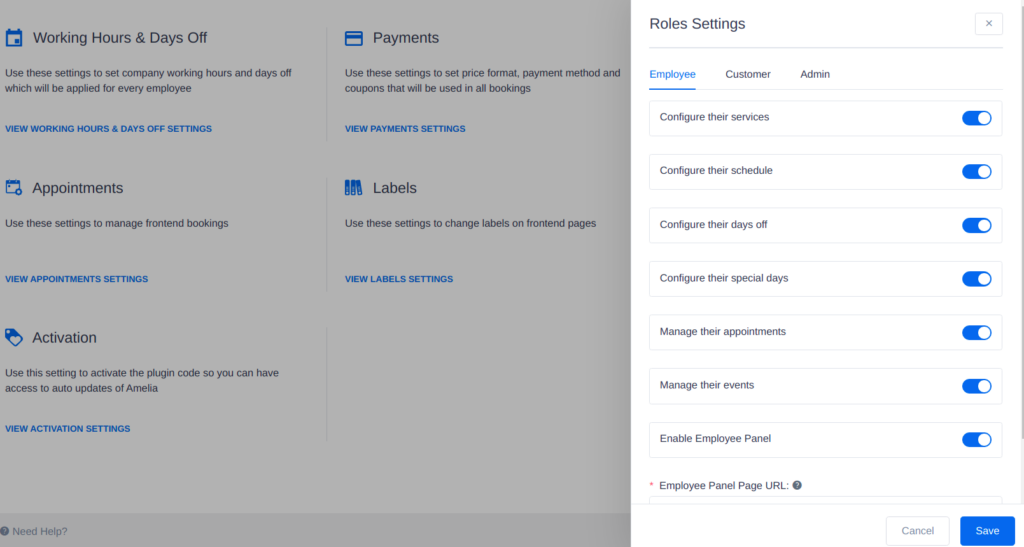
Roles Settings are currently divided into two tabs: Employee and Customer based on these two Naldoria user roles.
- Employee tab has the following options:
- Configure their services – This option allows your employees to choose services they will work on (to assign services to themselves). It is disabled by default, so in this case, employees won’t see the Assigned Services tab in their profile. If you enable the option they will see this tab and will be able to configure their services.
- Configure their schedule – This option allows your employees to edit their own work hours and breaks. It is disabled by default, in which case employees will only see their profile and be able to edit their personal information. If you enable it, they will see a new tab in their profile dialog that allows them to edit their Work hours.
- Configure their days off – This option allows your employees to add their days off. It is disabled by default so when you first install the plugin and connect employees with their employee role they will not be able to see the Days off tab on their profile. If you enable this, your employees will see the Days Off tab on their profile and they will be able to add their days off.
- Configure their special days – This option allows your employees to add their Special days. By default it is disabled so your employees will not see this option, but once you enable it they will see a new tab on their profile and they will be able to add days with special working hours and services on their own.
- Manage their appointments -This option allows your employees to add and/or edit their own appointments. It is disabled by default, in which case employees will only be able to see their appointments on the Appointments page and Calendar. If you enable it, they will see the “Edit” option beside each appointment and they will also be able to create appointments on the “+ New Appointment” button.
- Manage their events – This option allows your employees to add and/or edit the events that are assigned to them. It is disabled by default, in which case employees will only be able to see the events on the Appointments page and on the Calendar page. If you enable it, they will see the “Edit” option beside each event and the “Attendees” option, so they can see the list of attendees that have booked the event.
- Enable Employee panel – This option allows you to add the employee panel to your front-end pages where employees will be able to login and see and manage their appointments and events, or their profile. When you enable this option you will see an additional option: Employee Panel Page URL where you should add the URL of the page where you added the Naldoria employee panel shortcode.
- Customer tab has the following options:
- Check customer’s name for existing email when booking – This option allows you to choose whether you want to check the customer’s name for the provided email or not. By default, this option is enabled and your customers won’t be able to use the same email for booking with different first and last name. If you don’t want this, disable the option and your existing customers will be able to enter different information when they are booking with the same email.
- Automatically create Naldoria Customer user – If this option is enabled every time a new customer makes an appointment they will automatically get a WordPress user with the Naldoria Customer user role and email with login details from WP, and that WP user would be connected to the customer created in Naldoria. If someone is already a WordPress user, and they book an appointment for the first time in Naldoria while logged in to WP, the customer created in Naldoria will be connected to that WP user and they will get the Naldoria Customer role in WP (there are plugins for managing multiple roles in WordPress, such as User role editor). This way they will have the same login info for the Naldoria customer panel and WordPress.
- Allow customers to reschedule their own appointments – This option allows you to choose if you want to allow your customers to reschedule their single appointments. By default, this option is disabled but once you enable it your customers will be able to reschedule their single appointments by drag and drop or Edit option in their Calendar. However, they cannot reschedule group appointments since this appointment is scheduled by several different customers.
- Enable Customer panel – This option allows you to add the customer panel to your front-end pages where customers will be able to log in and see and manage their appointments or their profile. They will be able to cancel their appointments by default or reschedule them if you enable this option in the Roles settings. When you enable this option you will see four additional options below: Require password for login, Allow customers to delete their profile, Allow customers to cancel packages, and Customer Panel Page URL.
- Limit appointments per customer – By enabling this option, you can limit how many appointments a customer can book within a specific time frame and period.
- Configuring this will apply to all services, but you can configure limitations per service, by adjusting the limits through the Service settings
- Limit appointments per customer – By enabling this option, you can limit how many appointments a customer can book within a specific time frame and period.
- Limit package purchases per customer – By enabling this option, you can limit how many packages a customer can book within a specific time frame and period.
- Configuring this will apply to all packages, but you can configure limitations per package, by adjusting the limits through the Package settings.
- Limit package purchases per customer – By enabling this option, you can limit how many packages a customer can book within a specific time frame and period.
- Limit events per customer – By enabling this option, you can limit how many events a customer can book within a specific time frame and period.
- Unlike Services and Packages, configuring limitations per customer, per individual events is not currently possible, so the limitations you configure through Roles settings will apply to all events.
- Limit events per customer – By enabling this option, you can limit how many events a customer can book within a specific time frame and period.
Please note that the customer’s email will be checked for applying the limit, so in order to use this feature, the customer’s email needs to be a mandatory field in the front-end booking form.
- The screenshot below applies to Appointment and Event bookings. The limit for package purchases does not include the Time period is calculated from section since package bookings apply only to the Booking date and time.
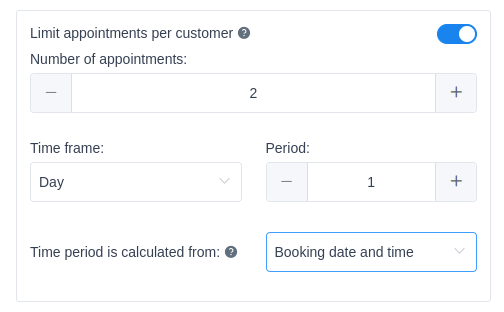
- Number of appointments/packages/events – This defines the number of appointments/packages/events the customer will be able to book when the limit is enabled.
- Time frame – You can define the limitation per hour, day, week, month, or year.
- Period – The period of the previously selected time frame when the limitation will apply.
- Time period is calculated from – There are two options when the logic will apply:
- Booking date and time – Selecting this option will set the limit based on the date when the booking is created, regardless of the appointment/event’s date and time.
- Appointment date and time/Event start date and time – Selecting this option will set the limit based on the appointment scheduled date/event’s start date and time.
Example:
Limiting the customer bookings as shown in the screenshot above will allow a single customer to book 2 appointments within a period of 1 day. The limitation will apply 24 hours from the time the customer booked the appointment.
- Since limiting the number of appointments/packages/events per customer checks the customer’s email address, the customers will be able to select the time slot and get to the Your Information step, where they enter their details. That’s when Naldoria checks the email and applies the limitation, so the customers will only see one of the three error messages:
- “Time slot is unavailable” (for appointment bookings)
- “Booking is unavailable” (for package bookings)
- “Event booking is unavailable” (for event bookings)
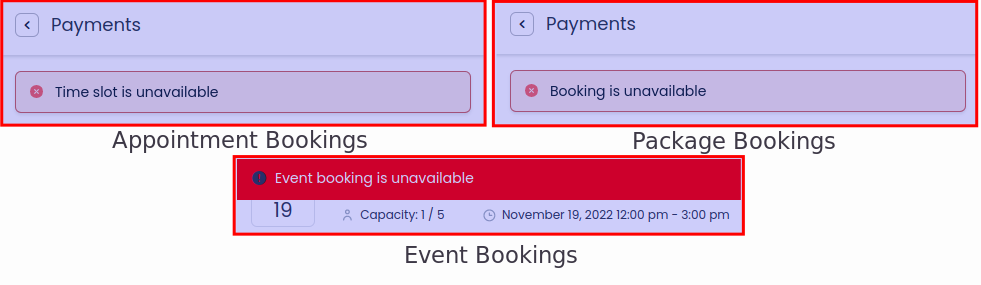
- This is done on purpose since the use cases can vary. Some businesses don’t want the customers to know that the number of appointments/packages/events they can book is limited, so having a simple notice like the one above should suffice.
- If you want your customers to know that the number of appointments/packages/events they can book is limited, you can add a simple text block above the form, explaining how the limitation works, so they either don’t try to book the time slots in the defined time period, or they understand why there’s an “unavailable” message in the form.
- Admin tab has the following options:
- Allow admin to book appointment at any time – This option allows you to choose if you want to allow the admin of the website to schedule appointments in the back-end at any time they want – without any restrictions regarding employees’ work hours, days off or special days. By default, this option is disabled but once you enable it the admin would be able to schedule appointments at any time.
Setting up the Custom fields
There are several field types you can add:
- Text,
- Text Area,
- Text Content,
- Selectbox,
- Checkbox,
- Radio buttons
- Attachment (currently .jpg, .jpeg, .png, .pdf, .xls, .txt, and .csv are supported)
- Date picker
- Address
You can add as many fields as you need. The “Text Content”, “Checkbox”, and “Radio Buttons” custom fields support HTML so you can add links to them (for example, if you want to add a hyperlink that’ll lead the customers to your “Terms & Conditions” page, before clicking on “I agree”). In the “Text Content” field, you can add pictures, change colors, etc. to customize the text better.
To add the custom fields, click on Naldoria/Custom Fields WordPress menu on the left-hand side. Click the “Add Custom Fields” button and choose one of the field types, or use the “+” button at the bottom right of the page to add it.
Please Note: In order for the Address custom field to work correctly please add the Google Map API Key in General Settings of Naldoria’sSettings page. Otherwise, the field will work just as a simple text field.

After you add a field you will see these options:
- Ordering – Use this option to reorder your custom fields – the order you set here will be the order customers will see on the booking form.
- Label – Use this option to enter the name of your field. The name can be in form of a question, an additional option, or whatever you need.
- Services – If you have multiple services and you require additional information for one or more of them, you can set it here. The Services option allows you to choose the services for which this field will be displayed. If you want to show this custom field for all services just choose the “All services” option from the dropdown.
- Events – If you have multiple events you will have the option to choose for which of them this custom field will be shown. If you want to show this custom field for all events just choose the “All Events” option from the dropdown.
- Required – Here you can set whether the field will be required or not. By default, when you add a field this option is enabled, but you can toggle the check-box to make the field optional.
- Delete – Next to each field, there is a “trash can” icon, so you can delete the field with one click. These icons are also located beside each option you add for the selectbox, checkbox, and radio button fields.
- Translate – If you’re using Naldoria in multiple languages, you’ll be able to configure the translation for each language you’ve added to Naldoria’s General Settings.
- Add Option – This option is visible for the selectbox, checkbox, and radio button fields, and enables you to add as many options as you need for each of these fields.
- Send custom fields info for each customer separately – This option is located above all custom fields, so you can choose in which manner the info from custom fields will be sent if you have group appointments. If you check this checkbox, every new customer in a group appointment will be sent separately in the email notification sent to the employee. If unchecked, your employee will receive info about all customers in one notification, and each time new customer books that appointment, the info will be appended and the employee will receive more data.
Once you’ve finished setting up the custom fields, refresh your booking form and the fields will become visible to you and your customers.

After your customers enter additional information in the fields and book an appointment or event that information will be saved in the appointment/event and you can see it in several ways:
- By clicking on the appointment in the appointments list. After you click on it, the appointment will expand and show the additional information.

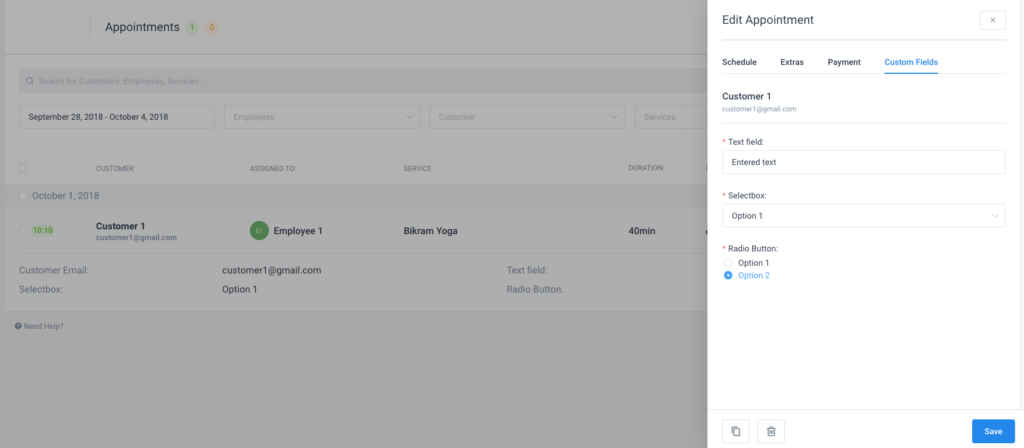
- By opening the Edit Appointment dialog. When you open the Edit Appointment dialog you will see a new “Custom fields” tab. There you can see the additional information from your customers, and you can also edit it if the customers send you some changes, for example.
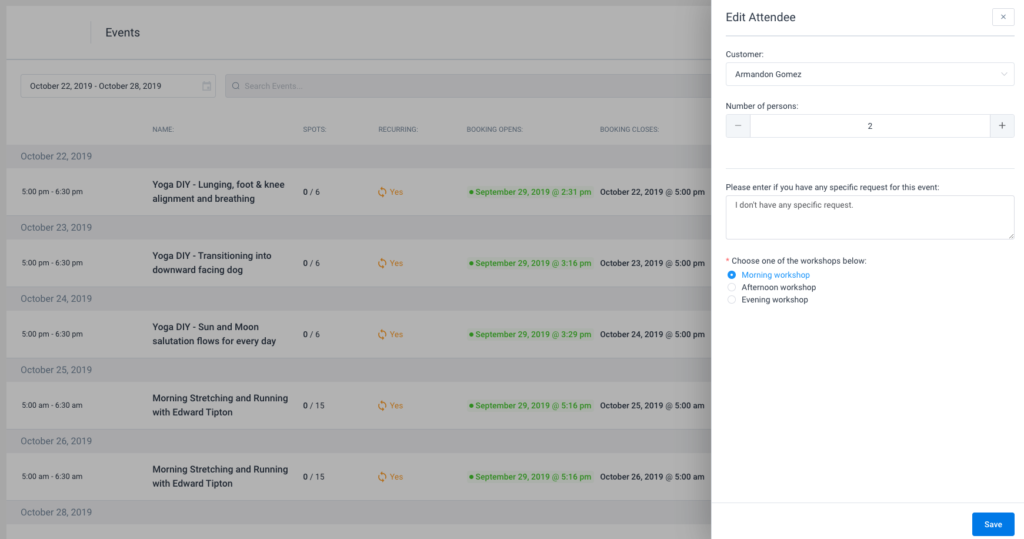
- By opening the Attendees list on the Events page. Once you go to the Events page, open the attendees’ list, click on one of the attendees and you will see an option “Edit attendee”, click on it, and attendees details together with the custom fields will appear.
If at a later time you want to change some field or delete it, don’t worry. The customers’ information collected before the change will stay in the scheduled appointments, and the change will only affect new appointments.
How to set deposit payments for Services
Each service can have a separate deposit amount set for payment during the booking. To set this, click to edit the existing service or click “+Add Service” to add a new one, then set a service price and you will see an option to enable the deposit payment below.
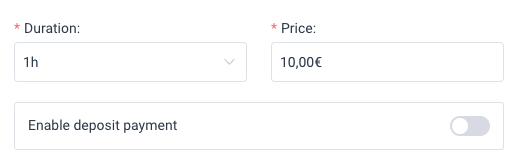
Please note: If you have set 0 as the service price, you will not be able to see the deposit payment option in the service modal. Also, if you use on-site payment then deposit payment will not be shown during the booking process. Deposit payment during the booking is possible only if you use online payment methods.
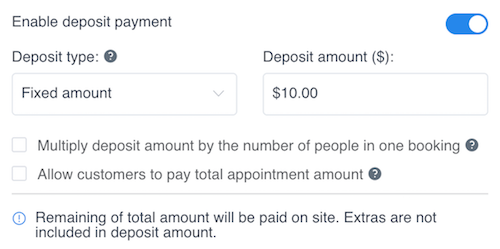
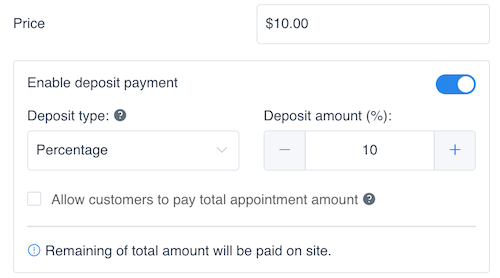
Enable the Deposit payment option and new options will appear:
- “Deposit Type” – here you can choose “Fixed amount” or “Percentage”. The main difference between these two options is that if you choose the “Percentage” deposit type, the deposit will be calculated on the total price including service extras and added people (and will change if the employee has a different price), while the “Fixed” amount will have an additional option to choose whether it will be multiplied by the number of people, but extras will not be included.
- “Deposit amount” – here you set the amount in percentage or in value that will be calculated as a deposit and paid during the booking process.
- “Multiply deposit amount by the number of people in one booking” – this option will be visible if you choose “Fixed amount” as a deposit type. “Percentage” deposit will always be calculated on the total price (including extras and additional people) while for the fixed amount you can choose whether it will multiply by the number of people or always stays the same.
- “Allow customers to pay total appointment amount” – this option manages if the customers will have an option to choose whether they want to pay just the deposit or the whole appointment amount in the booking process or don’t have the option to choose, but just pay only the deposit.
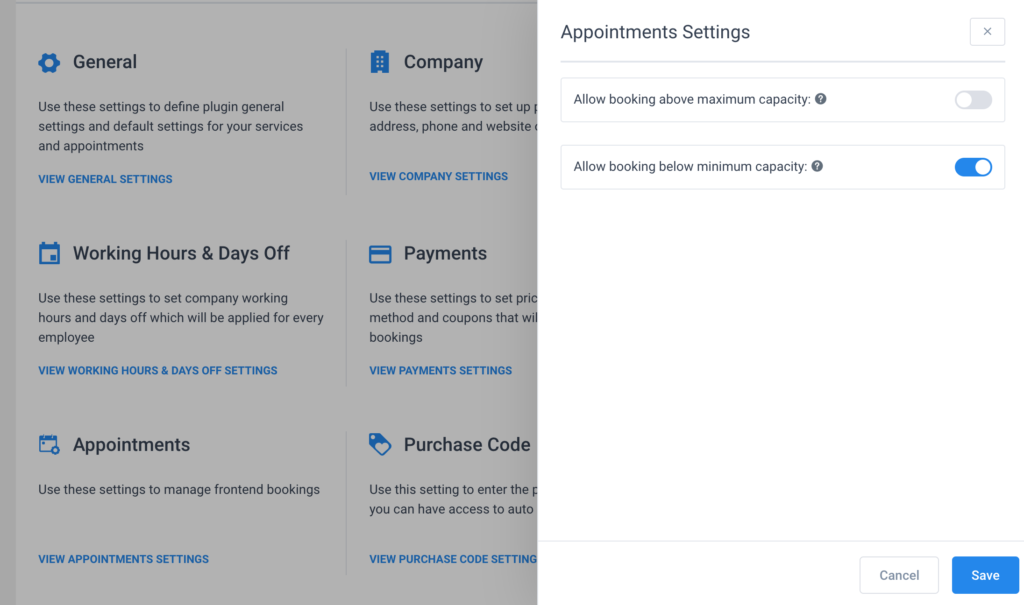
Allow booking above maximum capacity
This option is only for Services with “Pending” as a default status (for the Approved ones booking above maximum capacity is not possible). By default, this option is enabled, which means that your customers will have the ability to book the same appointment with Pending status endlessly, even though the maximum capacity for this appointment is full. As soon as the appointment is Approved in the back-end, the time slot will close. Once you disable this option, your customers will be able to book an appointment with Pending status until it reaches the maximum capacity, but once the maximum capacity is full the time slot will become unavailable and the appointment will be closed for booking.
Allow booking below minimum capacity
This option allows you to choose whether you will allow bookings below minimum capacity. By default, booking below minimum capacity is enabled which means that your customers will be able to schedule the appointment below minimum capacity, but that appointment will get Pending status because of it. If you disable it and set, for example, 3 as minimum capacity, your customer will automatically see 2 persons selected in the “Bringing anyone with you” option during the booking, and he will not be able to schedule the appointment without these two 2 persons.
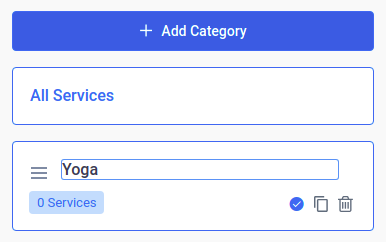
Adding, editing, and deleting Service Categories
On the left side of the category page, you will see an “Add Category” button. Click on the button, write the name of your category, click on the checkmark and your category will be saved. Once you’ve saved a category you can always edit, duplicate or delete it later, using the buttons on the righthand side of the category card.
Adding, editing, and deleting Services
After you have created at least one category you can start creating the services. Click on the “Add Service” button or the “+” button, and the “New Service” dialog will appear.
The “New Service” dialog is divided into five tabs:

- Service Details – The Service Details Tab is where you configure the most important service options. It consists of:
- Service photo – Click on the photo placeholder, upload the picture and this picture will appear on the back-end and on the front-end for that service.

- Service color – Click on the blue circle and you will see the color options which you can set for each service. This colour will be used for differentiating services on the Calendar in the back-end.

- Name – Here you need to write the service name, which is required.

- Category – Here you need to select the category that this service belongs to.

- Show service on site – Here you can choose whether the service that you create will be shown on site or not. By default, this option is enabled so services will be shown on the booking form on the front-end available for customers’ booking, but if you need to have some service just for making appointments on the back-end then you can disable this option for the specific service.

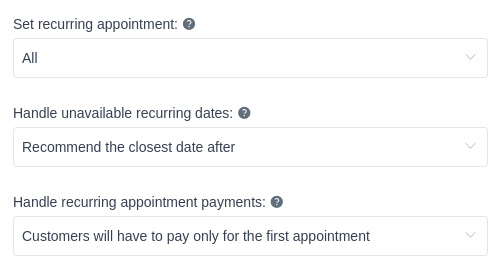
- Set recurring appointment – This gives you the option to enable recurring appointments for this service in a free (All), Daily, Weekly, or Monthly fashion. Once you select one of the offered selections, two new options will appear:
- Handle unavailable recurring dates – how the plugin will offer the replacement dates/times if there’s an unavailable time slot in the recurring list;
- Handle recurring appointment payments – allows you to choose whether the customers will pay only for the 1st appointment, or for all appointments when booking.
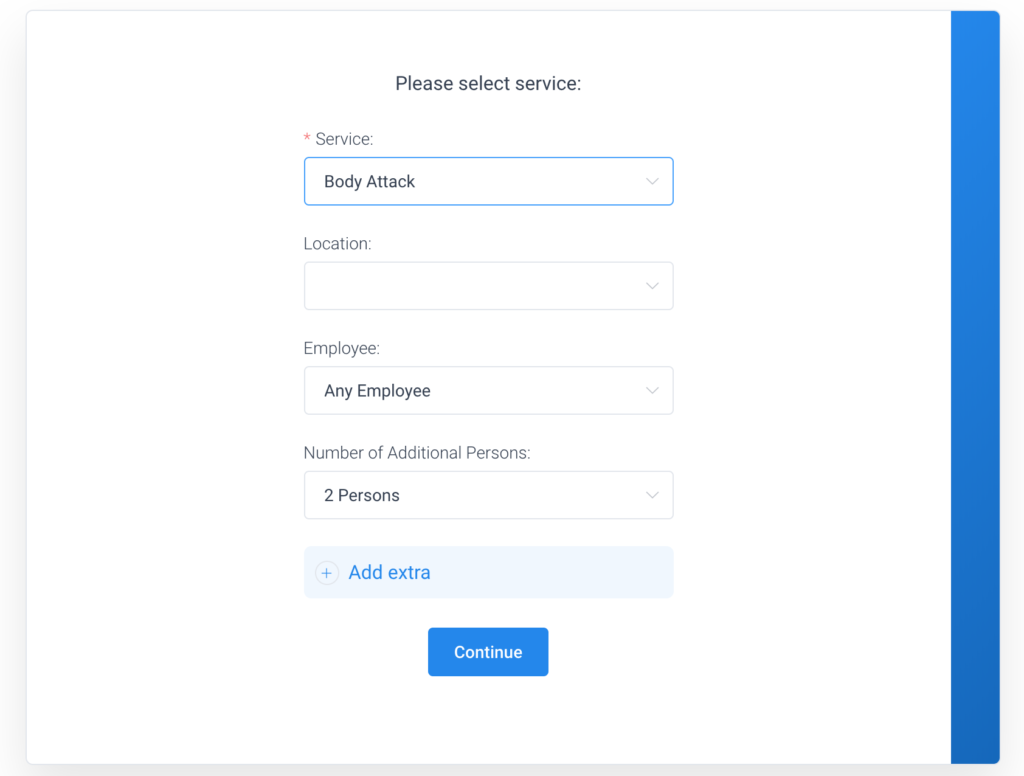
- Employees – Here you select the employees that will be assigned to the service.

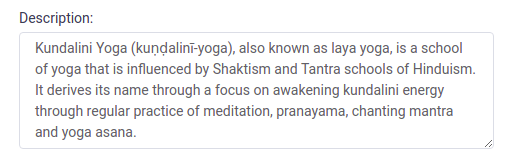
- Description – Here you can add a description that will appear on the front page if you use “Front-end Booking Catalog”. The description field supports HTML, so you can use it here in order to better customize your description.
- Limit appointments per customer – By enabling this option, you can limit how many appointments a customer can book within a specific time frame and period for this particular service. For detailed instructions about this feature, please check out the Roles Settings.
Example:
Limiting the customer bookings as shown in the screenshot above will allow a single customer to book 2 appointments within a period of 1 day. The limitation will apply 24 hours from the time the customer booked the appointment.
- Duration & Pricing – Under this tab you can configure price, duration and capacity for your services. It has the following options:
- Duration – Here you need to choose the service duration. Time slots you see in the “Duration” option are based on the setting defined in the “Default Time Slot Step” in “General Settings”. One more option that you can set regarding the service duration is “Use service duration for booking a time slot” in General Settings. This option you can use if you want to make the time slot step the same as a service duration is in the booking process.
Please note: If you change the “Default Time Slot Step” after you’ve chosen durations for services, it will not affect existing and saved services but it can cause some issues in the booking process, as your time slot will not match durations.
- Price – Here you need to enter the service price. The format of the price will follow the setting from the “Payments Settings”.
Please note: If you don’t want to charge your services just set 0 as a service price and the price calculation and payment methods will be removed from the booking form.
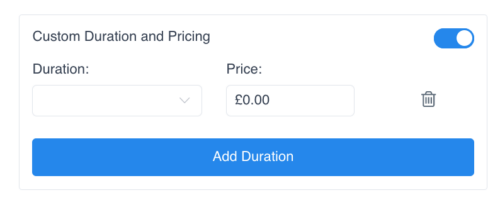
- Custom duration and pricing – This option allows you to set more than one duration and price per service. You set one default price and duration for the service in the aforementioned options, and if you need more durations, and prices accordingly, you enable ‘Custom duration and pricing’, and set as many durations as you need for the service. Please note that the option will become available only after you set the default Duration of the service. You can read more on how to use this feature here.
- Enable deposit payments – This option allows you to enable deposit payments for the specific service. The option will not be visible if you set 0 as service price, but once you set a larger price the option will appear and when enabled show more options. Detailed explanation about deposit payments you can read here.
- Buffer Time Before and Buffer Time After – These options give you the possibility to set the time before and after the appointment that needs to be reserved so that another booking for the same service and employee would not be made. It will not be seen on the front-end, but it will reduce the number of free time slots in the schedule of the employee. “Buffer Time Before” can be interpreted as the time your employee needs to prepare for appointments, while “Buffer Time After” is the time after the appointment that your employee needs to rest, clean up, or do something else before being able to accept the next appointment. Like for the “Duration” option, the time slots you see here are based on the setting defined in the “Default Time Slot Step” in “General Settings”.

- Minimum Capacity and Maximum Capacity – Here you can enter the minimum and the maximum number of persons per single service booking. If your company has a need for a group appointment (for example classes, tours, group training, etc.), this is where you’ll define its capacity. This option is available for every employee, so you can define a different capacity for each one.

- Show “Bringing anyone with you” option – Here you can choose whether you want to show or hide the “Bringing anyone with you” option. If you hide this option from the Booking form you will only allow individuals to book a group appointment.

- Multiply price by the number of people – Here you can choose whether the service and extras price will multiple by the number of people added with the “Bringing anyone with you” option. By default, the option is enabled which means that the price multiples by the number of people added.

- Gallery – In this tab, you can add images to your service. These images will show up on the front page of your service if you choose the “Front-end Booking Catalog”. By clicking on the “Add Image” button, you can upload images from your device or choose them from your media library. By dragging them, you can adjust their order in which they will be shown on the front page of your service. If you hover over the image you will see a trash can so single click you can delete it.

- Extras – Extras allow you the possibility to add additional services or products customers can buy when they are scheduling the appointment. By click on the “Add Extra” button, new options will appear:
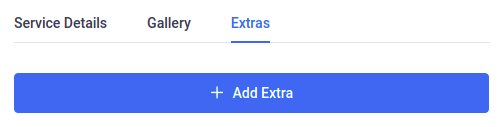
- Name – This is the place where you will enter a name for the extra. Besides the name, you will see the “Translate” option so you can translate extra name in multiple languages and use it on the multilingual website.

- Duration – If you want to define additional services and give them a duration, this is where you do it. Duration is not required because there can be extras that your customers can buy without affecting the appointment’s duration (e.g. special equipment).
- When you create at least one extra, you will see an option to choose whether the extras will be mandatory in the booking process or not, and this option will show up above the extras list. If you enable the option “Set extra as a mandatory field“, you will be able to choose the minimum number of extras that will be mandatory for booking when the customer books the service they are created for.
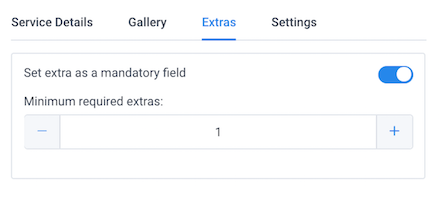
Please note: If your extra service has a duration, you should know that currently extra time will not be multiplied by the number of persons in the booking or extras quantity, so you will see time for just one extra.
- Price – This is where you set a price for your extra product or service.
- Maximum Quantity – Here you can set the maximum number of extras that one customer can choose in the booking process. For example, if you set 1, a customer will only be able to add one extra to the service. If you set more, your customers will be able to add a larger number.
- Multiply price by the number of people – Like the Services, the extras also have the option to choose whether their price will be multiplied by the number of people in the appointment. If you disable this option the price for extra will be the same no matter what is the number of people chosen for the “Bringing anyone with you” option. On the other hand, if you enable this option the price will be multiplied by the number of people added.

- Description – Like in the service dialog, this is where you add a description about this extra that will appear on the “Front-end Booking Catalog”. Same as the Extra name you can also translate the extra description using the “Translate” option beside the description and use it on a multilingual website.
Additional Settings
Some of the General Settings that are applied to all services, can be set for each service separately as well. You can set these options to be different per service: default appointments status, minimum time required before booking, minimum time required before cancelling/rescheduling, the period available for booking in advance, and redirect URL after booking. You will find these options when you create or edit a service under the Settings tab. By default, these settings will have the same values as in General Settings.
It is possible to set different WooCommerce products for different services. By default, all services are connected to one WooCommerce product, but if you create multiple products you will be able to choose a product that will be connected to each service. Once you enable WooCommerce as a payment method, go to the Services page, open one of the services and you will see a Settings tab. When you choose this tab you will see the option “Select WooCommerce product” where you can choose a product that will be connected to this service. This way, you will be able to set different taxes and other WooCommerce options for each product and each service in Naldoria.

There is also a possibility to set different payment methods for each service. If, for example, you have one service for which you want your customers to pay on-site and another one that requires payment during the booking process, you can set this now. In order to see the options first, you need to enable all payment methods that you want to use in Payment Settings on the Settings page. After you’ve done this, go to the Services page, open service and you will see the Settings tab. Enable the payment method that you want to have for that service and click Save.
There is also a possibility to set different payment methods for each service. If, for example, you have one service for which you want your customers to pay on-site and another one that requires payment during the booking process, you can set this now. In order to see the options first, you need to enable all payment methods that you want to use in Payment Settings on the Settings page. After you’ve done this, go to the Services page, open service and you will see the Settings tab. Enable the payment method that you want to have for that service and click Save.
Please note: If you disable all payment methods for one service, that service will have default payment method set in Payment Settings on the Settings page.
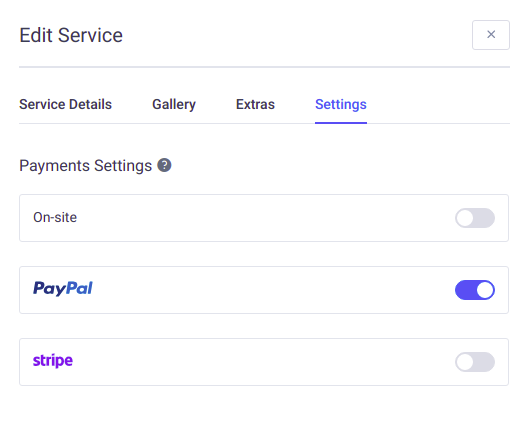
After you’ve entered all of the data, click “Save” and your service will appear on the page.
In the page header, you can see the total number of your services. You can have as many services and service extras as you need, and if you have a large number of services you can filter them by clicking on the category title.
Please note: When you edit a service and change the service capacity or price, once you click on the “Save” button you will see the message to choose whether you want this change to be applied only for the service or for the all assigned employees. If you choose the first option you will change a service setting and these changes will be applied only to employees created afterward. But if you choose the second option you will change this setting for all assigned employees regardless of whether they have a custom setting or not.
There are three more important options in the “Edit Service” dialog: “Duplicate”, “Hide” and “Delete”. The “Duplicate” and “Hide” options are available for users with administrator and manager roles, but the “Delete” option is only available for administrators.
“Duplicate” is a helpful option when you have several similar services. By using it, you won’t have to enter them all again. Open the service you want to duplicate, in the bottom left corner click on the “Duplicate” button, and the same service, will open again (just the copied version).
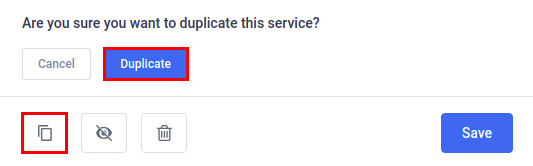
Next to the “Duplicate” is the “Hide” button. If you don’t want to delete your service, but you will not need it for some future period, you can hide it by clicking on this button. The hidden service will still be visible on the back-end of your plugin (in a gray color and with the hidden sign), but it will not be visible on the front-end of your website.
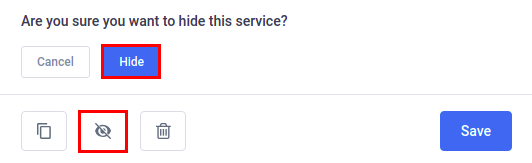
Please note: If you hide a service, you will also hide the employees and locations that are connected only with this service. If they are connected with some other service too, they will stay visible.
The “Delete” option is available only for the WordPress administrator. If you want to delete a service, click on the desired service, and in the “Edit Service” modal that appears, find the “Delete” button at the bottom left corner of the modal. Click on the “Delete” button, and one of three messages will appear depending on the number of connected appointments:
- If your service doesn’t have any connected appointments simply confirm your deleting,
- If your service has past appointments, you will see the information about the number of appointments and you will have to confirm your deleting,
- If your service has appointments in the future, you will be so informed and you will not be able to delete it.
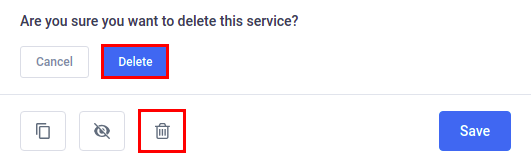
Please note: If you delete services with appointments in the past, you will also delete all past appointments, so if you want to keep records of your past appointments, the best way is to hide the service to preserve historical appointments data.
Sorting the Services
You can sort services in the list by choosing the type of sorting in the “Sort Service” dropdown or you can do this by the drag and drop option in the list. The order that you set here will be the order in which services will appear on the front-end forms for booking.
In the “Sort Service” dropdown you have four main options: Name Ascending, Name Descending, Price Ascending, and Price Descending, but you also have Custom as an option which will be automatically chosen if you move any service on the list with drag and drop option. For making the custom order by drag and drop, just click on the burger icon which you will see on each service, and drag and drop the service on the list.

Understanding appointments
There are two different types of appointments each of which is based on the maximum capacity of the service that is delivered. An appointment is considered as a “Single” appointment if the maximum capacity of the service is 1. If the maximum capacity is higher than 1, the appointment is considered as “Group”. There are two types of group appointments:
- Group appointments where all customers are separate (usually the case when they don’t know one another).
- Group appointments where one customer defines a number of persons that are coming with him or her.
The main difference between these two is that in the first one every person appears in the appointment separately, with all details defined, such as name, email, appointment status, payment details, etc.; this means that any person can cancel his/her participation in the appointment separately.
The situation with the second type of group appointments is that only the person who has scheduled the appointment has a name, email, appointment status, and payment details. The others are seen as +1.. +10 “addition”. So if one of them decides to cancel his or her participation in the appointment, there are two options: either they will cancel for all, or you need to reduce the number of persons in the “Edit Appointment” dialog.
Each appointment can be made through one of three booking forms in the regular process or through the WooCommerce checkout if you want to use some other payment method, connect WooCommerce invoices, or include taxes.
Appointment statuses
Statuses are the appointment state indicator, that indicates whether the arrangement is approved, pending, cancelled by customers, or rejected by the employees.
Currently, there are 4 statuses:
![]()
In the plugin General Settings, you can set for all your appointments to have an Approved or a Pending status by default. If you choose Approved, all appointments will be automatically confirmed to the customer immediately after the scheduling.
![]()
If you choose Pending, you will need to manually approve all appointments after they are scheduled. The appointments can be approved by the administrator and by the manager, and if you enable notification for this action, both employee and customer will get informed about this action.
![]()
Cancel status allows your customers to cancel the appointments through the back-end of the plugin. Once they log in, on the Appointments list they will see the Cancel button beside each future appointment. After they cancel the appointment on your list will get display Cancelled. If cancel notifications are enabled your employee will also be informed.
![]()
Last but not least, Rejected status allows Admin, Manager, and Employee users the option to Reject Approved or Pending appointments. You can also set a notification for this action, so once the appointment is rejected, both customer and employee will receive an email notification.
You have two possibilities for changing appointment statuses: you can change it directly through the appointments page, or you can open the appointments dialog and change the status. For the first option, on the appointments list, click on the appointment status drop-down and change the status. For the second option, click the edit button beside the appointment, the Appointment dialog will open. Click on the status button, and you will see a drop-down where you will be able to choose a new status. The main difference between these two is that in group bookings, by clicking on the first option you are changing the appointment status for all members of the appointment, while the second option allows you to change the status for each member separately.
On the appointments page, you will see a status filter so at any point you can filter your list to see appointments with one specific status.
Duration
Appointments’ duration depends mainly on the service duration, and also on the duration of any added extras. If, for example, you have a service that lasts 2 hours together with an extra service that takes an additional 30 minutes, if your customer chooses the extra service, he or she will see 2 and a half time slots when they choose a time slot for their appointment. If they choose a service without an extra, the duration of the appointment will be the same as the service duration (2 hours).
Buffer time
Buffer time (before and after), that you’ve set when you configured services, is the time that doesn’t affect appointments duration but reduces the number of free time slots in the schedule. If, for example, you have configured a 30 minutes buffer time before for the service that lasts 4 hours, your customer will see 4 hour time slots during their booking, but they won’t see the 30 minutes buffer in the time slot. The next time someone tries to book the same service for the same employee, the next suggested slot will appear 30 minutes after the first appointment finishes.
Price
The appointment price depends on the service price, the extras price, and the number of customers. Price is calculated with a “service price+extra price” formula, and both are multiplied for every additional customer in the group appointment. Please note that you can set a different price for each employee, so the appointment price can depend on which employee is chosen.
Through the front-end: Here, the customer takes the initiative of scheduling an appointment with the website, while you have the option to change the appointment status, reschedule, cancel, or assign another employee.
- Through the back-end: This approach allows admins and managers to schedule an appointment from the WordPress dashboard. This is the best way to schedule an appointment if you have a customer on the phone or have just received a message from a customer requesting an appointment.
In this chapter, you’ll see how to schedule appointments through the back-end. The following process for scheduling an appointment begins after you click the “+ New Appointment” button located at the top of the page or the “+” (plus icon) button in the bottom right corner of the page. Once you click on any of the buttons, a “New Appointment” dialog will appear, allowing you to choose all necessary information in order to create a new appointment.
“New Appointment” dialog is divided into two tabs:
- “Schedule”: Use this field that you must populate pane to create a new appointment. “Customer(s)”, “Service”, “Employee”, “Date”, and “Time” are mandatory and you need to populate these fields to schedule a new appointment. There is no specific order in selecting “Customer(s)”, “Service” and “Employee”, but before you can choose the appointment date, you have to populate these three fields. After selecting the date, you will be able to select the time of the appointment:
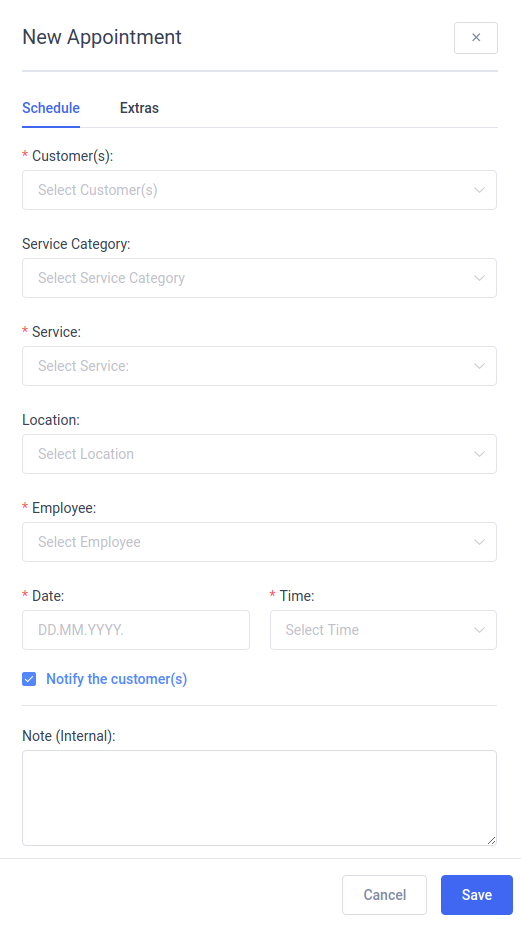
- “Customer(s)”: Here you need to select the customer(s) to whom the service will be provided. If the customer is not an existing customer, click the “Create New” button. The “New Customer” dialog will open and you’ll be prompted to add basic details, such as the customer’s first name, last name, email address. Creating a new customer is described in greater detail in the “Managing single Customer” chapter. The newly created customer will be added to the appointment. Each selected customer represents a single customer booking. After selecting the customer(s) you will be able to configure the number of persons for each customer booking. This can be useful when one customer wishes to book an appointment for several people. This is possible if services allow you to have more than one customer at the same time. It is also possible to change the booking status of each customer booking separately.
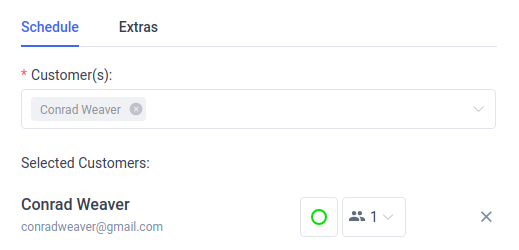
- “Service”: Select the service that will be delivered to a customer(s). Once you select the service, it will narrow down to the employee and location options. You will only be able to select employees that are assigned to provide the selected service and the locations where this service is offered.

- “Employee”: Find and select the employee that you want to provide the appointment. Selecting an employee will narrow down to the service and location options, so you will only be able to select the services that the chosen employee provides and to the work location of the employee.

- “Apply Coupon”: If you wish, you can add a coupon here in order to reduce the appointment price. Find and select the coupon that you want to apply for the appointment. Only coupons that are created for the chosen service will be available in the list. You can read more about creating coupons on the Finances & Coupons page.

- “Date”: Select an available appointment date from the date picker. Dates won’t be available until you choose the customer(s), service, and employee. Once you have selected the appointment date, you will be offered available time slots in the “Time” drop-down.

- “Time”: Choose the time of the appointment from the available time slots.

- “Service Category”: While this field is not required it will make it easier for you to select the service by filtering the services of the chosen category.

- “Location”: While this field not required, it will make it easier for you to select the employees that work in the selected location. The field is not visible if you don’t have at least one created location.

- “Notify the customer(s)”: When this option is checked, a notification that contains the summary information for the booked appointment will be sent after you save this appointment. To configure this option, view the “Notify the customer(s) by default” setting in the “Notification Settings”.

- “Note (internal)”: Here you can write a quick note to pay attention to customer(s) particular needs. This note is internal and is not visible to the customer(s).
- “Extras”: After selecting “Customer(s)”, “Employee” and “Service” navigate to the “Extras” tab to add the additional service extra. You can configure the extra for each customer booking. Check the extra item that you want to add to the appointment and choose the quantity of the extra item. If an extra item is chargeable the price of the extra will be multiplied by the number of persons in the customer booking. If the extra item increases the appointment duration it is recommended to select an extra item before you select the appointment time because selecting extra within a duration can decrease the number of available time slots.
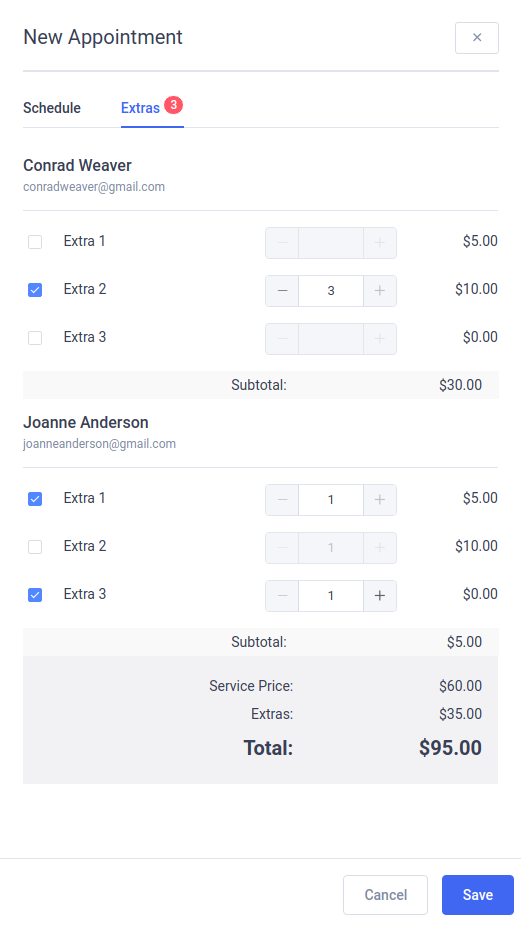
Editing a single appointment
It often happens, that you need to make changes to an existing appointment. Maybe the customer needs to reschedule their appointment, or maybe an employee is unexpectedly out of the office. To edit an existing appointment, simply click on the “Edit” button to the right of the appointment you want to change.

Clicking on the “Edit” button will open the “Edit Appointment” dialog where you can change any appointment parameters. The difference between the “Edit Appointment” and “New Appointment” dialogs is that the “Edit Appointment” dialog has the “Payments” tab where you can see and change payment information.
In the “Edit Appointment” dialog you have the option to reschedule the appointment, change customer booking status, change the employee, change the service… If you are changing the date, you may see that a selected employee is not available for the newly selected date, or that the selected time slot is busy. If this occurs, simply select a different employee or choose a different time slot.
You can choose whether or not to send the customer(s) an email notification of the change, notification by checking/unchecking the “Notify the customer(s)” checkbox.
Once you’re finished, click the “Save” button in the dialog footer to save your changes.

To delete an appointment from the “Edit Appointment” dialog, simply click on the “Trash” icon button and click “Delete” to confirm.
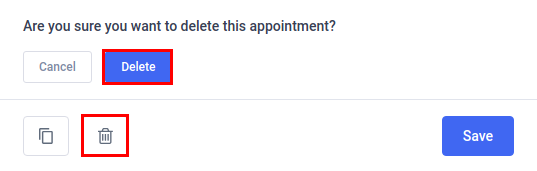
You can also duplicate the appointment by clicking on the “Copy” icon button. It will open a “New Appointment” dialog with the same information as the duplicated appointment. You’ll have to pick an available date and available time slot for the new appointment. Duplicating an appointment might be helpful when you are in a meeting with a customer, and he/she wants a follow-up appointment for the same service and employee.
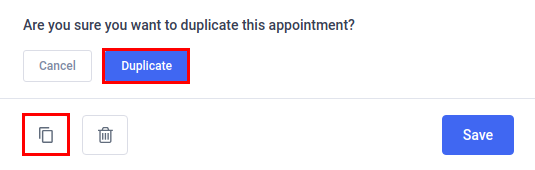
List of Appointments
The “Appointment” page shows all the information about individual appointments. To specify the number of records that are to be displayed, select the required number in the “Default items per page” in the “General Settings”.
With the search input, you can search for appointments by customer’s name, employee’s name, or service’s name.

Your appointments can be exported as a CSV for reporting. At the top right of the “Appointments” page, next to the search input, tap the “Export” icon button. Clicking on the “Export” icon button opens a dialog that allows you to choose the delimiter used for CSV and select the columns you’d like to export. When you are ready tap on the “Export” button in the dialog to download the CSV file.
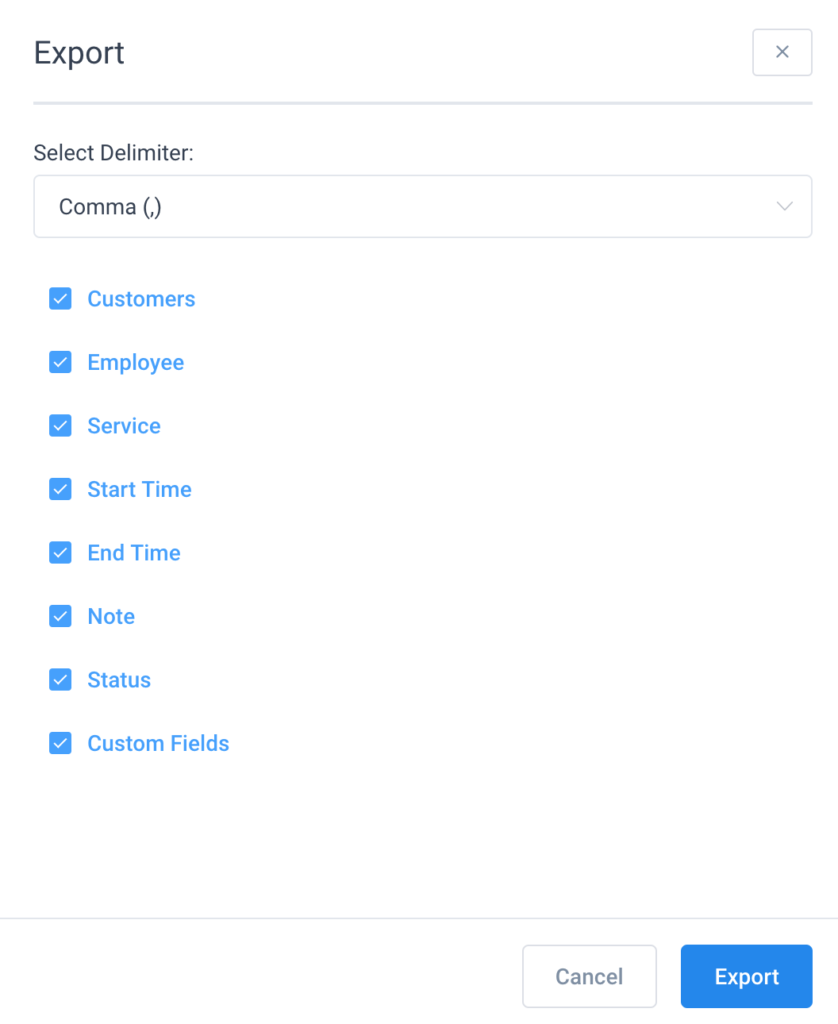
With filters that appear at the top of the page, you can narrow down appointments by common characteristics such as date, employees, customer, services, or status. The date filter is predefined by the period of seven days starting from the current date.

The appointments table is grouped by date and provides information about the appointments such as time, a customer(s), employee, service, duration, payment, and status. You can expand an appointment (row) by clicking on it. An expanded record shows the information about the customer’s phone customer’s email. You can use the “Status” drop-down to change the status of all customer bookings at the time. Click the “Edit” button to open the “Edit Appointment” dialog for the chosen appointment.
You can delete multiple appointments at the same time by checking the appointments you want to delete. The dialog box will appear in the table footer when you check at least one appointment you want to delete. Once you are certain you want to delete the records click the “Trash” icon and then the “Delete” button.

Creating Recurring Service
In order to enable recurring booking for one certain service, you will need to set a couple of new options in the Service modal. Go to the Service page, click “Add Service” or edit the existing one, and in the Service Details tab you will see the “Set recurring appointment” option. By default “Disabled” is chosen in the select box. Besides “Disabled” you will have four more options:
- “All” – this option allows your customers to choose one of all recurring options: daily, weekly, and monthly.
- “Daily” – if you select this option customers will only have the option to set up a daily appointment recurrence. Customers can choose whether the appointment will repeat every day, every 2 days, every 3 days, etc., and also choose the date until the appointment will repeat or to choose the number of repeating’s.

- “Weekly” – if you select just the weekly option, customers will be able to set up a weekly recurrence. Customers will have an option to set up the repeating to be every week, every 2 weeks, every 3 weeks, etc., and also be able to choose multiple days in the week when the appointment will repeat. Same as for all recurrence types, customers will be able to set up the date until the appointment will repeat or choose the number of times for repeating.
Please note: Unavailable dates set in employee’s working hours will be disabled and customer will be able to choose only repeating for days when the service is provided.
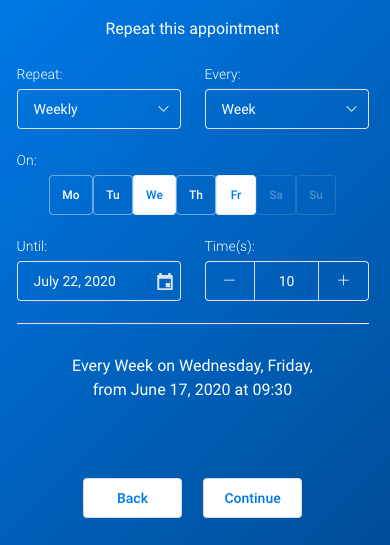
- “Monthly” – if you select monthly repeating customers will be able to set monthly recurrence. Customers will have similar options as for the other recurrence types, the only difference here is that customers will be able to choose whether the appointment will repeat on the same specific date or on the same day in the first second, third, fourth, or last week.
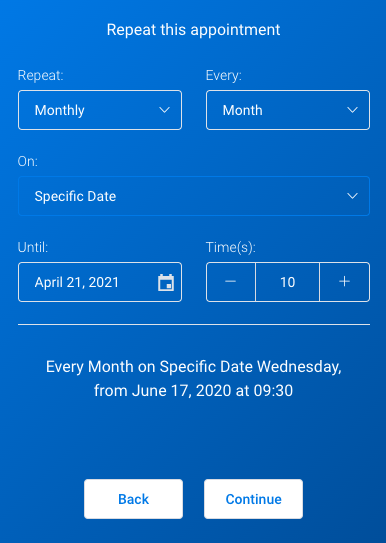
Once the Recurring option is enabled two new options will appear:
- “Handle unavailable recurring dates” – where you can choose the action that will be done if one of the dates is unavailable. You have three options here:
- “Recommend the closest date after” – in the case when the date is unavailable the plugin will recommend the closest date after that date.
- “Recommend the closest date before” – same as the above just the plugin will recommend the closest date before.
- “Recommend the closest date before or after” – the plugin will recommend the closest date before or after that date.
Please note: If the same date has available time slots before or after the chosen time slot the plugin will recommend the closest time slot at the same date no matter which option you have chosen here.
- “Handle recurring appointment payments” with two options:
- “Customers will have to pay only for the first appointment” – where price calculation will be shown for all appointments but the customer will need to pay only for the first one.
- “Customers will have to pay for all appointments at once” – where customers will need to pay for all recurring appointments at once.
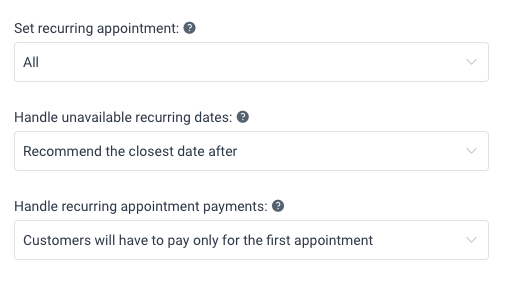
In the picture above the default set of options is shown.
- “Daily” – with this option customers will be able to set daily recurrence (every day, 2 days, 3 days, 4 days, etc.)
- “Weekly” – with this option customers will be able to set weekly recurrence (every week, 2 weeks, 3 weeks, 4 weeks, etc.) and to choose several days in the week when the appointment will repeat.
Setting up a recurring list in the notifications
In order to send the list of recurring appointments in your notifications, you need to copy and paste the %recurring_appointments_details% placeholder to the notifications. Once you do that go to the Settings page, open Appointments Settings, and you will see the option “Recurring placeholders”. By default in this field, you will have just %appointment_date_time% placeholder which means that the list of recurring appointments will be sent just with the date and time of each appointment. If you want some additional data to be sent in the list, all you need to do is to copy the placeholders from the notification page here and the list of recurring appointments will be sent with those data.
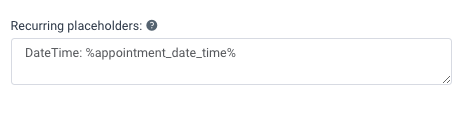
Booking the recurring appointments
Once you set up everything above your service will now get an option for customers to schedule recurring bookings. Once a customer chooses the service and proceeds to the calendar with available dates the recurring option will be available.
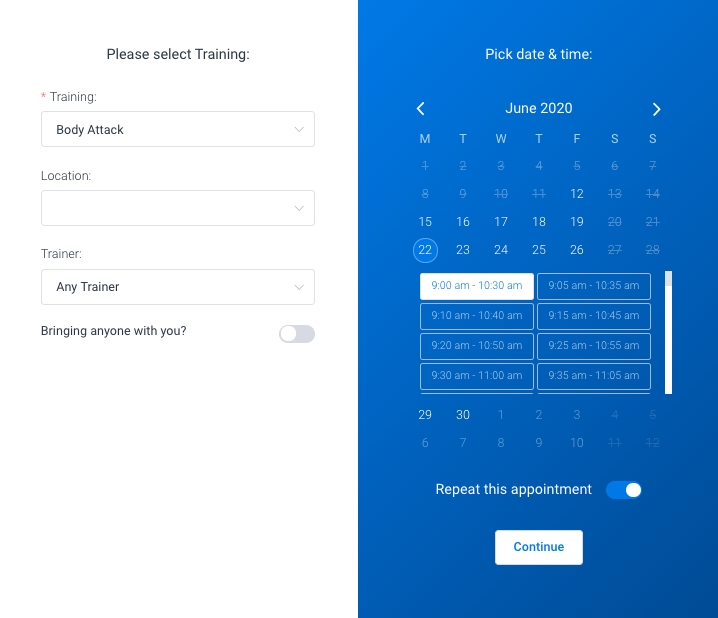
The customer needs to choose the date and time slot and then enable the “Repeat this appointment” option before he clicks “Continue”.
If the “Repeat this appointment” option is enabled the customer will see another step in the booking form to set up recurrence (this step is shown above in the part where service settings are explained for each type of recurrence).
After the customer chooses recurrence and proceed to the next step the list of recurring appointments will be shown with an option to edit or delete each of the recurring appointment.
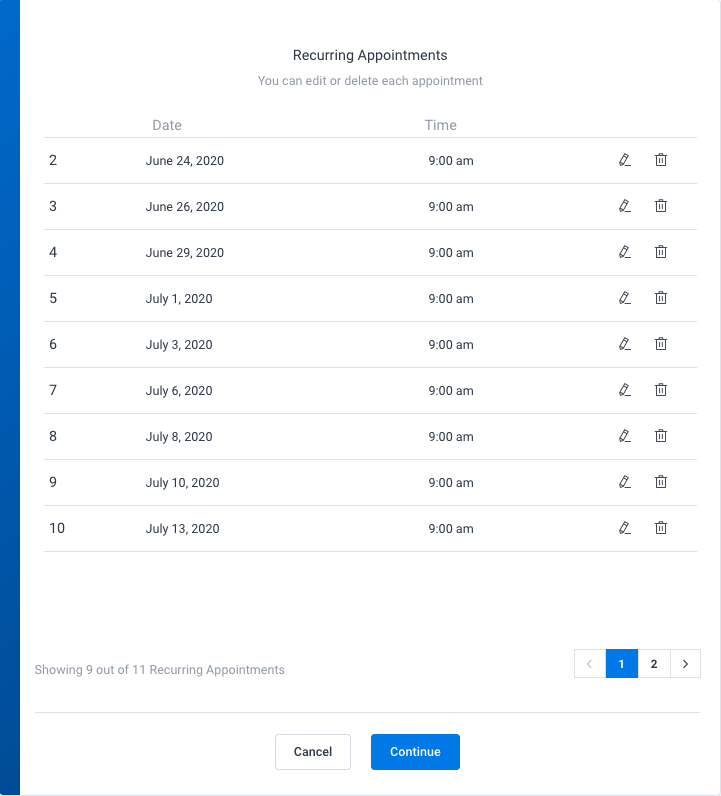
If some appointment isn’t available the adjusted time will be set and the whole appointment will be marked so the customer can know if he wants to change it or delete it.
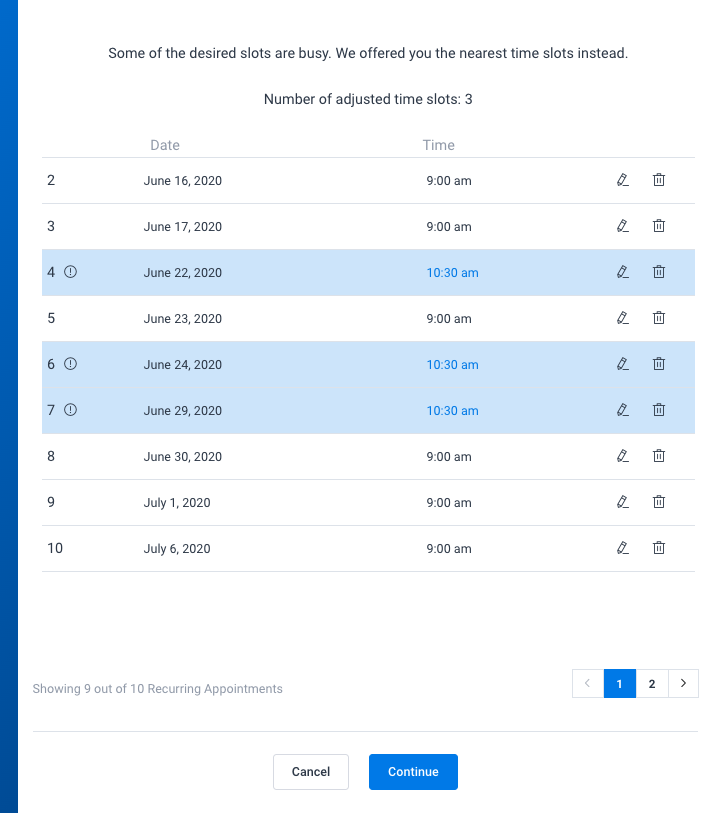
Using coupons with recurring appointments
Using coupons for recurring appointments will be possible based on the settings that you set on the coupon side. If you set a large coupon limit and don’t set a limit for each customer, your customers will be able to use coupons for all recurring appointments no matter if they are paying just the first one or all of them. However, if you set a limit and the customer during the booking reaches that limit a message that a coupon limit is reached will be shown with a notice about the number of appointments on which the coupon has been applied.
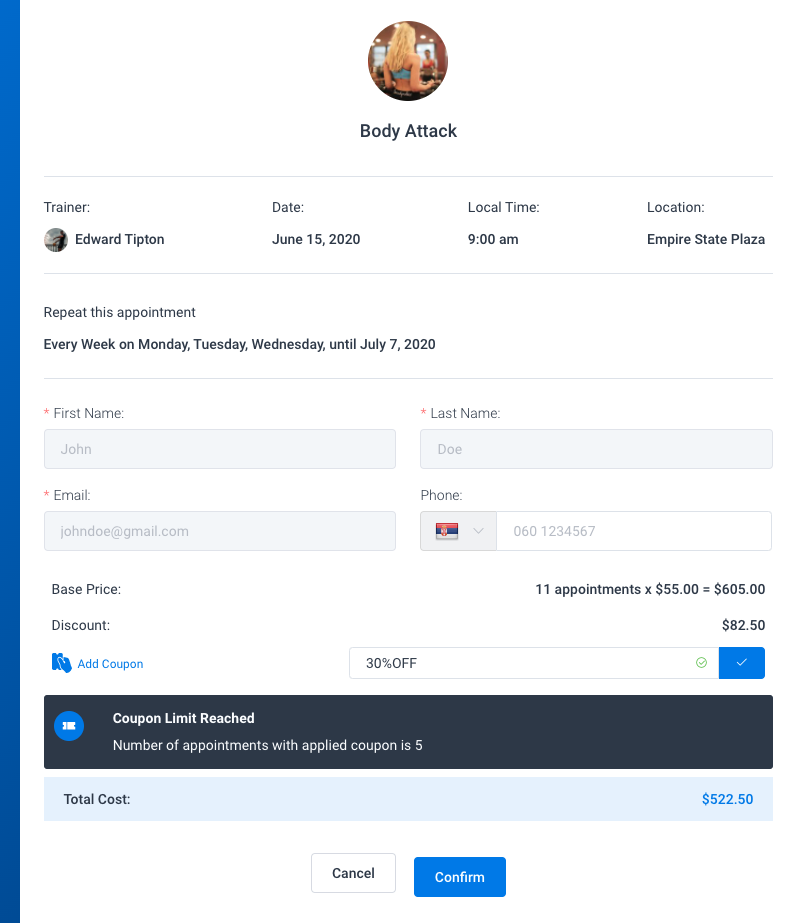
Configuring the Custom Duration of Services
When creating a new service, or editing an existing one, navigate to the “Duration & Pricing” tab in the top menu of the service. In there, you can define the default duration and price of the service. In order to enable the Custom Duration, you need to enable the “Custom Duration and Pricing” slider below the “Capacity” fields:
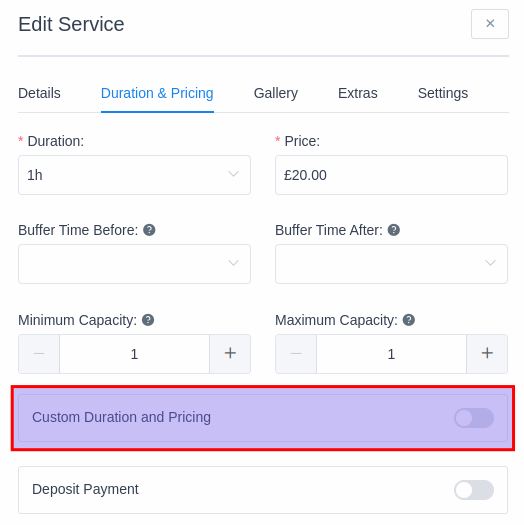
Once this is enabled, you’ll be able to configure the custom duration and the custom prices for the Service. Like all time periods in Naldoria (service duration, employee work hours, breaks, buffer times), the offered duration depends on the Default Time Slot step, configured in Naldoria’s General Settings.
In the example below, the Default Time Slot step is set to “30 minutes”.
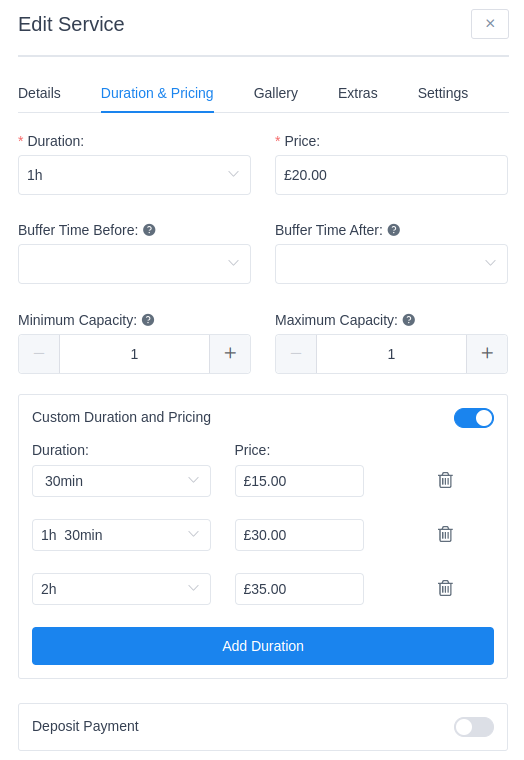
Depending on the Default Time Slot step, you have the freedom to configure Custom Duration anywhere between 1 minute and 8 hours.
Once you configure this, the price of the Service and the Custom Duration periods will apply to all employees assigned to this service. However, just like before, you can configure the price of Custom Duration per employee.
Configuring the Price per Employee
As mentioned above, the price of all Custom Duration periods will be applied to all employees, but you can navigate to the Employee’s section in Naldoria’s, select an employee and change the price this employee will provide the custom duration (or the Service) for.
In the “Assigned Services” tab, in the Employee’s profile, you’ll see the list of all services the employee is assigned. The services that have at least one Custom Duration period will appear with a pencil symbol on the right:
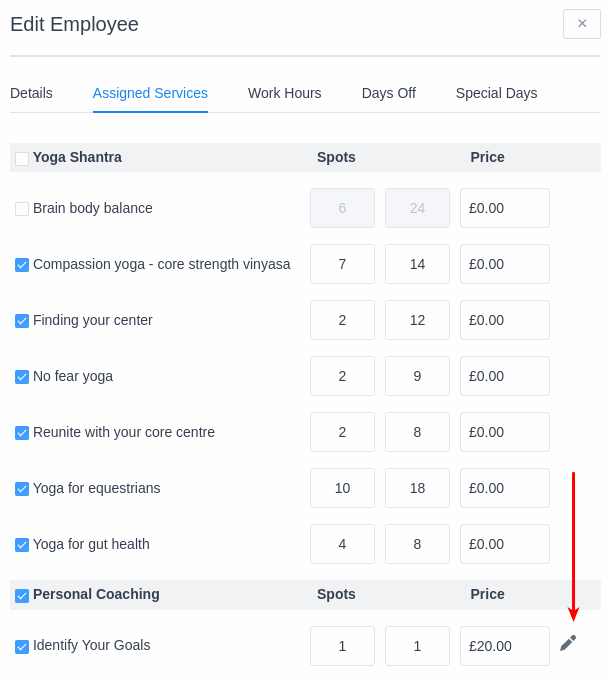
Clicking that pencil symbol expands all available Custom Duration periods below.
Please note: You will not be able to change the duration of these periods, as they apply to the Service, but you will be able to configure different prices for the selected employee, as shown in the screenshot below.
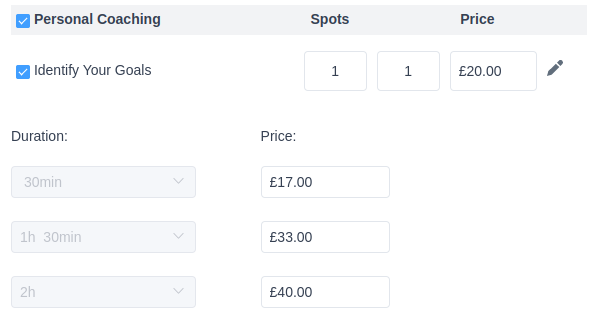
Please note: Make sure that the Work Hours of your employee are long enough to fit all Custom Duration periods + any possible Buffer Times.
Example #1: If one of the Custom Duration periods lasts 3 hours, and your employee’s work hours are from 09:00 – 11:00, the employee will not be able to offer a 3-hour-long appointment;
Example #2: If your service has Buffer Times before and/or after the appointment, you need to take those into account when creating the Work Hours of an employee. If the Service (or one of the Custom Duration periods) lasts 2 hours, and there’s a buffer time of 1 hour, while your employee works from 09:00 – 11:00, the total for the service (duration + buffer time) will be 3 hours, so the employee will not be able to offer a 3-hour-long appointment.
The solution here is to extend your employee’s Work Hours.
Booking a Custom Duration Service on the Front-end
Custom Duration is implemented in all Naldoria’s Service-booking forms (Step-by-Step, Catalog, Search, and the old Step-by-Step). We’ll show you what it looks like in the new Step-by-Step booking form, but it is similar to all appointment-booking forms.
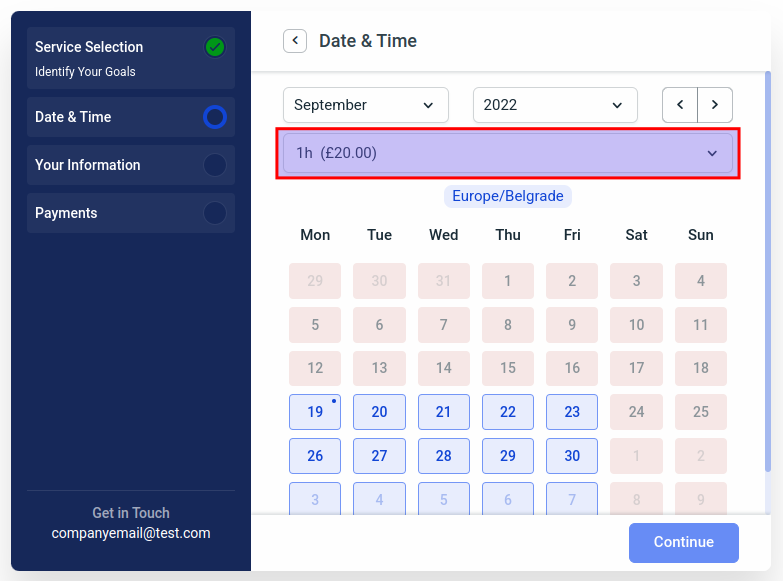
This is a drop-down menu, so in order for customers to select a different duration of a Service, they need to click on the menu:
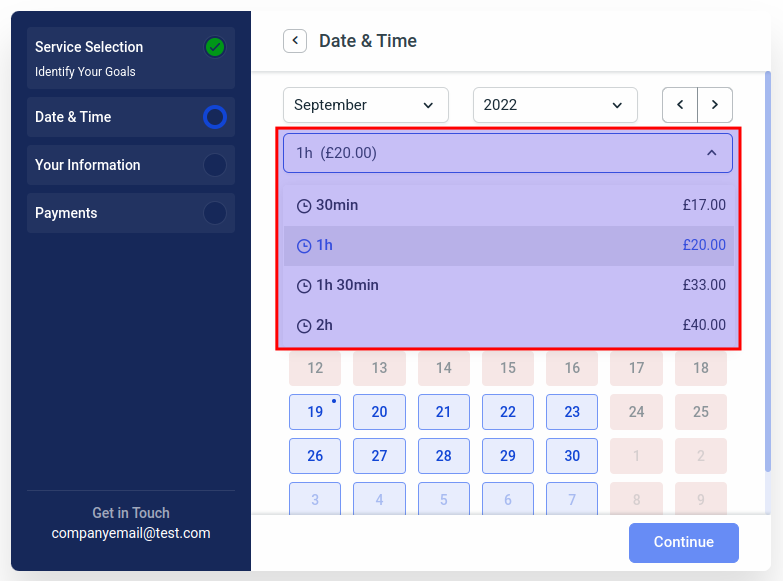
Depending on the employee’s availability, their Work Hours, and other services appointments, the offered time slots will vary.
For example, if the default duration of 2 services is 1 hour, and there’s a 1-hour service booked at 12:00, the customer won’t be able to book a service with Custom Duration (a 2-hour long service) at 11:00. So, Naldoria will allow your customers to choose the duration they want, but it will display the available time slots based on the employee’s availability.
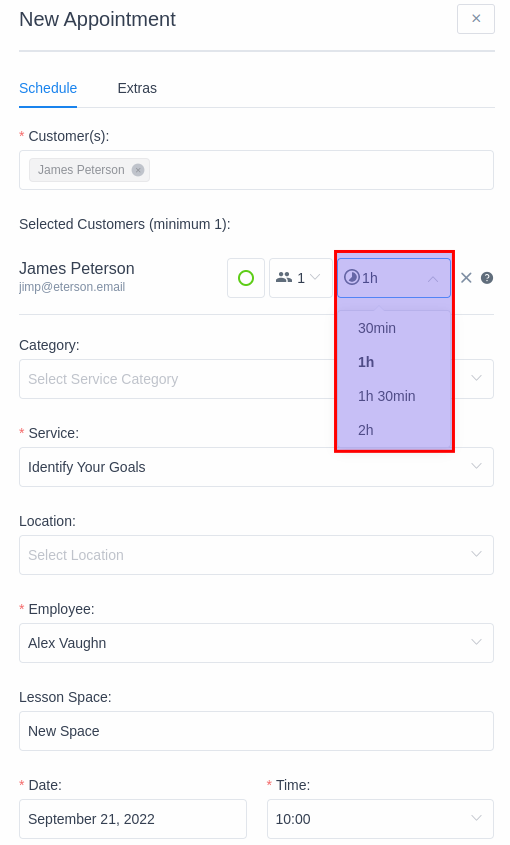
- At the moment, Events cannot be used with Packages, only Appointments (Services).
Creating your first package
To create your first package you will need to set up two things first:
- Create services that you will offer – packages are created from existing services, so you will not be able to create a package unless you’ve created at least one service.
- Create employees and connect them with services – our plugin needs at least one service and one employee created and connected so it can work properly, and the same goes for the packages as well.
Now when you are done with creating service and employee, we can start with creating the package.
To access the Packages page, open the Services page, and you will see the Packages tab. Click on it and your Packages page will be shown.
Click on the “+ Add Package” button and you will see new options for creating the package that will be separated into five tabs:
Package Details is the first tab that consists of several options:
- Picture – you can upload a picture that will be shown for your package on the front-end booking forms,
- Colour – here you can choose a colour of your package that will differentiate this package from other ones on the front-end booking form as well as on the back-end Packages page.
- Name – this is the only mandatory field on this tab because a package cannot exist without a name. Give your package a name that will be shown during the booking but also later on the Customer’s front-end panel and the admin’s backend. Besides the name, you will see the “Translate” option so you can translate the package name into multiple languages and use it on the multilingual website.
- Duration – here you can choose whether your package will have an unlimited or limited duration. You can choose to limit package duration for X number of days, weeks, or months, and you can also set a specific date as the date of expiration.
- Description – here you can set a description for your package that will be shown during the booking to give more details to your customers. Same as the name of the package, you can translate the description since it will be shown on your website if you plan to create a website in multiple languages.
- Limit package purchases per customer – By enabling this option, you can limit how many packages a customer can book within a specific time frame and period for this particular Package. For detailed instructions about this feature, please check out the Roles Settings.
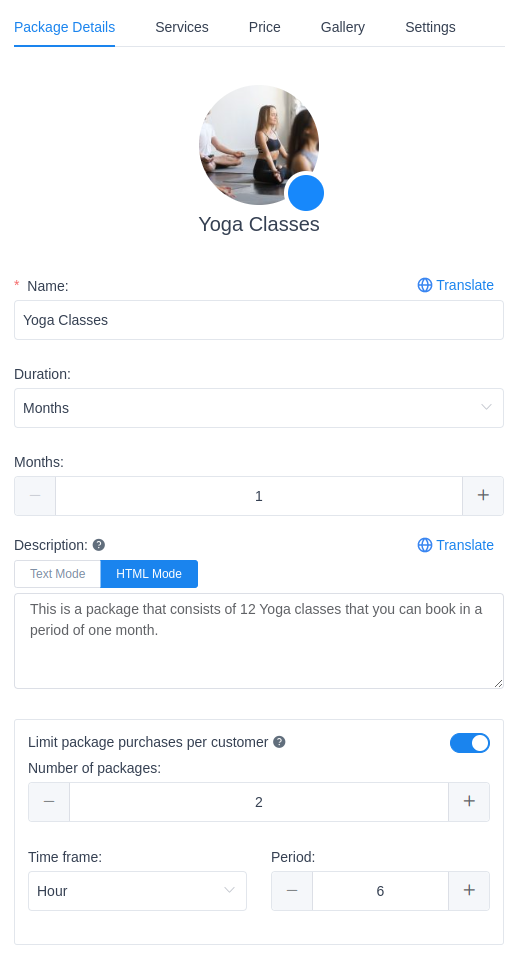
Example:
Limiting the customer bookings as shown in the screenshot above will allow a single customer to book 2 packages in a period of 6 hours.
The Services tab is the place where you will actually configure your package. In the dropdown, select service/s that you want to add to the package, and new options for those services will appear:
- If you add more than one service to a package, the “Total Number of Appointments” option will show up.
- If this option is disabled, you will be able to configure the total number of appointments per service. Example: Each service will have its own number of appointments (service 1 will provide 2 appointments within a package, service 2 will provide 3 appointments within a package, and so on).
- When enabled, you will configure the total number of appointments per package. Example: You will not be able to set the number of appointments per each service, but instead define the number of appointments within a package, so if you set it to 5 and you have 5 services in the package, your customers will be able to book 1 appointment for each service, or 5 appointments for one service, or 2 appointments for 1 service and 3 appointments for another service, and so on.
- The service picture, price, and name will be pulled from the Services page and those cannot be changed here.
- “Number of appointments” is the option that you can use to set the number of appointments that will be included in this package for the chosen service. For example, if you have a Yoga class and you want to create a package of 12 yoga classes that will last 30 days, you will choose just one service in the dropdown and choose 12 in the “Number of Appointments” option. You can, of course, choose multiple different services and set this number of appointments for each. Please note that this option is automatically disabled if you enable the “Total Number of Appointments” option.
- “Minimum bookings required” is the option where you set the required number of appointments for the chosen service that the customer needs to book in order to be able to book the package. You can set 0 if you don’t want to restrict customers and as a maximum number here you can set the number chosen in the “Number of appointments” option.
- “Maximum bookings required” is the option where you set the maximum number required for booking. It is added here to allow you to have one more option – to allow customers to purchase a package without any booking. This is possible if you set 0 as both, minimum and maximum required bookings, in that case after the customer chooses a package our plugin will automatically redirect the customer to the info and payment step, skipping the calendar.
- “Employees” – this option allows you to choose which employees assigned to the service will provide the service in the package. This gives you flexibility because if you use both services and packages you don’t need to have all employees assigned to the service assigned in the package as well. If you don’t check any employees, our plugin will connect the package with all employees assigned to the service.
- “Locations” – same as for the Employees option here you can choose locations that will be included in the package for a service. If you don’t check any location our plugin will connect the package with all locations assigned to the service.
Editing a package with the “Total Number of Appointments” turned off:
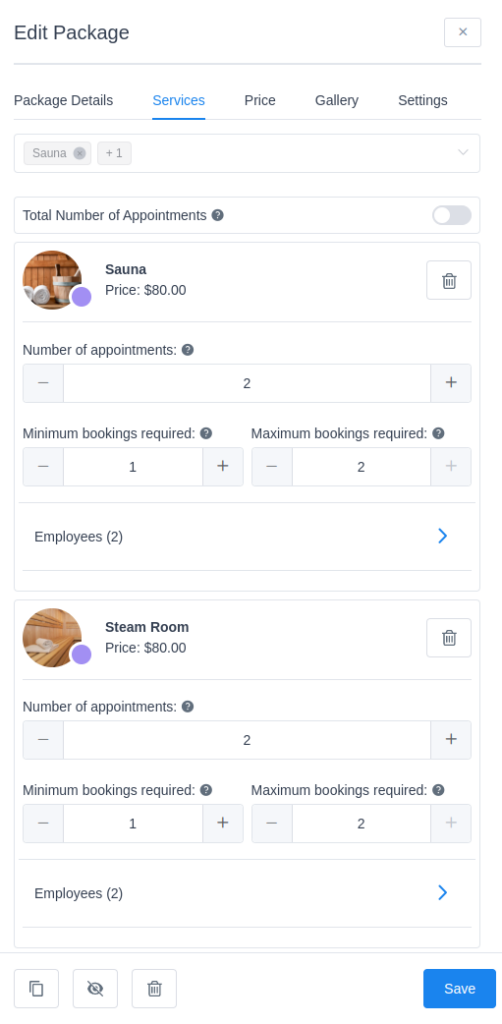
Editing a package with the “Total Number of Appointments” turned on:
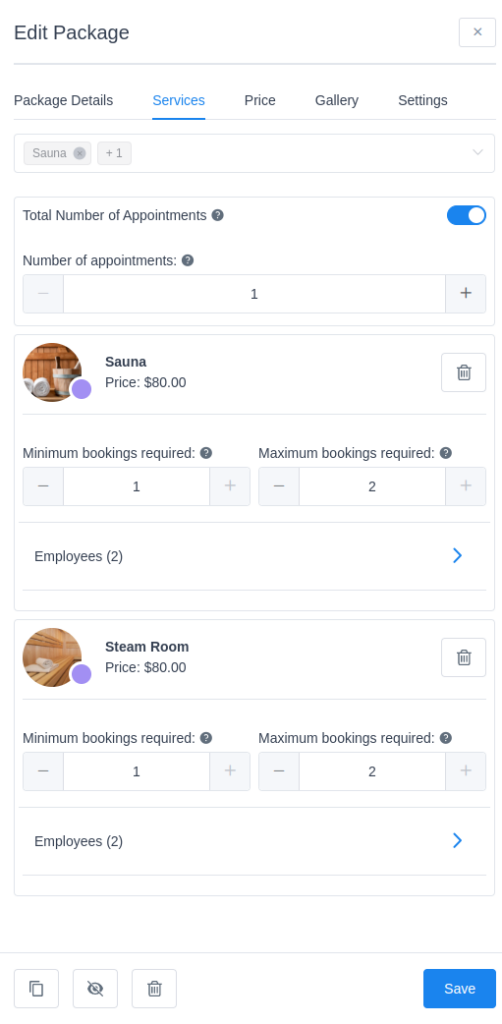
Please note: If you want to sell a package without any required booking in the Service tab for all selected services just set “Minimum booking required” and “Maximum booking required” to be both 0 and the customer will be able to purchase a package without choosing a date or time slot.
The price tab is very simple and you can use it to set the price for your package. You have two options here:
- Custom price – if you select this option that means that you can set a custom price that will be different from the total calculated price of all appointments (services) that you added to the package. In “Price” you can simply enter the price for your package and in the “Discount” you can also set the discount that the package will have if you want to show it as a deal on the front-end booking form. If you set a discount, your customers will see this on the package to interest them to purchase a package of services rather than a single service.
- Calculated price – If you choose this option this will mean that price of the package will be calculated as the total price of all appointments and services added to the package. If you have chosen “Calculate price” you will see the option “Enable deposit payments” so you can set up deposit payments for the package. More about this option you can read here.
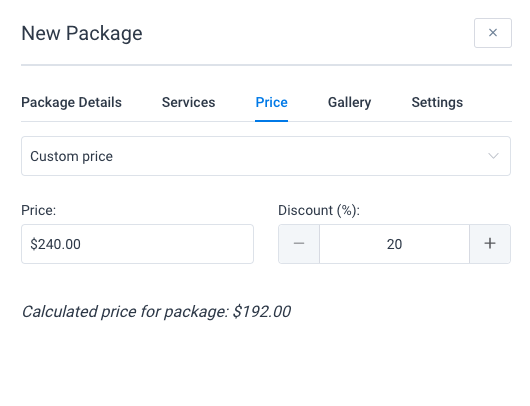
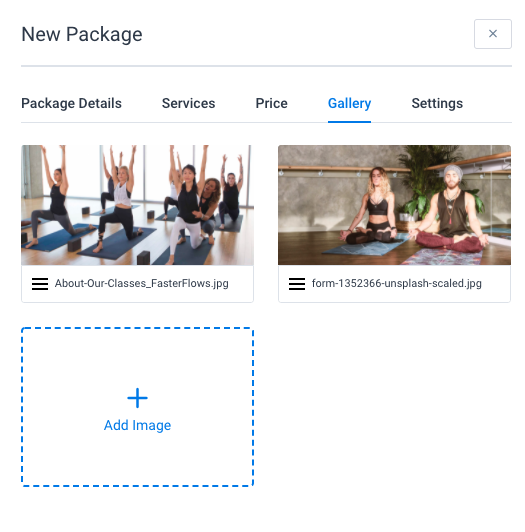
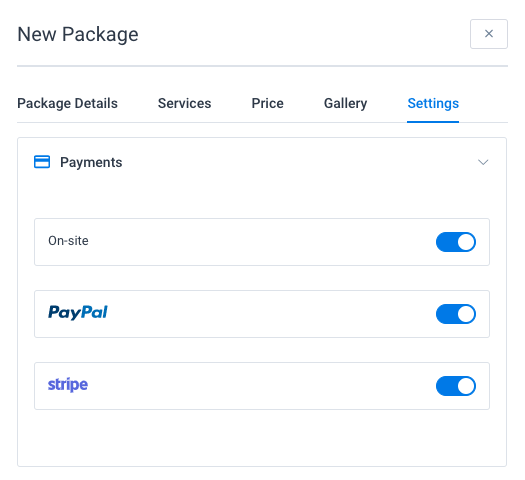
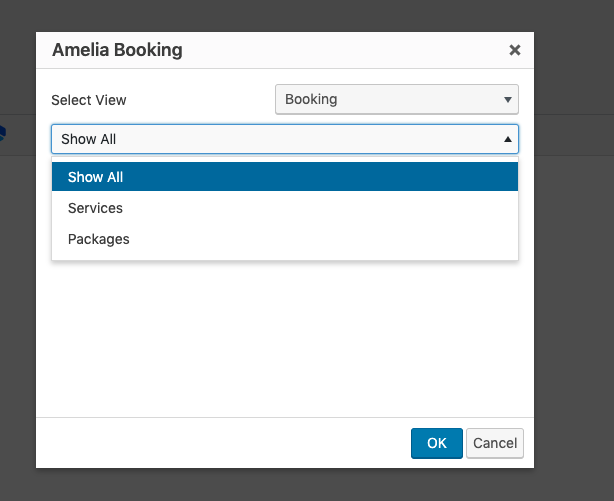
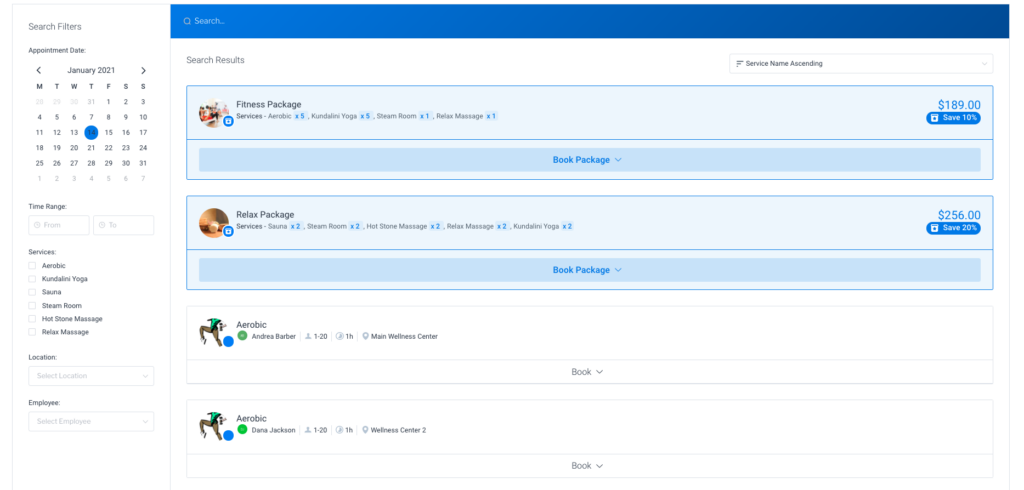

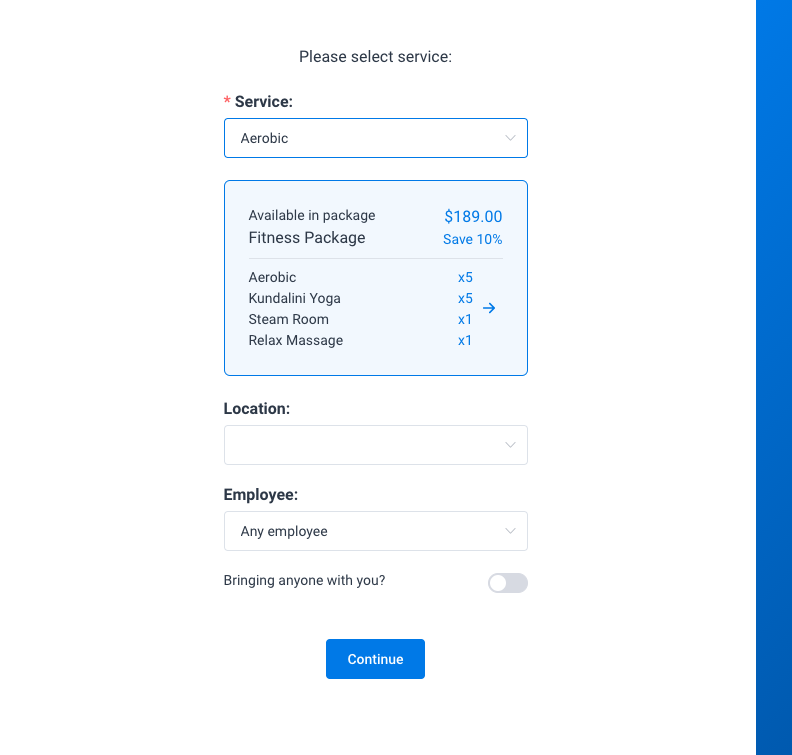
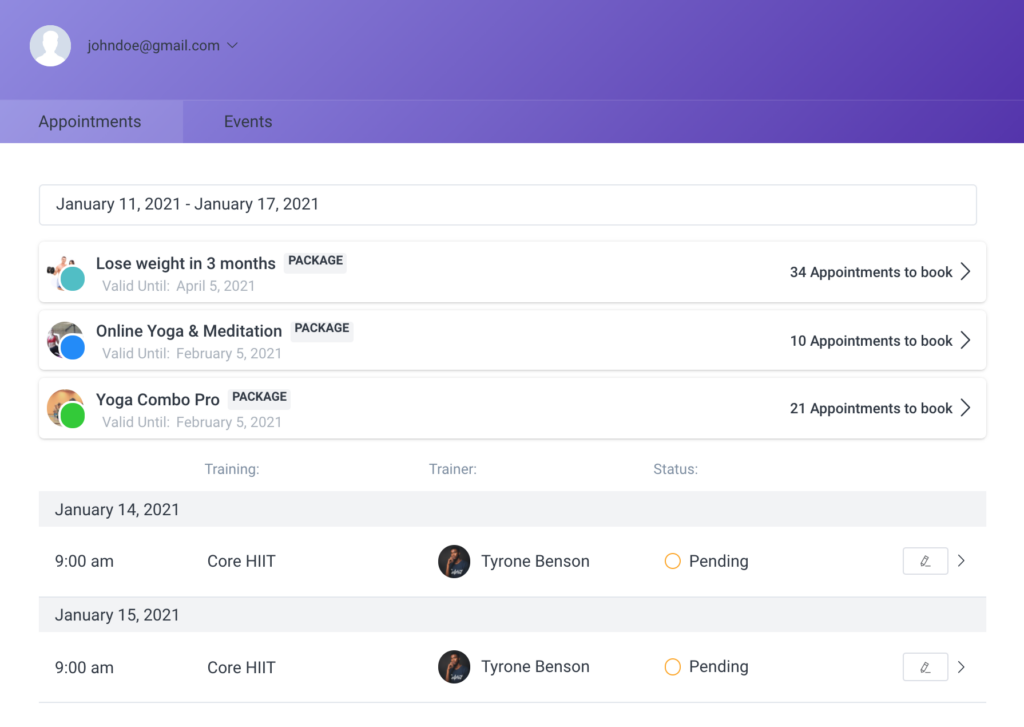
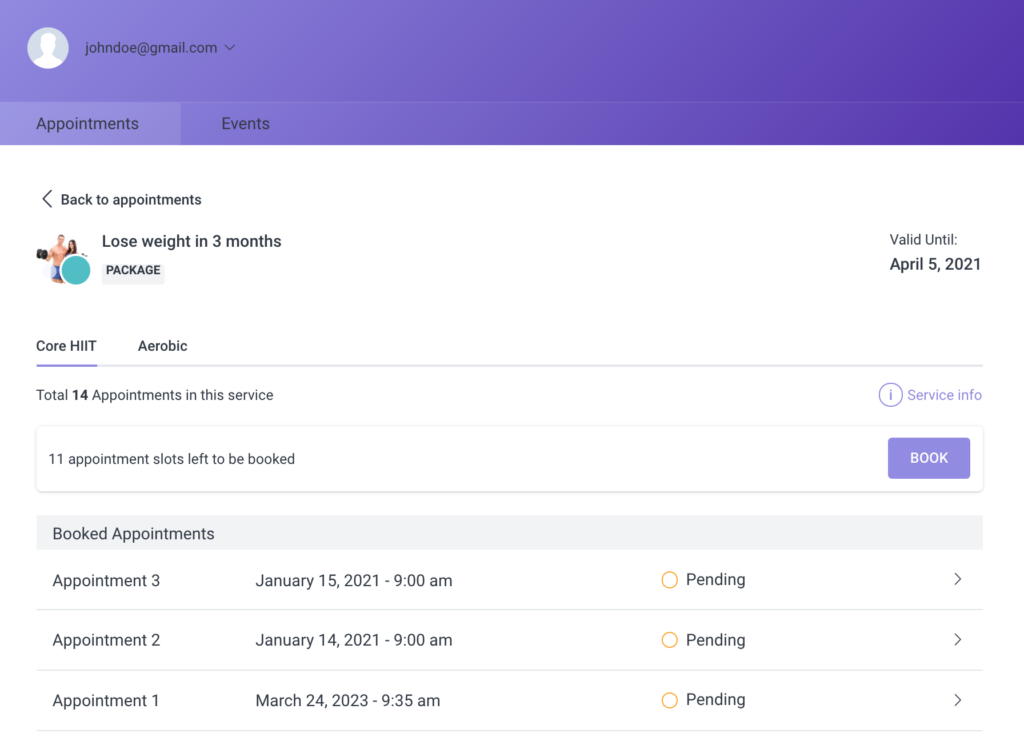


The admin can check and manage purchases of packages in the back-end of Naldoria. They can book packages for customers, book only appointments in already purchased packages, edit the booked packages and cancel the purchases (or open the already canceled ones) when needed. This can be done on the Services page, under the Packages tab for each package there is the Manage Packages button next to Edit.
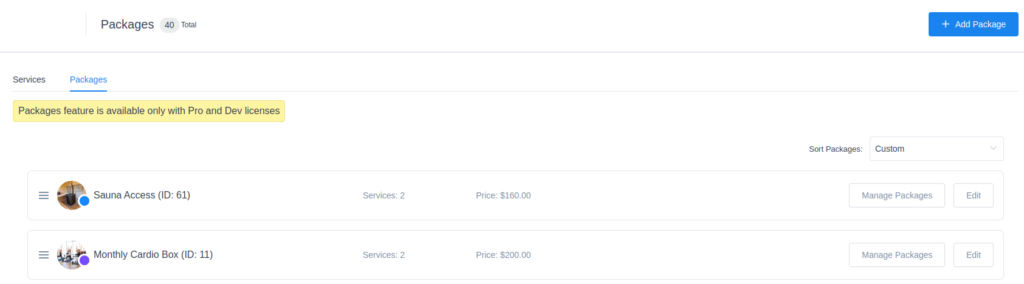
When you click on the Manage Packages button for one of the created packages in the list, you will open the page where you can see all of the purchases of that package for the chosen period of time. There is the calendar field above the list where you can set the date period for which you want to see the purchases, and there is a customer filter as well if you need to see one customer’s purchases only.
In the upper-right corner, there’s a “+Book Package” button which allows you to book the package for one of your existing customers. You will only be able to select the customer in the modal that pops up, and after you book the package, you’ll be able to edit it and book appointments individually. By default, the package is only assigned to the customer, so they can book their own appointments within the package from the Customer Panel.

For each purchase there is information about the customer that purchased the package, the total number of appointments in the package and how many appointments are left to be booked, the date and time when the package was purchased, employees that are assigned to the appointments, the package price, and payment status. Also, there is the Cancel button and by clicking on it that purchase is cancelled, so the customer won’t be able to book appointments in it anymore.
When you click on one of the purchases the list of all appointments in that purchase will open
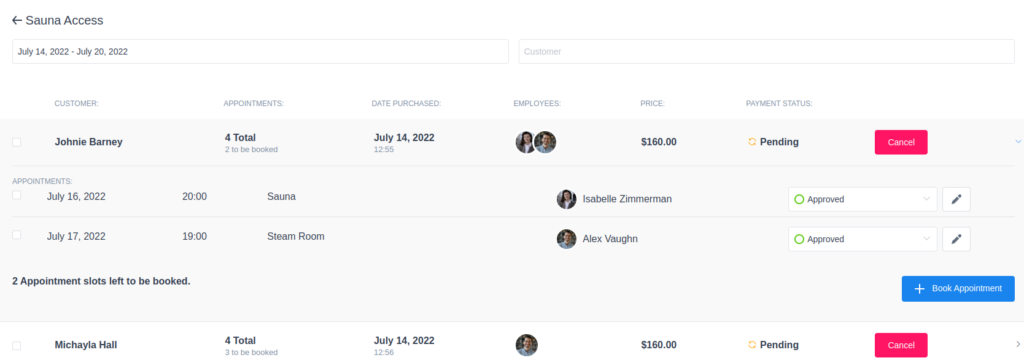
So here you can see the details for the appointments booked in this purchase, you can change their status and edit them. If some appointments are canceled, either here or in the customer panel, that appointment slot will be available for another booking in that purchase. There is also the + Book appointment option, so you can book the rest of the appointments in this purchase for the customer when needed.
Managing a single Employee
Let’s begin with creating the first employee. Go to the “Employees” page on the back-end, click on the “Add Employee” button or the “+” button on the bottom right side of the page, and the “New Employee” dialogue will appear. We will now go through the options:
- Details – is the first tab for creating the employee.
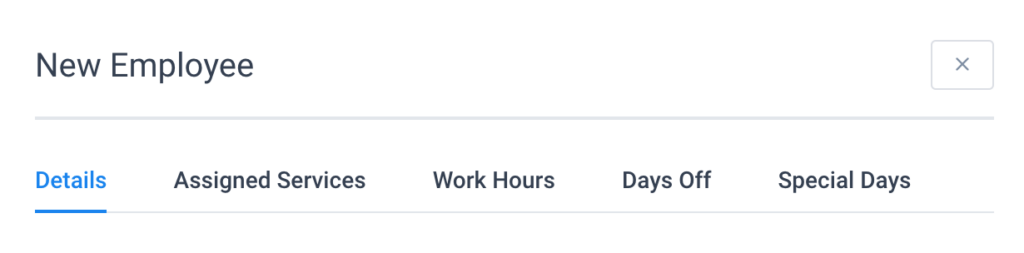
It consists of:
- Employee photo – for every employee you can set the photo that will be visible on both sides of the plugin – on the back-end so you or your manager can differentiate them easily, and on your website so your customers or clients can see them.

- First Name, Last Name, and Email are mandatory fields for every employee. Note that you cannot have two employees with the same email – if you enter the same email a second time, and try to save the employee, you will see a red alert under the email option that informs you about an already existing email.

- Location – This option isn’t always visible:
- If you don’t create a location the location option will not appear in any settings, and it will not be visible in this modal as well. Let’s say your company is doing business in one location only, and you don’t want to show that location because it is the only one. You can create it and then hide it, but that doesn’t serve any purpose. So, you can simply skip creating the location.
- If you create just one location every employee you create will get this location.
- If your employees provide services at multiple locations, the Location option in the Employee modal becomes mandatory and you will have to choose a location for each employee.

- Phone number – It is optional, but you have the possibility to add your employee’s cell phone number. In the notification settings, you can enable SMS notifications for employees, so if you want to use this feature, you should fill in this field. The phone number will not be visible anywhere on the front end of your website.
- WordPress User – This allows you to give your employee an account that allows entrance to the back-end of the plugin. By adding this role, you give your employees an option to see their appointments on the Appointments page and Calendar and export the list of their appointments so they can track it any time. You can select an existing user (that you created on the Users page) or Create New by clicking on the button in this dropdown. If you click to create a new WordPress user, once you save the employee, a new Naldoria employee user with the email you entered above will be created. Then you can go to the Users page to change the password and other settings regarding this user.
Please note: To link the employee to an existing WordPress user, that user needs to have the “Naldoria Employee” user role
- Google Calendar – where your employees can connect their Google Calendars, so once the appointment is scheduled it will be automatically added to their calendar. All they need to do is to click on the button beside the Google Calendar option and they will be redirected to choose their Google Account. Once they choose it, they will be back on their profile in the Naldoria Plugin with the selected Google Calendar email.

- Please note that after choosing the Google account your employee will be synced with, you may be presented with the “This app isn’t verified” screen.
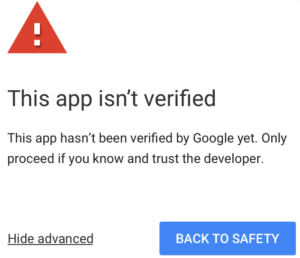
- This is happening because the verification is not yet complete, and you simply need to click on “Advanced” and then on “Go to your-website (unsafe)“, and you will be redirected to the next screen where you need to allow Naldoria to access the calendar.
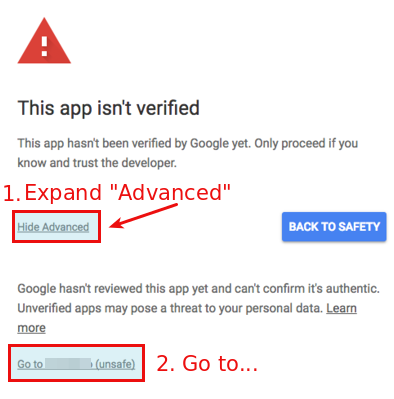
- Once the Calendar is connected the Google button will change in colour and offer an option to “Sign out from Google“, so you’ll know if the synchronization is working.
Outlook Calendar – Your employees can connect their Outlook Calendar in few clicks, once the appointment is scheduled in Naldoria it will be automatically added to their calendar. If they have busy slots in their calendar already, those time slots will not be available for booking in Naldoria. By clicking on the button beside the Outlook calendar option employee will be redirected to login into his/her Microsoft account. After logging in successfully, will be redirected back to the employee’s profile in the Naldoria Plugin and the Outlook calendar button will turn red which means that the calendar is connected successfully.

- Zoom User – Naldoria has native Zoom integration for virtual sessions, to use it, you need to connect your zoom account. Here you can select Zoom User, which will be listed after you connect your Zoom account. After selecting the Zoom user, once the appointment is scheduled, a zoom meeting will be automatically created and your customers and employee will get unique links to access the meeting.

- Employee Panel Password – If you want to use the Naldoria front-end employee panel to let your employees manage their bookings without access to WordPress Dashboard, straight from the front-end page of you your website, you can set a password for your employee here. After adding the password employee will receive an email to access the Naldoria front-end employee panel.

- Time Zone – If you have employees scattered across the globe, you can define the time zone for each employee. This allows the employee to configure his Work Hours in the Employee Panel in his own time zone.
- Description allows you to describe your employee to the customers so they can read more about their work experience, rewards, benefits, and so on. You can also translate this field in case you have a multi-lingual site.
- Please note that the employee description will only be shown in the new Step-by-Step 2.0 booking form. It is not going to be displayed in old forms.
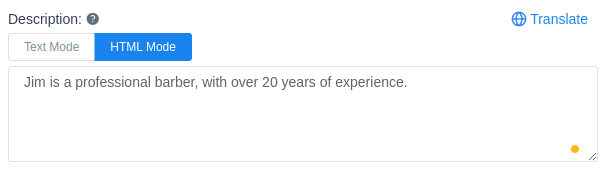
- The Note is an additional field that is not mandatory, but you can fill it out if you want additional information. This option will not be visible on the front-end of your website
Assigned Services – This is where you can check the services provided by the current employee. Each employee can have more than one assigned service and there is no limit on the number of services that can be assigned, i.e. all services can be checked. Once you check one of the services, the price and capacity inputs become available, allowing you to set a custom price and capacity for the employee. There is an edit pencil icon next to the services for which the ‘Custom duration and pricing’ option is enabled, so you can set different prices for each duration per employee here.
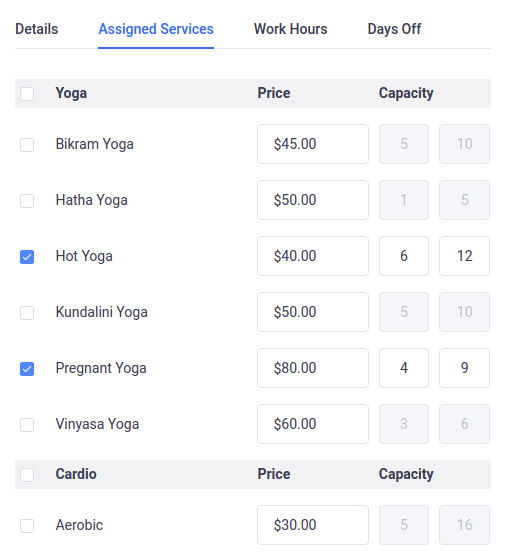
Please note: If you assigned a custom price and capacity for the employees, please be careful when you are changing this setting in the service. If you change the price or capacity for that service you will see a message to choose whether you want to apply this setting only for the service or for all assigned employees. If you click to change it for all employees you will override your custom employees settings.
- Work Hours – This is where you set custom working hours and breaks for any employee if that employee has different working hours and breaks from those you’ve set in the company global settings. You can choose different working hours and breaks for any day, but if you want to set the same schedule for the entire week, simply set it for Monday and click on the “Apply to All Days” button, and the Monday schedule will be copied to the other days.
Click on the + button and new options will open, choose a time in the “Work Hours” option, choose services that the employee will offer in that period of time, and then choose a location. It is possible to set different locations for different periods in a day or days in a week. In the employee’s details you can still set a one default location, so if your employee works on only one location just set it in the “Details” tab and you don’t have to set it in the work hours for each period since the default location will be automatically added to all periods. However, if you have multiple locations for one employee you will be able to choose one location for each time period that you create here.
- Days Off – As is the case with working hours and breaks you can set custom days off for every employee. Click on the Add Day Off button and you’ll see several new options. Enter a name, a date, or a range of dates, and check if you want this day off to repeat yearly. After you click Add Day Off, your Day Off will be saved, and depending on whether it is a repeating one or a one-time day off it will be coloured in orange or red on the list.
- Special Days – This feature allows you to set one or multiple days in which your employee will have different working hours and/or provide different services. Whether you need to set shorter or longer working hours for just one day or a period, or set a different service for one specific day or a whole week, here you can do all of this. Once you set it, it will override the employee’s general working hours and service schedule but it will not override the days off. Click on the “Add Special Day” button and new options will appear. In the Date option choose a date or a range of dates, then set one or multiple periods of time with working hours and choose one or multiple services for each of them in the Service option, and select a specific location in the Location option. After you configure the special schedule, click on the “Save Special Day” button and this schedule will be applied.
If you have services that are only provided from time to time (not on a daily or a weekly basis), this feature is for you. You can simply delete the working hours and just use the special days, and the calendar on the front-end will show the first available appointment slot. This is useful especially for services that happen from time to time. The customers won’t need to search for a date. Instead, the month with the available date will be shown right away.
Please note: employees can also edit their information, schedule, days off and special days. For each of this action, you have an option in the Roles Settings so you can choose what they will be able to do. Of course, before that, you need to add Naldoria Employee user role to each of them so they can log in and access their profile.
Once you’ve set it all, click on the “Save” button and your employee will appear on the “Employees” page.
Working with the Employees list and search page
You can have one or as many employees as you need, and you can choose how to show them on the back-end of the plugin, and easily search or sort them. This is especially important for companies with a large number of employees.
On the “Employees” page you have several search options: by name, by service, by location, and two options to sort them by name: ascending and descending. These options will make your search easier in those situations where you have a large number of employees.

There are also two options to show employees on the page:
- Grid view, which is a default option, and
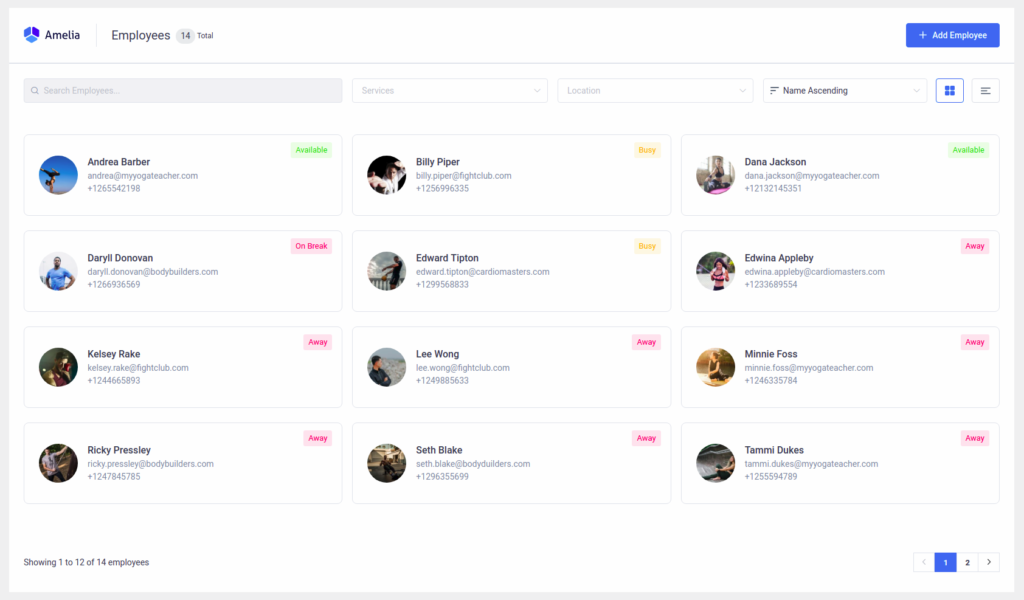
- List view
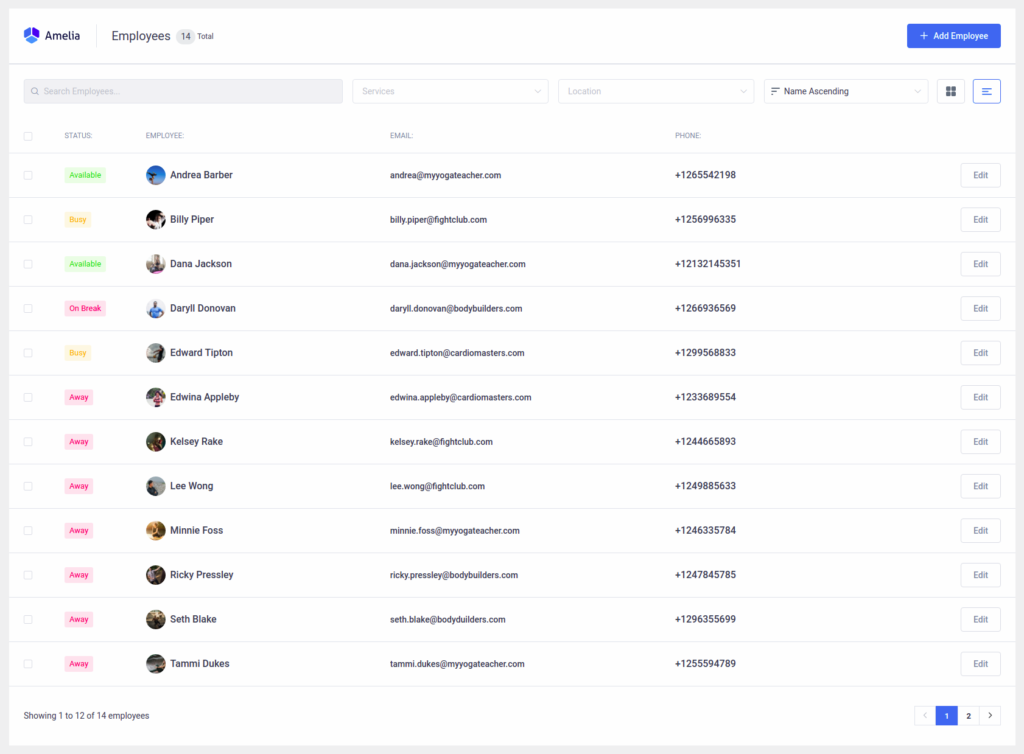
In both, you will see an availability status for each employee, their name, email, and phone number. In the list view, you have an additional option – to mark and delete several employees at once.
Duplicate, Hide and Delete option
Click on the employee and the “Edit Employee” dialog will appear with three new buttons in the bottom left corner: “Duplicate”, “Hide” and “Delete”. While the “Duplicate” and “Hide” options are available for both, administrator and manager, the “Delete” option is only available for the administrator.
The “Duplicate” option is the first of three and helps you configure the settings. If you have several employees with the same location, assigned services, working hours, and breaks, you can easily duplicate the first one you’ve created, and just change the name, email, and a few others if you need. In that way, you can create a list of your employees much faster. After you click to duplicate the employee and confirm this action, the copied version will open. The only difference is that this copied version will not enter email, as you cannot have two or more employees or customers with the same email address.
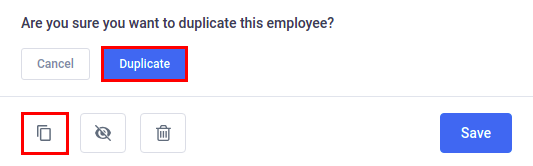
With the “Hide” option, you can temporarily hide an employee from the website front-end, without needed to permanently delete him/her. You will find this option right next to the “Duplicate” button in the “Edit Employee” dialog. When you hide an employee it will still be visible on the back-end of the plugin with a hidden sign, but it will not be visible on your front website.

Please note: If you hide an employee which was the only one assigned to the service and/or location, the service and/or location will automatically be hidden as well.
While “Duplicate” and “Hide” options are available for managers and administrators, the “Delete” option is available only to the administrator. You can use a “Delete” option when you want to permanently delete an employee. You have two options to do so:
- By clicking on a “Trash” icon button in the bottom left corner of the “Edit Employee” dialog.
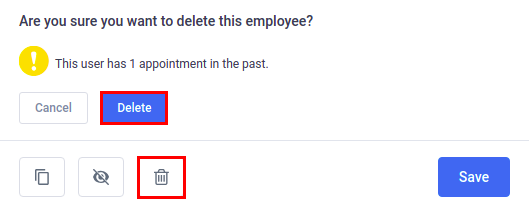
- By selecting it on the employee’s list and then clicking on a “Trash” icon in the bottom left corner of the Employees page.

Either way, you can delete employees without any appointments or with only appointments in the past, but you cannot delete employees that have appointments in the future. Once you click on a delete button you will see a message that will inform you of the number of appointments and the ability to delete.
Please note: If you delete an employee that has had appointments in the past, those appointments will be deleted as well.
Employee Time Zone
The timezone set in your WordPress general settings applies to Naldoria as well, but the employees can be set in a different time zone than the one set here. If this is the case, they will have their schedules set in their own time zones and they will receive notifications for appointments and events accordingly. This option is available both on the back-end in the employee profile on the Employees page, where the admin can choose the time zone for the employee and on the employee panel where employees can set it up for themselves.
Employees will find this option when they login to the panel and go to the My Profile section. When the profile sections open, you need to select the time zone you are in and save the changes.
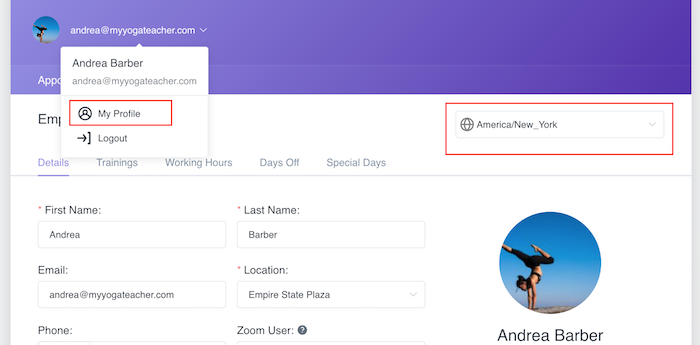
And that’s it.
* Please note that you need to click on your mail address in the panel and select the profile option and change the time zone there.
The time zone option you see in the picture below only serves as a temporary filter that can show you when your appointments will be in different time zones.
This option is useful if you travel often, but if you do not change and save the time zone on your profile, all appointments will be displayed according to the time zone that is set in WordPress.
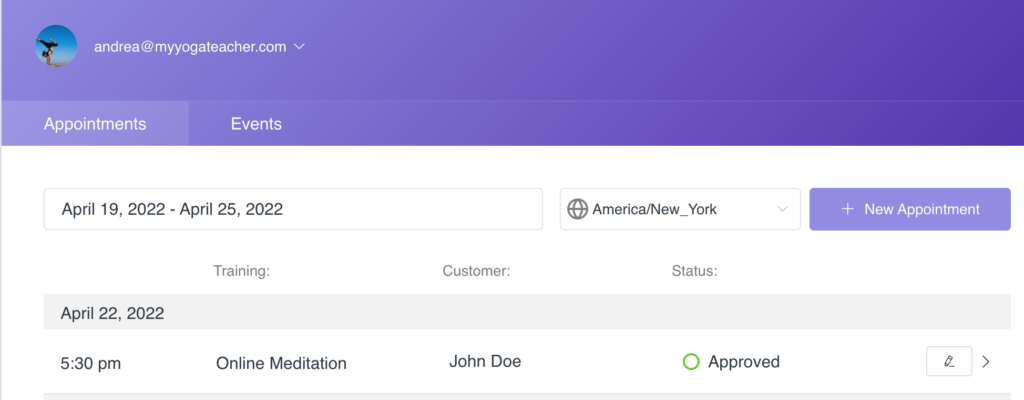
To enable the Panel go to the Settings page and open Roles Settings. On the first Employees tab, you will see the “Enable Employee Panel” option.

Once you’ve enabled this option a new option called “Employee Panel Page URL” will appear. Here you need to paste the URL of the page on which the Panel shortcode will be placed, in order to be able to send the link to your customers via notifications.
Please, be aware to add a placeholder to the notifications in which you want to send the Employee Panel URL, you can find it in the </> Show Email Placeholders on the email notifications page or you can just paste %employee_panel_url% placeholder.
Choose options that employee will have on the panel
By default, employees can see their own appointments and events on the front-end employee panel. In our Roles Settings you can define more options that employees will have:
- Configure their services – this option allows employees to assign services and set their own capacity and price for each service.
- Configure their schedule – this option allows employees to set their working hours and specific schedule for each service and location.
- Configure their days off – this option allows employees to set their days offs.
- Configure their special days – this option allows employees to create days when they will have some other specific working schedule than it is set in working hours for each week.
- Manage their appointments – this option allows employees to add new appointments or edit existing ones assigned to them.
- Manage their events – this option allows employees to add new events or edit the existing ones assigned to them.
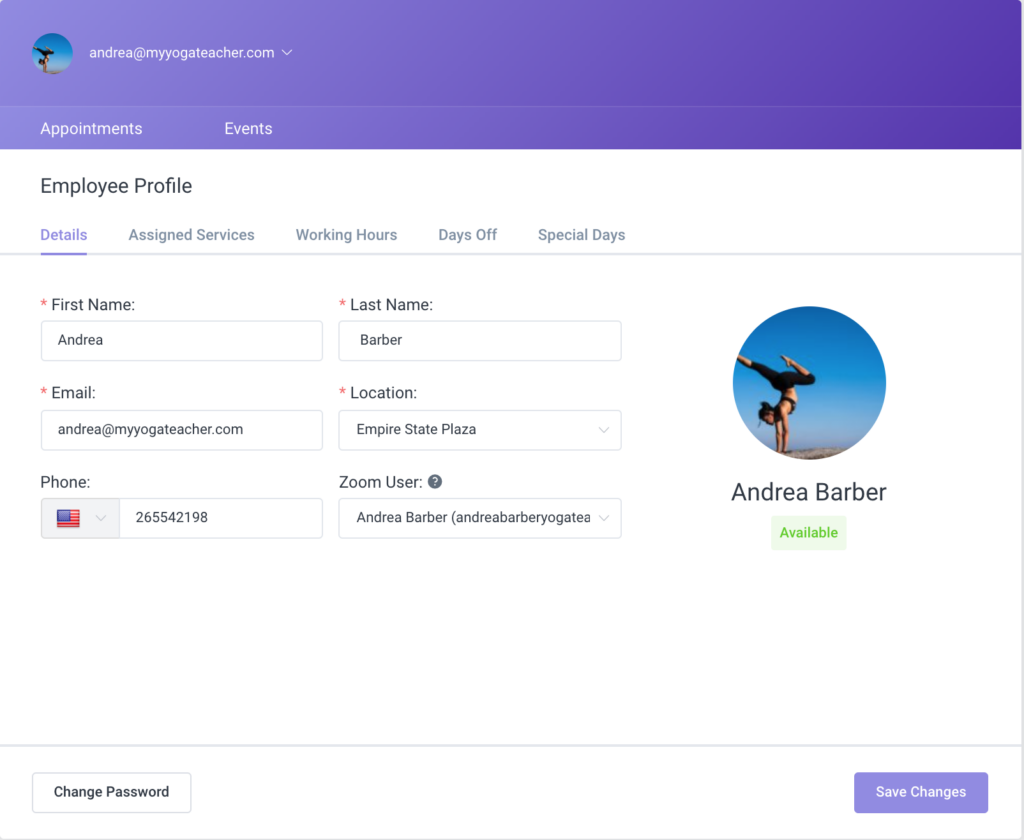
One note: Option to go to the employee’s profile or to log out you will find once you click on the arrow beside the employee’s email address in the header (take a look at the picture below).
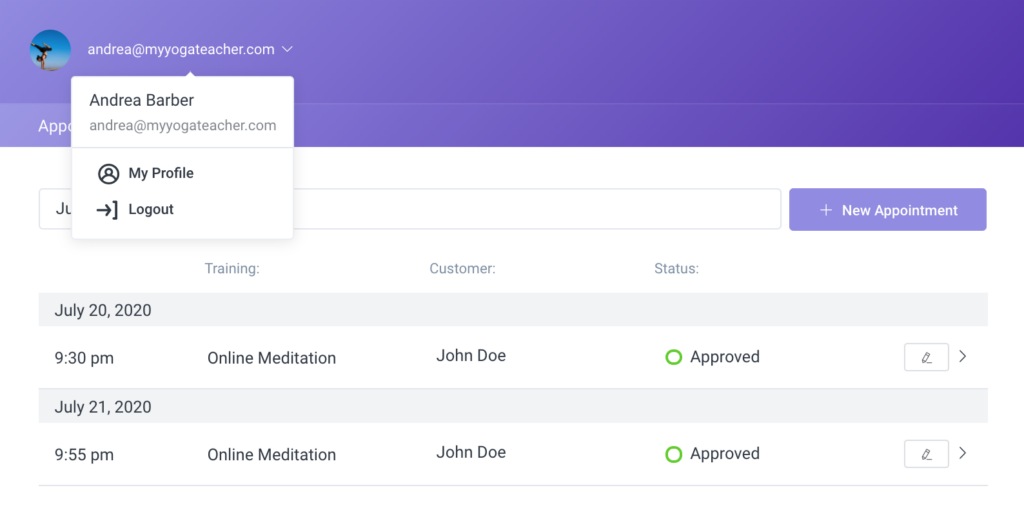
Set employee’s password for the front-end panel
To be able to enter the panel employees will have to enter their own email and password. Both, the email address and the password admin sets in the employee’s profile on the back-end. To set this, open the Employees page, click to add an employee or edit an existing one, enter the email address and add a password in the field “Employee Panel Password”. Once you click Save to save the employee’s profile an email with a password and link to the employee panel will be sent to the employee.

Don’t worry, the employee will also have an option to change the password that the admin sets on the back-end once logged in to the panel. Option for changing the password you will find in the bottom left corner of the details tab on the Employee’s profile.
To set the template of this email go to the notifications page, choose the “To employee” tab, and on the bottom, in Other Notifications, you will see “Employee Panel access”. Click on this and the template will appear so you can edit it. By default, this notification will be enabled which means that each employee will receive a notification once you add a password to their profile.
The Time Zone Option
Employees can choose their own time zone, or any time zone they want, in which they will see the times of their appointments and events in the employee panel.
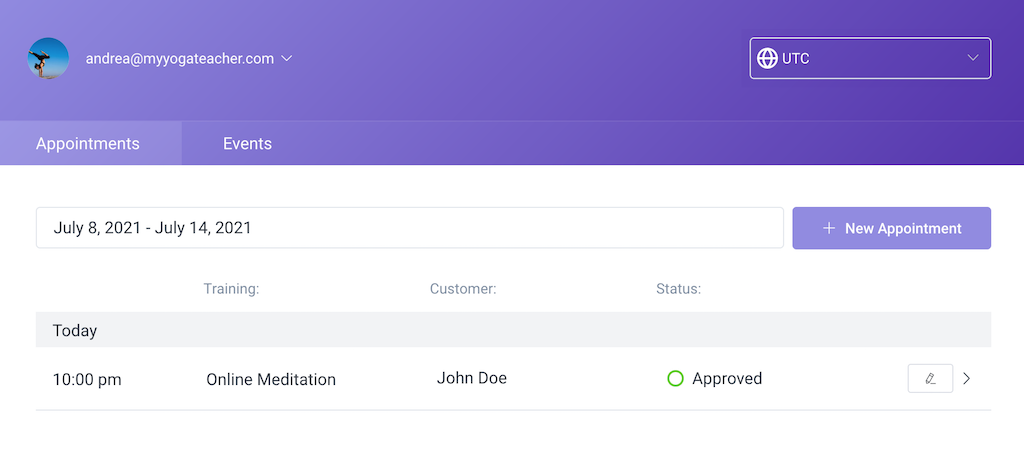
The Customers page in the Naldoria Booking plugin’s back-end enables you to easily track customers if you are logged in with an “Administrator” or an “Naldoria Manager” user role. Every time you add a new customer at the back-end of the plugin, or when a new customer books an appointment through your website, they will automatically be added to this list (whether they have a WordPress user account or not).
Managing a single Customer
To create your first customer, go to the “Customers” page, click on the “Add Customer” button or the “+” button on the bottom left side of the page and the “New Customer” modal will appear. When you are creating a customer, you must enter the customer’s first name, last name, and email. Other options such as “WordPress user”, “Phone”, “Gender”, “Date of Birth”, and “Note (Internal)” are optional and easy to set so we will just go through those of greatest importance.
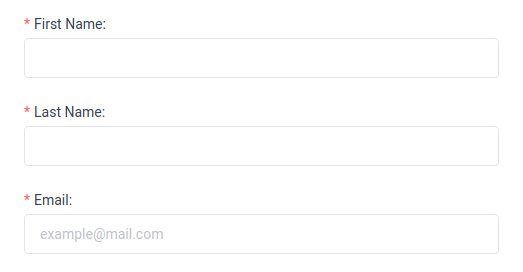
WordPress User – You can use this option when you want to create a connected WordPress user account with an “Naldoria Customer” role. You have two options: you can click on the “Create New” button and add a new “Naldoria Customer” user or you can select it from the existing ones. After you add a WordPress user role to your customer, he or she will be able to see appointments in the Calendar and on the Appointments page in the back-end panel and cancel appointments with just one click on the “Cancel” button beside each appointment.

Date of birth – This option is important when you want to use a “Birthday Greeting” notification for your customers. You’ll find more about this and other notifications here.

After you have entered the desired data, click on the “Save” button and your customer will appear in the customer list, although without the date of the last appointment, as you have just created it.
When you need to edit customer details simply click on the “Edit” button located beside every customer on the customers’ list.
Please note: If you edit a customer, your changes will apply to all appointments in the database.
Working with Customers list and search page
The customer list shows all the information about every customer: names, their WordPress usernames (if there is a connected WordPress user), phone, note, and perhaps the most important one – the date of their last appointment. To specify the number of records that are to be displayed at a time, select the required number in the “Default items per page” in “General Settings”.
Just as on the other pages, on the “Customers” page you will see:
- The total number of customers you have
- A search input you can use to search through your customers by their name.
- A sort option you can use to sort your customers by ascending or descending name.
You can export a list of your customers in a form of a CSV file. At the top right of the “Customers” page and next to the sort option, tap the “Export” icon button. Clicking on the “Export” icon button will open a dialog allowing you to choose the delimiter used for CSV and to select the columns you’d like to export. When you are ready, tap on the “Export” button in the dialog to download a CSV file.
You can also delete multiple customer profiles at the same time on the page by checking the ones that you want to delete. The dialog box with the “Trash” icon will appear in the table footer when you check at least one customer you want to delete. After you click on it you will see a message, and if you are certain that you want to delete the customer records click on the “Delete” button to confirm your deleting process.
Naldoria Customer WordPress user
Like we explained on the Users and Roles page in our documentation, each customer can have an Naldoria Customer WordPress user role. With this role, customers can log in to the back-end of the Naldoria plugin and see only their appointments on the Appointments page and Calendar page. The customer has two options there:
- Cancel the appointment on the Appointments page, or
- Reschedule the appointment on the Calendar page,
The Cancel option is enabled for all customers with Naldoria customer user role by default, and it cannot be disabled. Next to each future appointment, the customer will see the Cancel option like in the picture below. Once they click on Cancel, the appointment will be cancelled and both, the customer and the employee will receive notification about it (if this notification is previously set for sending).

Reschedule option is not enabled by default and if you want to allow your customers to reschedule their appointments, first you need to go to the Roles Settings and enable the option “Allow customers to reschedule their own appointments”. After you do this your customers will be able to reschedule their appointment on their Calendar page in two ways:
- By drag and drop the appointment to a new date and/or time – once the customer begins with dragging the appointment they will automatically see which time slots are unavailable for the specific service and employee.
- By clicking Edit on the appointment in the Calendar – once the customer clicks to edit, the Appointment modal will open and the customer will be able to set a new date and/or time for the appointment.

Please note: Customer cannot reschedule the group appointment because of the other customers in it, he can only reschedule the single ones.
How to enable and set the Front-end customers panel
To enable the Panel go to the Settings page and open Roles Settings. Once you’ve done that, click the Customers tab in the modal and you will see the “Enable Customers Panel” option.
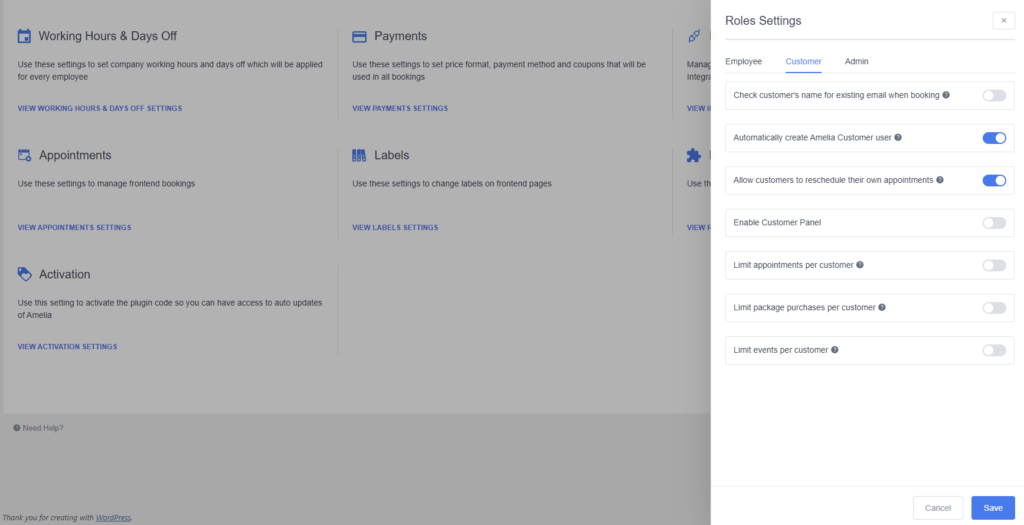
Once you’ve enabled this option new three options will appear.
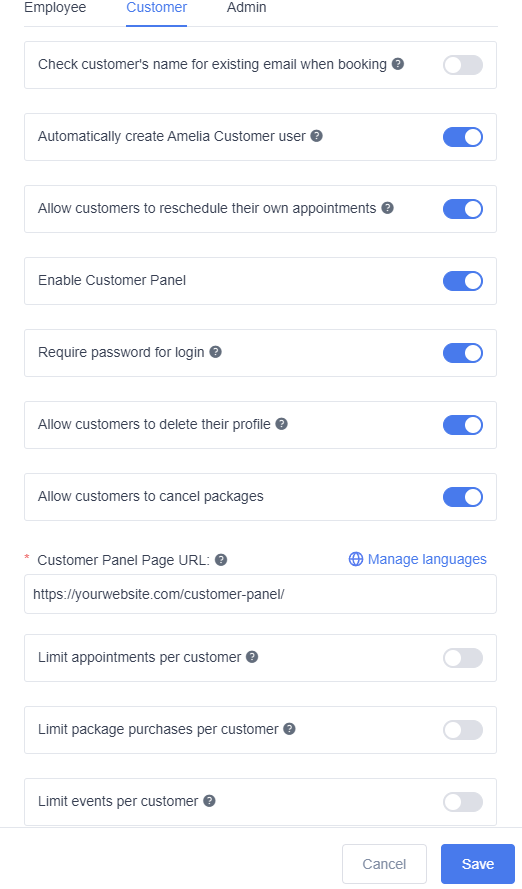
Require password for login
This option enables you to choose whether you will require the classic login to the Panel, or you will allow accessing the Panel solely via a link from the notifications.
By default, this option is enabled; this means that customers will need to log in with an email and password to access their appointments on the Panel.
If you disable this option – the customer will be able to follow the URL with a unique token in the email notifications without entering their username and password.
Allow customers to delete their profile
By enabling this option, you can follow GDPR rules. Note that by default, the option is disabled, which means that customers will not be able to delete their profile information.
If you enable it, the customers will see the Delete button on their profile, and they will be able to delete their personal information by clicking on it. That will not remove their appointments, but it will delete all their personal data from your database.
The customer’s profile will still be visible to the admin and manager because of the scheduled appointments, but instead of the Customer’s personal information, the Customer ID will be shown.
Since Naldoria does not store any data from your customers in compliance with GDPR, by adding the Delete button to the Customer Panel, customers’ data will be deleted from your database.
To enter the customer’s profile details click on the arrow beside the customer’s email and choose “My Profile”.
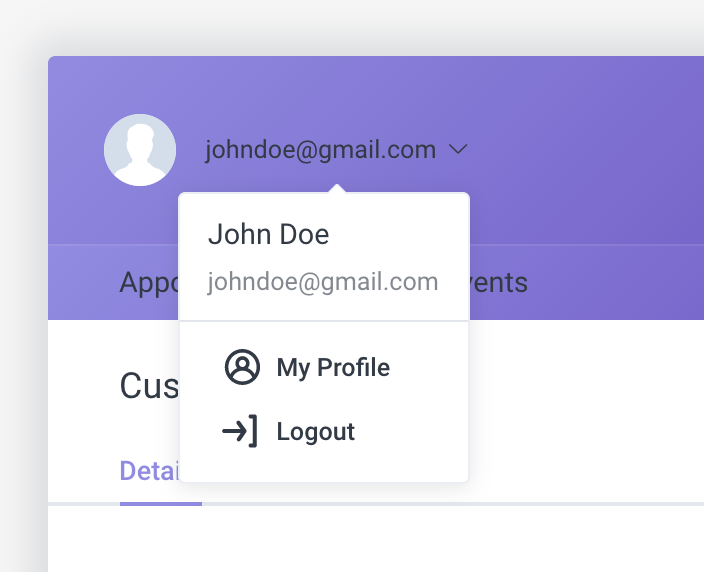
Once you enter the profile, in the bottom left corner you will see an option to “Delete Profile”.
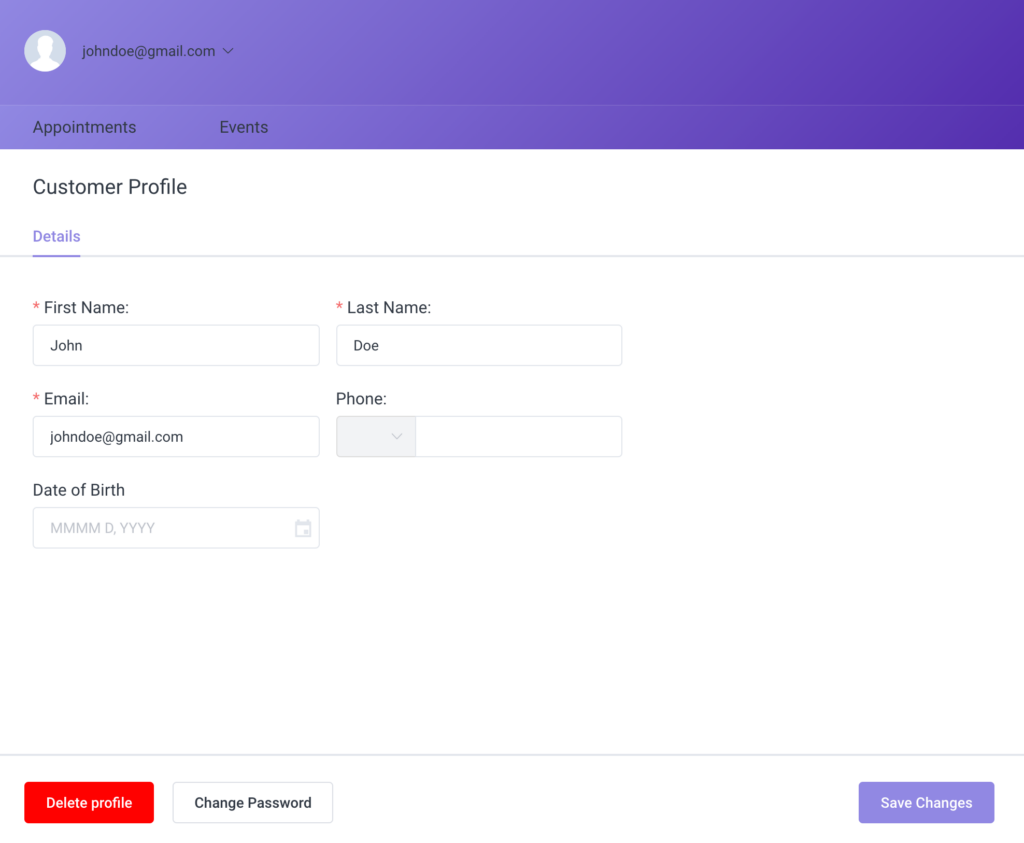
Please note: Allowing customers to delete their profile will not delete existing appointments.
Allow this option to be GDPL Compliant.
Allow customers to reschedule their appointments
By default, this option is disabled; this means that your customers will not be able to reschedule their appointments on the Customer Panel. The only option that will be visible to them is to Cancel the appointment and it is located in the “Pencil” button shown in the screenshot below.
Please note that the “Cancel” option can’t be disabled.
If you enable the “Reschedule” option, next to the Cancel button, they will also see the Reschedule button once they click on the “Pencil” button. By clicking on the Reschedule button, the dialog will pop up, and your customers will be able to reschedule the appointment for some available slot in the future.
Don’t forget that in General Settings, you can set up the minimum time required before cancelling/rescheduling.
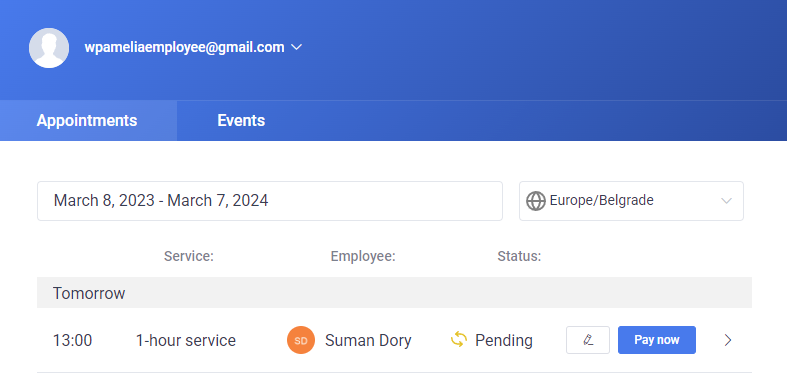
Paying from the Customer Panel
Once you enable the “Allow payment via Payment Link” option in Payment Settings (after you’ve added at least one online payment option), appointments that have been booked from the back-end (or from the Employee Panel) will have the “Pay Now” button next to them, as shown in the screenshot above.
If you have multiple payment methods enabled (for example, PayPal and Stripe), when a customer clicks on the “Pay Now” button, a dropdown list of payment methods that they can choose from will appear. In case you have only one payment method (for example, WooCommerce, which can’t be combined with other payment methods), your customers will see only that option.
Once the payment has been processed, payment will be updated on the Finance page, and automatically changed to the “Paid” status.
The Time Zone Option
Customers can choose their own time zone, or any time zone they want, in which they will see the times of their booked appointments and events in the customer panel.

Managing Package Appointments through the Customer Panel
Customers can also manage their packages through the Customer Panel. If they have booked a package, a content block on top of the appointments list will appear.

Content that is shown is the expiration date of the package and how many appointments are left to be booked. By clicking on a specific package, your customers will have the option to see detailed information about booked appointments, book the ones that have not been booked, pay the package if it was booked for the customer from the back-end, or cancel the whole package.
Customers can also reschedule their appointments from packages on the Appointments tab, and in addition to this, they can also select an employee from the panel, by choosing the one from the dropdown list above the calendar, when they try to book another appointment as a part of the package.
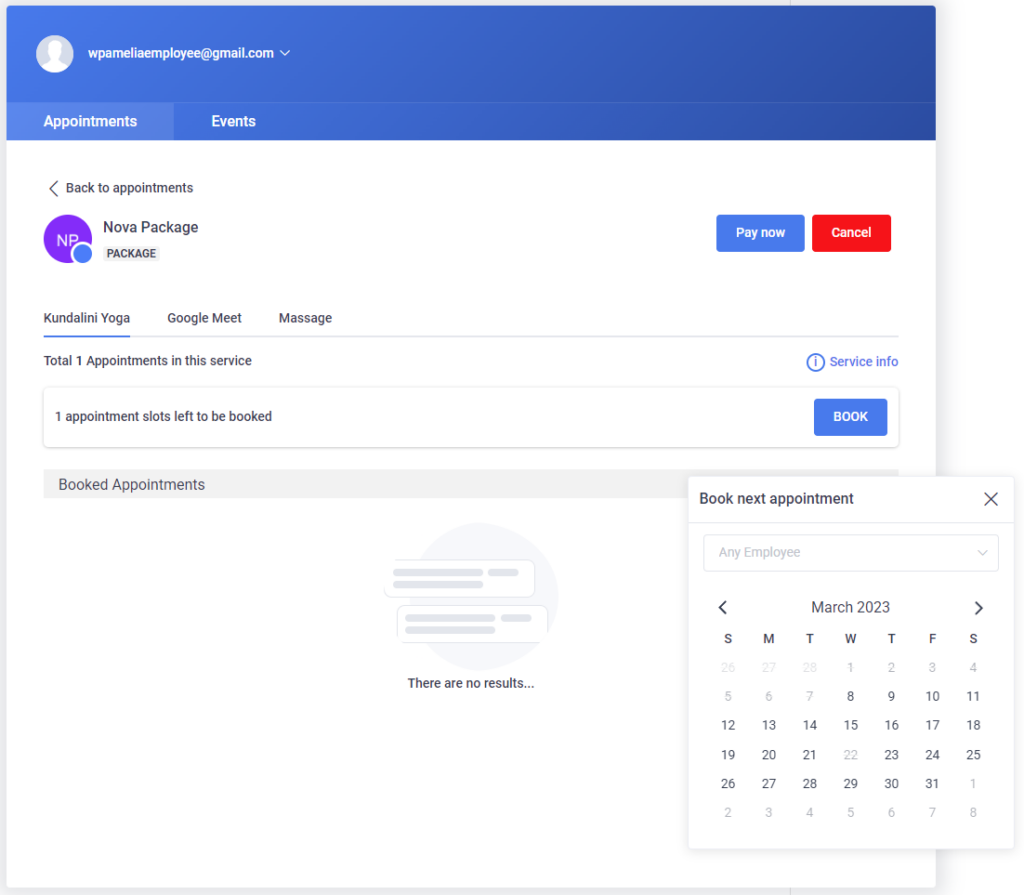
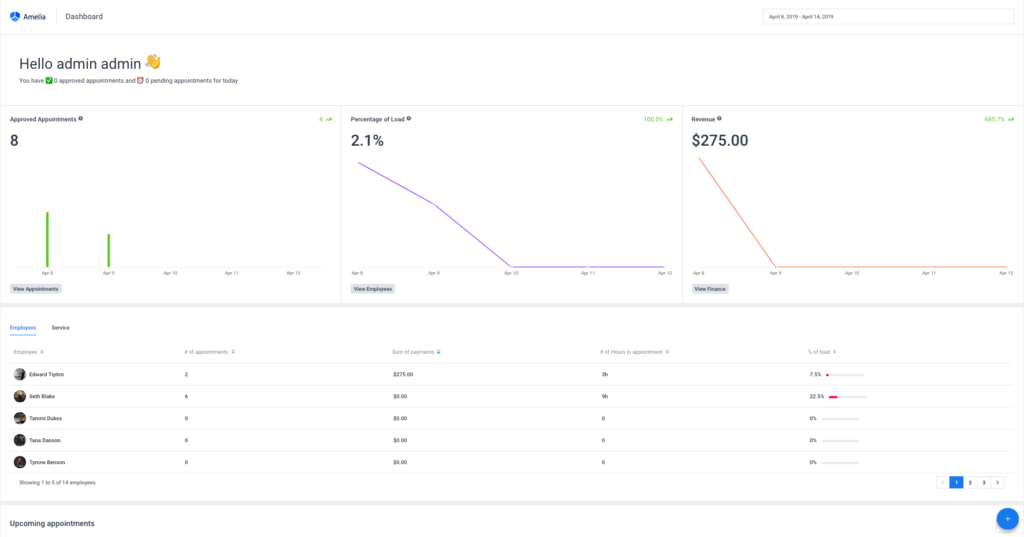
Date picker, with the predefined dates range, is on the top of the page and by default, it filters the data in the first, second and fourth dashboard sections and for the current week. It is predefined in a range of seven days. You can modify the date range in the date picker which will cause data in the first three sections to be updated.
![]()
The first section of the dashboard shows metrics for the current date range selection and is divided into three blocks:
- Approved Appointments – This metric represents the number of approved appointments based on the date range you choose. In the chart below the number, you can see how many approved appointments were for each date in the selected date range. By clicking on the “View Approved Appointments” link below metric, you will be taken directly to the “Appointments” page. You’ll see appointments with the “Approved” status in the date range that has been previously set on the “Dashboard” page. The metric in the upper right corner of the Approved Appointments block shows the increase/decrease compared to the same period in the past (for example, if you select a range of 7 days, this number will show the change compared to the previous 7 days).
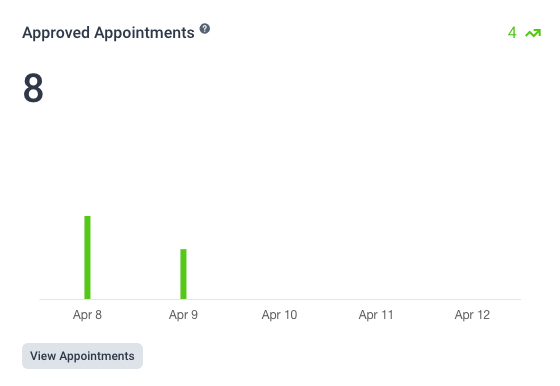
- Percentage of load – This metric shows the percentage of load for all approved appointments for a chosen date range. It is calculated as the number of occupied hours/number of total working hours for the whole company. As for the Approved appointments, the chart below shows the percentage of load for each date in the chosen date range. In the upper right corner, you will see another metric that shows the increase/decrease compared to the previous period.
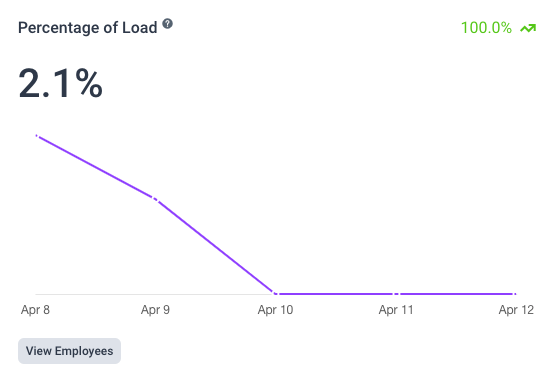
- Revenue – This metric represents the amount of money a company received during a selected period (based on approved appointments and finalized payments). Clicking the “View Revenue” link will take you to the “Finance” page with a predefined date picker in the date range that has been previously set on the “Dashboard” page. The chart below the metric shows the revenue for each date in the selected date range so you can see how your payments behaved during the selected period. In the upper right corner, you can see the increase/decrease in revenue compared to the previous period.
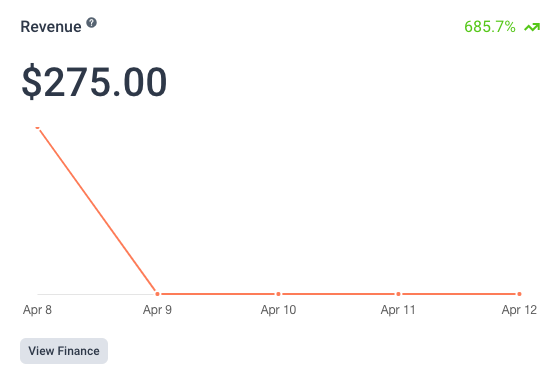
The second section of the Dashboard shows the table in which you can see detailed data for each employee or service for the selected date range. The table contains five columns:
- Employee/Service column in which you can see all your employees/services and sort them by name,
- Number of appointments which represents the total number of approved appointments for each employee/service for a selected date range,
- Sum of payments which represents the total amount of paid appointments for each employee/service for a selected date range,
- Number of hours in appointment which represent the total number of scheduled hours for each employee/service for a selected date range,
- Percentage of load which represents the detailed view from the metric above shown for each employee/service for a selected date range. It is calculated as the number of scheduled hours (for approved appointments) / amount of total working hours for employee/service.
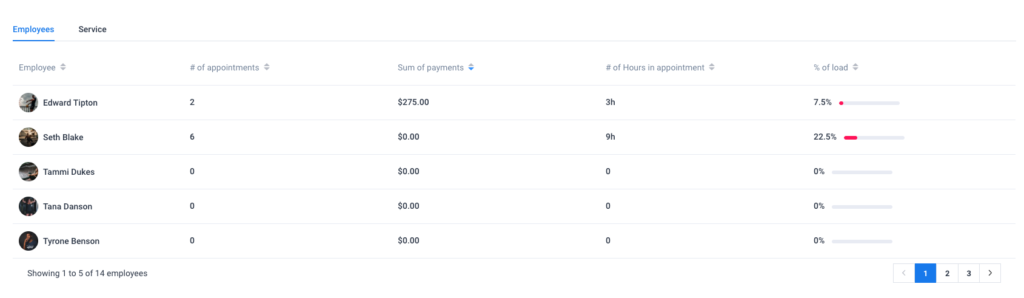
Each column can be sorted so you can easily see which employee/service has the largest number of scheduled (approved) appointments, revenue, number of scheduled hours, or percentage of the load.
The third section of the WordPress booking system dashboard shows “Upcoming appointments”. This table provides information about the next ten appointments that are scheduled including the time of the appointment, the customer(s), employee, service, duration, and payment method. You can expand an appointment row by clicking on it. An expanded record shows the information about the customer(s) phone, customer(s) email, and information added in the custom fields. You can quickly change the appointment status by choosing from four available appointment statuses from the drop-down.
To edit an existing appointment, click on the “Edit” button to the right of the appointment you want to change. Clicking on the “Edit” button will open an edit dialog that allows you to update the data in the existing appointment. If this button is disabled, then the appointment has passed and it can not be changed.
At the top right side of this list of today’s appointments, you will see an Export button, so you can easily export the list of today’s appointments in a CSV file.
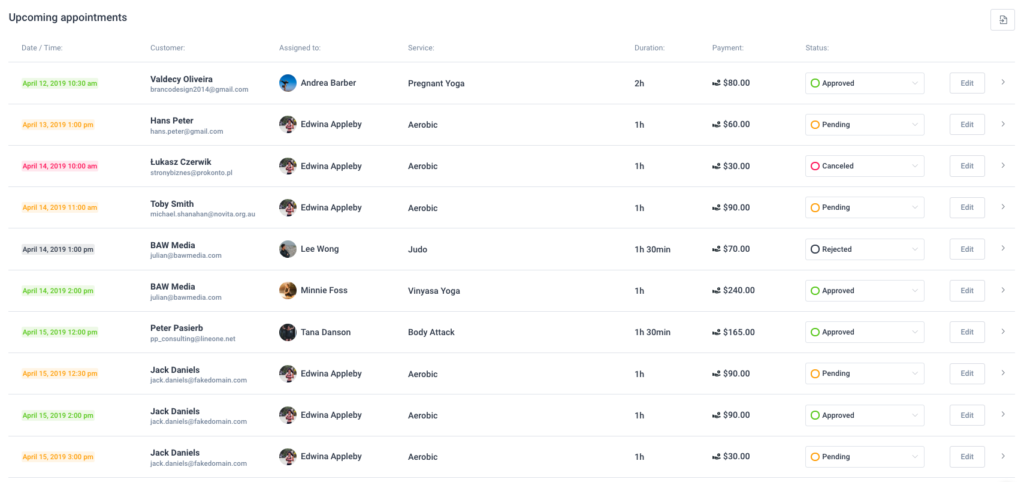
The fourth section of the dashboard displays your data in charts, so you can easily see which services, employees, and locations are your primary earners and how many new/returning customers you are onboarding. You’ll see data for the date range that you’ve set above.
The left side of the section is divided into three tabs. These column charts display “Interests / Conversions” data:
- Employees’ Interests / Conversions – This chart displays a comparison of interests in making an appointment with an employee against arranged appointments with the employee for the selected period, broken down by employees’ names. When the “Confirm Booking” modal is open to the customer, interest in selected employees increases by 1.
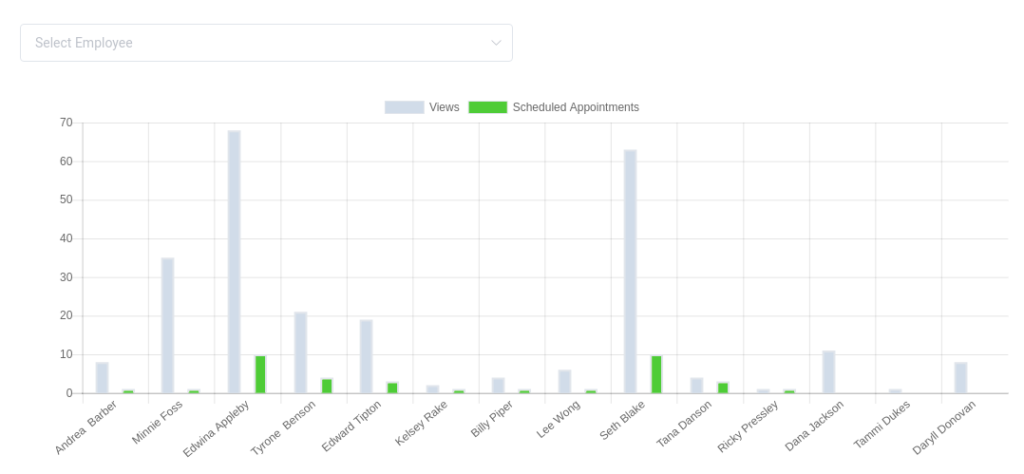
- Services Interests / Conversions – This chart displays a comparison of interests in making a service appointment against an arranged service appointment for the selected period, and is broken down by service names. When the “Confirm Booking” modal is open to the customer, interest in the selected service increases by 1.
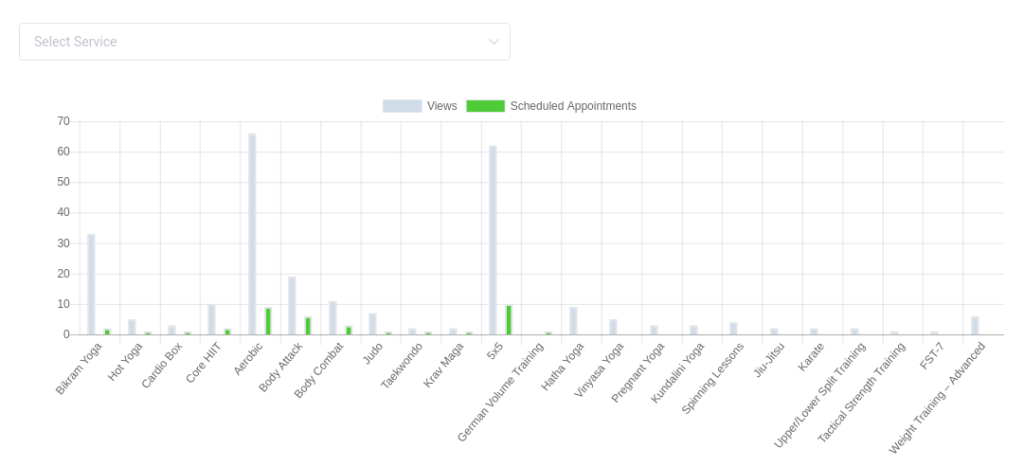
- Location Interests / Conversions – This chart displays a comparison of interests in making an appointment at the selected location against arranged appointment at the selected location for the selected period, and is broken down by location names. When the “Confirm Booking” modal is open to the customer, interest in the selected location increases by 1.
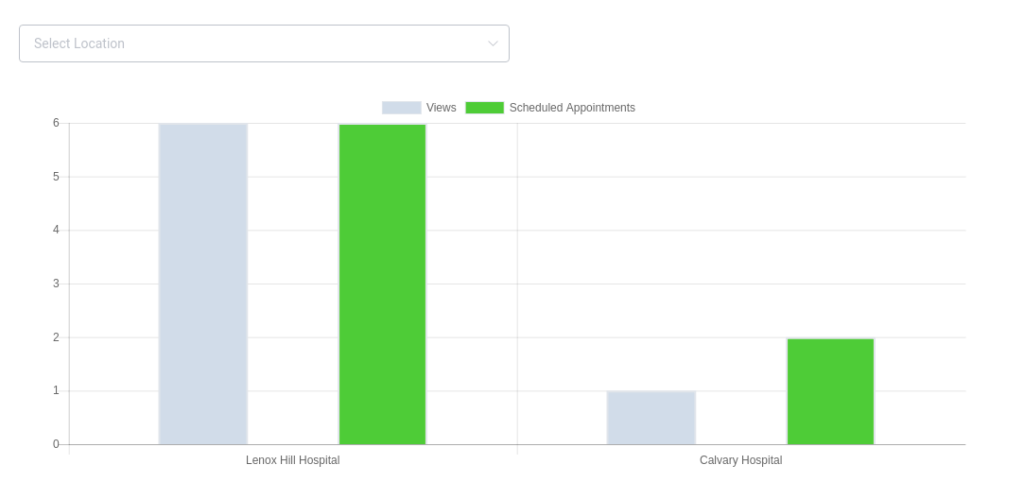
The right side of the section displays customer data in a pie chart so you can easily see the number of new and returning customers. The percentage at the top-right corner of the chart shows your customer increase or decrease based on the date range you choose. For example, if you pick May 14, 2018 – May 20, 2018, the percentage will show you how this range compares to the last week, May 7, 2018 – May 13, 2018. If you had 4 customers from May 7, 2018 – May 13, 2018, and 6 customers from May 14, 2018, to May 20, 2018, the percentage will show a 50% increase.
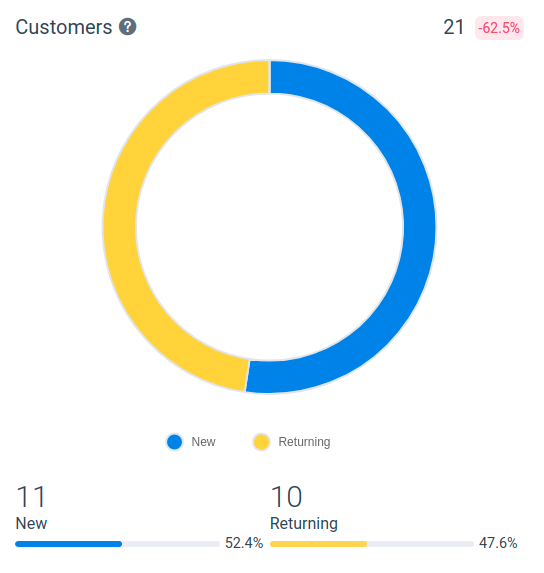
In the bottom right corner of the “Dashboard”, you can click on the “+” (plus icon) button to quickly add a new customer or schedule a new appointment.

There are five available calendar views: “Month”, “Week”, “Day”, “List”, and “Timeline”. “Week” is the default calendar view. It displays seven columns, each representing a day of the current week.

You can navigate through the calendar booking system by clicking on the arrows in the top left corner of the calendar. By clicking on arrows, you can move one step forward or one step back (by a month or week for example). If the calendar is in the “Month” view, it will move the calendar forward/back one month. If the calendar is in “Week” or “List”, it will move the calendar forward/back one week and lastly, if the calendar is in “Day” or “Timeline”, it will move the calendar forward/back one day.
Between navigation arrows, you can click on the “Today” button to move the calendar to the current date.
You can also move the calendar to an arbitrary date by selecting a single date in the date picker that can be opened by clicking on the arrow that is displayed next to the header’s title.
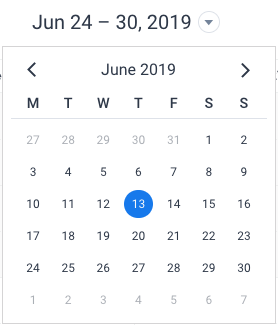
Date & Time formats in the calendar booking system will be used from “WordPress Date/Time Settings” and the frequency for displaying time slots (calendar grid) on “Week”, “Day” and “Timeline” calendar views will be used from “Default Time Slot Step” setting.

“Day” and “Timeline” view display employees as columns or rows. For the “Day” view employees are rendered in the headings.

All blocks on the calendar are used to store information about appointments and events. Each appointment in the Calendar stores all information about your appointment or event. These blocks are used to provide information like the start and end time of an appointment, an employee assigned to it, location, service, customer(s), and status. Appointments are coloured by the service colour. Appointments that don’t take up excessive space will not show all the information about the appointments, but you can see the information by hovering over it. As for the events, they are coloured in the colour that you have set in “the Customize” tab for each event and marked with a small icon so you can easily differentiate them from the appointments.
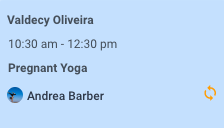
Future appointments can be rescheduled by dragging the block in the calendar. Upon dragging, you will be asked to confirm the change of the appointment’s start time. It is not possible to drag appointments into the past, outside of an employee’s working hours or during an employee’s breaks. You can also click on the appointment that is in the future to edit the information from the appointment’s modal.
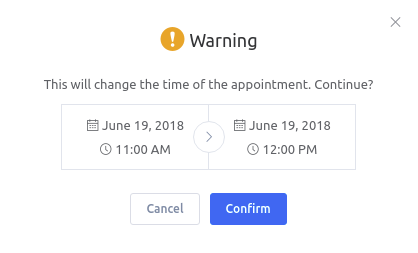
From the “Calendar” page you can add a new appointment by clicking on the “+” button in the bottom right corner of the page, or by clicking on the “New Appointment” button in the right upper corner.
Payments
The “Payments” page shows the information about individual payments. To specify the number of records that are to be displayed at one time, select the required number in the “Default items per page” in the “General Settings”.
Payments for the appointments are marked with blue colour and payments for the events are marked green. Also, since the events have the option for assigning multiple employees here in the employees’ column you can see multiple employees assigned.

With the filters that appear at the top of the page, you can narrow the results by common characteristics such as date, customer, employee, service, status, or event. The date filter is predefined by the period of seven days starting from the current date but you can change to some other period and the plugin will remember this in all date filters.

Your payments can be exported to a CSV file for reporting. At the top right of the “Payments” page and next to the filters, just tap the “Export” button. Clicking on the “Export” button opens a dialog that allows you to choose the delimiter used for CSV and to select the columns you’d like to export. When you are ready, tap on the “Export” button in the dialog to download the CSV file.
The payments table provides information about the payments such as the payment date, customer/attendee, employee, service/event, and status. You can expand a payment (row) by clicking on it. An expanded record shows the information about the appointment or event date, payment method, and the amount paid for the booking.
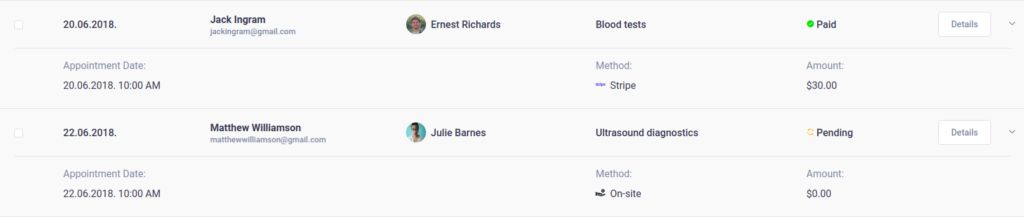
Payment passed through either PayPal or Stripe automatically has a “Paid” status. For a payment using an “On-site” method, the payment status and paid amount have to be updated manually. Click the “Details” button to open the details dialog for the chosen payment. Here you can see the detailed information for the individual payment, change the payment data or delete the payment. By clicking on the “Pen” icon in the dialog footer, a small dialog will appear from where you can update the paid amount and the payment status.
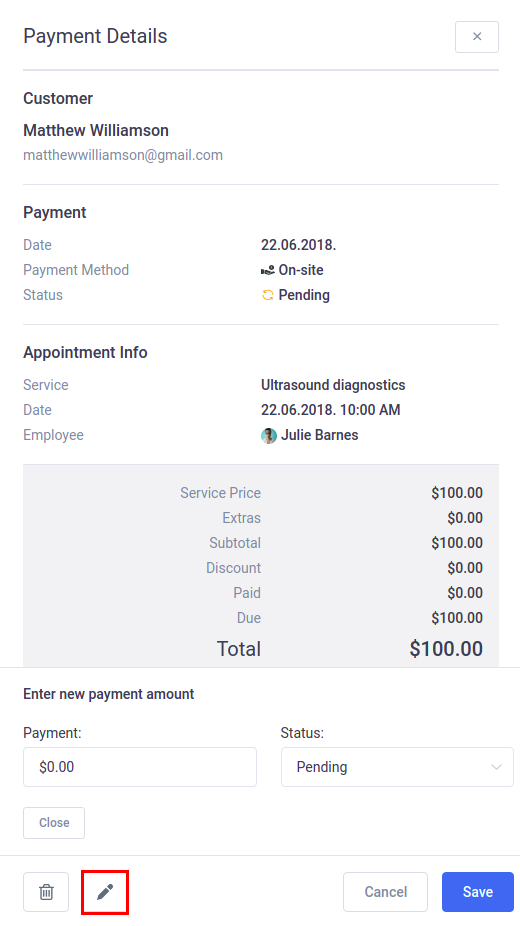
You can easily delete multiple payments by checking those you want to delete. A dialog box will appear in the table footer when you check at least one payment you want to delete. Once you are certain that you want to delete the records click the “Trash” icon and then the “Delete” button.

Coupons
Once you enable the “Coupons” option in Naldoria’s Payment Settings, the Coupons tab will show up on Naldoria’s “Finance” page. It allows you to create promotional coupons to reduce the prices of appointments/events by a percentage or a fixed amount.
You can use filters to display specific records for a coupon code and the services/events for which customers can apply coupons. Coupons can be exported to a CSV file by clicking on the “Export” button. Clicking on the “Export” icon button opens a dialog allowing you to choose the delimiter used for CSV and select the columns that you’d like to export.

The Coupons table shows information about the coupon code, percentage off, fixed amount off (deduction), service(s) and/or event(s) where the coupon can be applied, usage limit, how many times the coupon was used, and the expiration date of the coupon.

To create a new coupon simply click on the “+ New Coupon” button located at the top of the page. After opening a dialog you need to provide the “code” for your coupon (coupon name that customers will enter to get a discount), “discount” (expressed in percentage), “deduction” (reduced amount of selected “Currency” setting in the “Payments Settings”), the “maximum number of times the coupon can be used”, and select the “Service(s)” and/or “Event(s)” the coupon is valid on. There are several options for the automatic sending of coupons, so you will also see the option to set “Maximum usage per customer” and the whole new tab called “Notifications”.
In the “Notifications” tab you can now set “Notification interval” and define after how many scheduled appointments or events the customer will receive the coupon code in the notification automatically. Also, you can enable the option “Recurring notification” if you want to send this code again in case the customer didn’t use the code for a discount.
Once you are done entering the coupon information, simply click on the “Save” button and the newly created coupon will appear together with other coupons in the list. Once you create a coupon, customers can enter the coupon code on the “Confirm Booking” modal to reduce the price of their appointment.
Please note:
- In order for the coupon code to be sent, you need to paste the coupon code placeholder into the notification template (found in the </>Email Templates menu in Naldoria/Notifications)
- If the customer used the coupon code, it will not be sent again in the notification even though you have enabled the recurring option
- The coupon code will be sent after the customer schedules X number of the same appointments (with the same services)
- As for the events, the coupon code will be sent after the attendee books an X number of different events
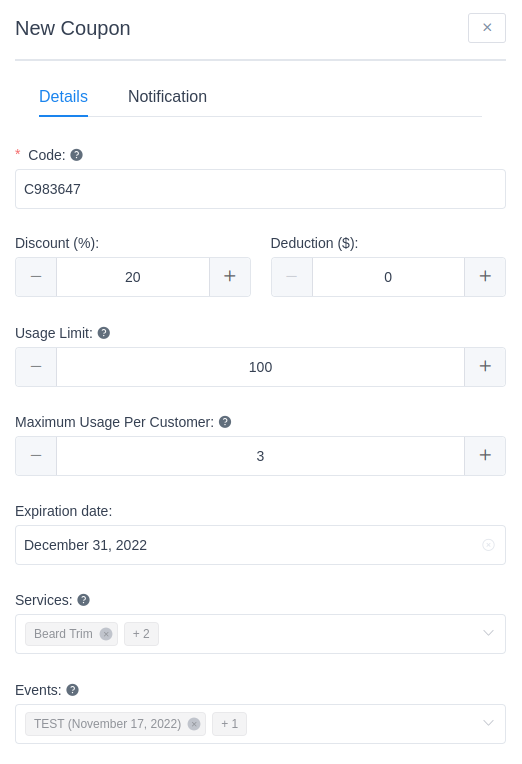
To edit an existing coupon, click on the “Edit” button to the right of the coupon you want to change. Clicking on the “Edit” button will open an edit dialog that allows you to update the data in existing coupons. From the dialog, you can also duplicate, hide and delete a selected coupon by choosing one of the actions in the dialog footer.
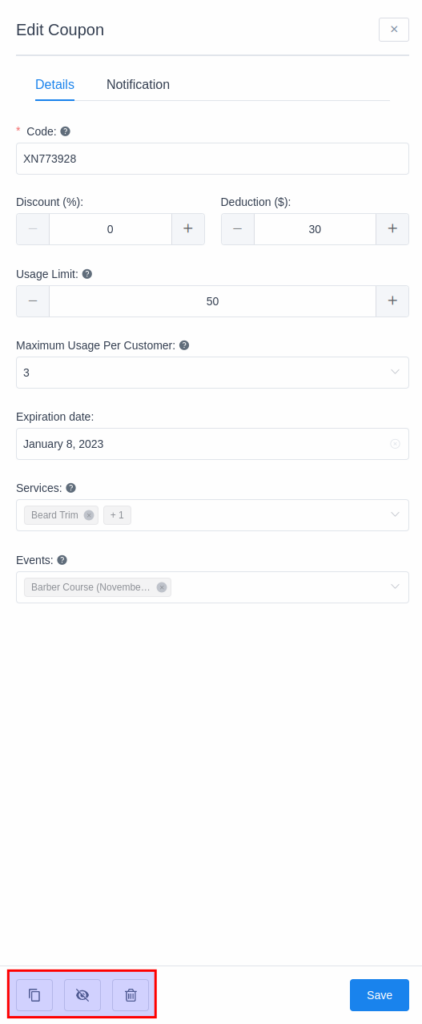
You can delete multiple coupons at the same time by checking the coupons you want to delete. The dialog box will appear at the bottom of the page when you check at least one coupon you want to delete. Once you are certain that you want to delete the coupons click the “Trash” icon and then the “Delete” button.

Hidden coupons will be greyed out in the coupons table and will no longer be valid, and so will the coupons that have reached their usage limit.